EasyManua.ls Logo

REP PR-4000 User Manual

Default Icon
3 pages
To Next Page IconTo Next Page
Page #1 background imageLoading...
Page #1 background image
PR-4000 Lat Pull-Down Assembly Instructions
Parts Included:
Multi-Grip Pullup Bar
2 Poles
Horizontal Pole Brace
2 Weight Horns
2 Cables
Chain
Top Horizontal Brace
Foot Brace
Bottom Horizontal Brace
Name Plate
Hardware Included:
M16x110 Bolt, Washers, Nut
x 4
1.
Attach horizontal connecting brace to the
bottom of the back uprights. Also attach
the top brace of the lat pull down to
the top of the rack.
Denver, CO(720) 420-1731
Any issues? Please contact us directly by phone: 720-420-1731, email: info@repfitness.com or
morse code...(.-. . .--. ..-. .. - -. . … …). We are always here for our Customers! - Team REP
M10x25 Bolt, Washers, Nut
x 4
M10x45 Bolt, Washers, Nut
x 3
M12x25 Bolt, Washer
x 4
Handle x 1
M8x20 Bolt, Washer - x 4
2 Pole Supports (Rubber Washer and Bumpers)
6 Pulleys
2 Plates to secure Pulleys
Attachments
x 4
x 8
x 4
(M16x110)
㻹㻝㻢㻌㼤㻌㻝㻝㻜㻌㼎㼛㼘㼠㻘㻌㼣㼍㼟㼔㼑㼞㻘㼚㼡㼠
× 4
× 2
㻵㼚㼟㼠㼍㼘㼘㼍㼠㼕㼛㼚㻌㻵㼚㼟㼠㼞㼡㼏㼠㼕㼛㼚
PRA-4700
㻼㻾㻭㻙㻠㻣㻜㻜㻚㻝㻥㻜㻟㻞㻝
10 20 30 40 50 60 70 80 90 100 110 120 130 140 150
Millimeters
Inches
1/4 3/4
1/2
1
1/4 3/4
1/2
2
1/4 3/4
1/2
3
1/4 3/4
1/2
4
1/4 3/4
1/2
5
1/4 3/4
1/2
6
× 3
㻼㼡㼘㼘㼑㼥
× 6
× 1
× 3
㻹㻝㻜㻌㼤㻌㻥㻜㻌㼎㼛㼘㼠㻘㻌㼣㼍㼟㼔㼑㼞㻘㼚㼡㼠
㼏㼍㼎㼘㼑䞊㻮㻌㻌㻌㻔㻟㻢㻡㻜㼙㼙㻕
㼏㼍㼎㼘㼑䞊㻭㻌㻌㻌㻔㻟㻝㻡㻜㼙㼙㻕
× 4
㻹㻝㻜㻌㼤㻌㻠㻡㻌㼎㼛㼘㼠㻘㻌㼣㼍㼟㼔㼑㼞㻘㼚㼡㼠
M12 x 25 bolt, washer
× 2
M8 x 20 bolt, washer
㻹㻝㻜㻌㼤㻌㻞㻡㻌㼎㼛㼘㼠㻘㻌㼣㼍㼟㼔㼑㼞㻘㼚㼡㼠
chain
rubber
triangle handle
㻌㼍㼐㼖㼡㼟㼠㼕㼚㼓㻌㼜㼛㼜㼜㼑㼞㻌㼜㼕㼚
㽢㻝
M10x90 Bolt, Washers,
Stoppers, Nut x 3
Adjusting Pin
(M8x20)
x 2
x 2
2.
Connect bottom pieces of lat
pull down to each other.
x 2
x 2
(M12x25)
x 1
x 1
Question and Answer IconNeed help?

Do you have a question about the REP PR-4000 and is the answer not in the manual?

REP PR-4000 Specifications

General IconGeneral
TypePower Rack
Weight Capacity1000 lbs
Hole Spacing2 inches
MaterialSteel
ColorBlack
Number of Posts4
Steel Gauge11 gauge
Upright Size3 x 3 inches
Hole Size5/8 inches
FinishPowder-coated
Height Options80 inches, 93 inches

Summary

PR-4000 Lat Pull-Down Assembly

Step 1: Attach Horizontal Braces

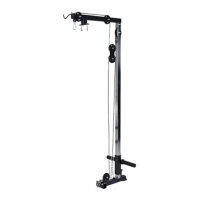
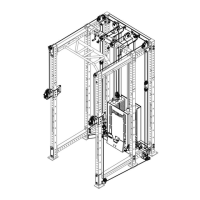
Connect the horizontal connecting brace to the bottom of the back uprights and attach the top brace of the lat pull down to the top of the rack.

Step 2: Connect Bottom Pieces

Connect the bottom pieces of the lat pull-down to each other.

Step 3: Attach Bottom of Lat Attachment

Attach the bottom of the lat attachment to the horizontal brace of the rack.

Step 4: Set Up Pole Supports

Set up the pole supports and secure them to the lat attachment.

Step 4: Attach Pulleys

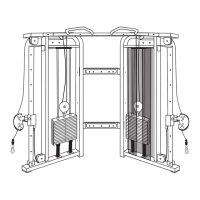
Attach the four pulleys that secure onto the braces of the lat pulldown system.

Step 5: Feed Cables Through Pulleys

Feed cables through pulleys, secure the last two pulleys with plates, and attach cable ends to the base for tension.

Step 6: Attach Attachments

Put ball, stopper, and carabiner on each cable end for attachments and secure weight horns.
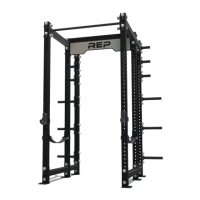
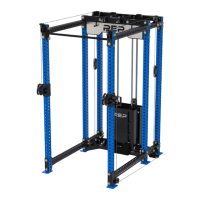
Related product manuals