10
RBC25SS3
RBC5SS3
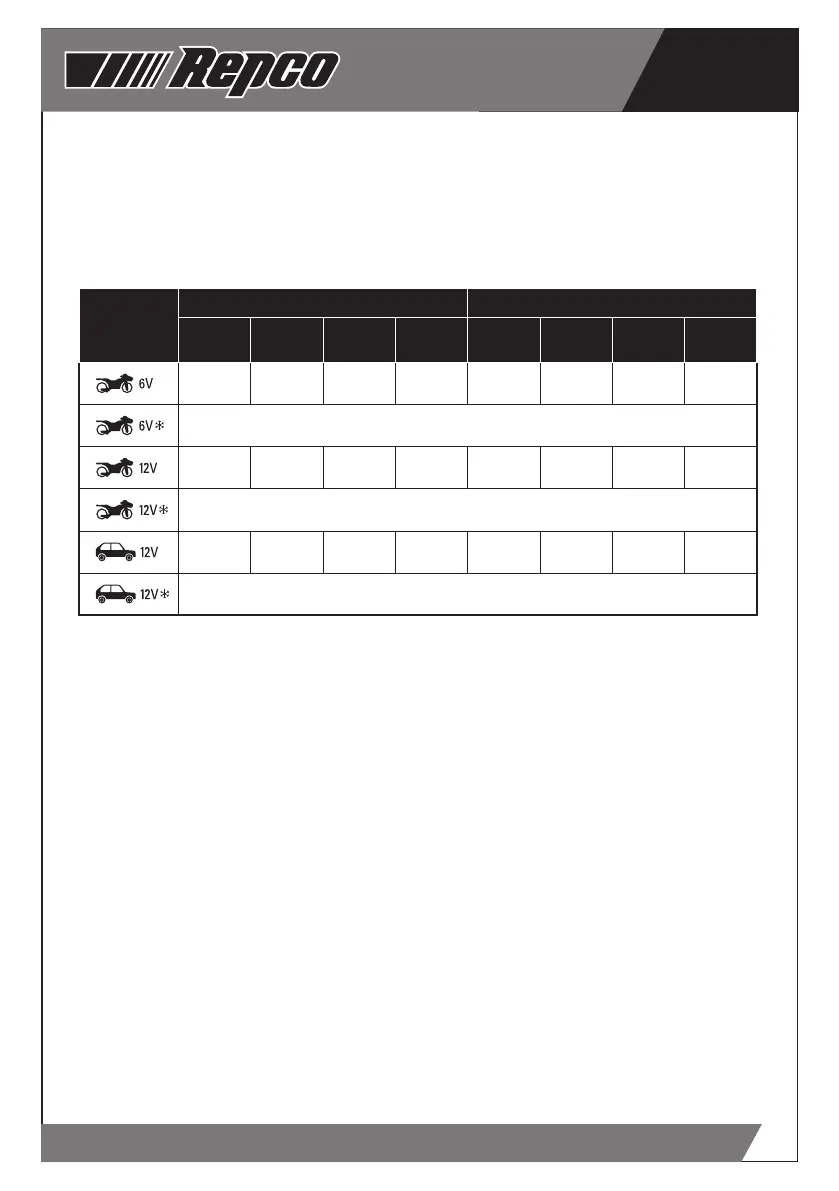
STEP 5 - SELECT VOLTAGE / OPTION
Using the table below, determine the charge
option for the battery to be charged and press
the “MODE” button to select the correct setting.
Note - If the battery charger does not detect a
properly connected battery, or detects an incorrect
battery voltage, the “Er1” will display on the screen
and charging will not commence.
RBC25SS3 RBC5SS3
Mode Selection
Automotive
(CCA)
Marine
(MCA)
Deep Cycle
(Ah)
Reserve
(A)
Automotive
(CCA)
Marine
(MCA)
Deep Cycle
(Ah)
Reserve
(A)
50 - 150 70 - 210 8 - 25 15 - 40 90 - 300 125 - 375 15 - 50 25 - 85
Select when ambient temperature is below 20ºC
50 - 150 70 - 210 8 - 25 15 - 40 90 - 300 125 - 375 15 - 50 25 - 85
Select when ambient temperature is below 20ºC
90 - 300 125 - 375 15 - 50 25 - 85 180 - 600 250 - 750 30 - 100 50 - 170
Select when ambient temperature in below 20ºC
STEP 6 - CHARGING
A representation of a battery will appear in the top
right hand of the LCD window during the battery
charge sequence – bars will flash inside the
battery representation to show that the battery is
being charged. The voltage being supplied to the
battery is also displayed in the LCD window.
Note - During the charge cycle, voltages up to
15.8V (7.9V in 6V MODE) may be observed – this is
normal. It may be normal for the displayed voltage
to fluctuate during the DESULPHATION stage of
the charge cycle - this is normal.
Note - The LCD is backlit to assist when light
is poor, or when dark. To conserve energy, the
backlight will extinguish after approximately 30
seconds. To re-energise the backlight, simply
press the MODE button.
Once charging of the battery is complete, FUL will
display in the LCD window.
Note - If at any stage during charging, the battery
is found to be faulty, Er2 will be displayed and
charging will terminate.
STEP 7 - DISCONNECTION
Once charging is completed and FUL is displayed
in the LCD window, BEFORE removing the battery
clamps, switch the mains supply power to OFF, and
disconnect (unplug) the battery charger from the
supply socket outlet.
Note - If left connected, the charger will monitor
the battery and maintain the battery ready for use
- preventing slow discharge over time, which is
detrimental to lead acid batteries.
Battery out of the Vehicle
Remove the NEGATIVE (BLACK) connection first.
Then remove the POSITIVE (RED) terminal clamp.
Battery mounted in the Vehicle
Remove the chassis connection first.
Then remove the other battery clamp from the
battery terminal.
 Loading...