6
5
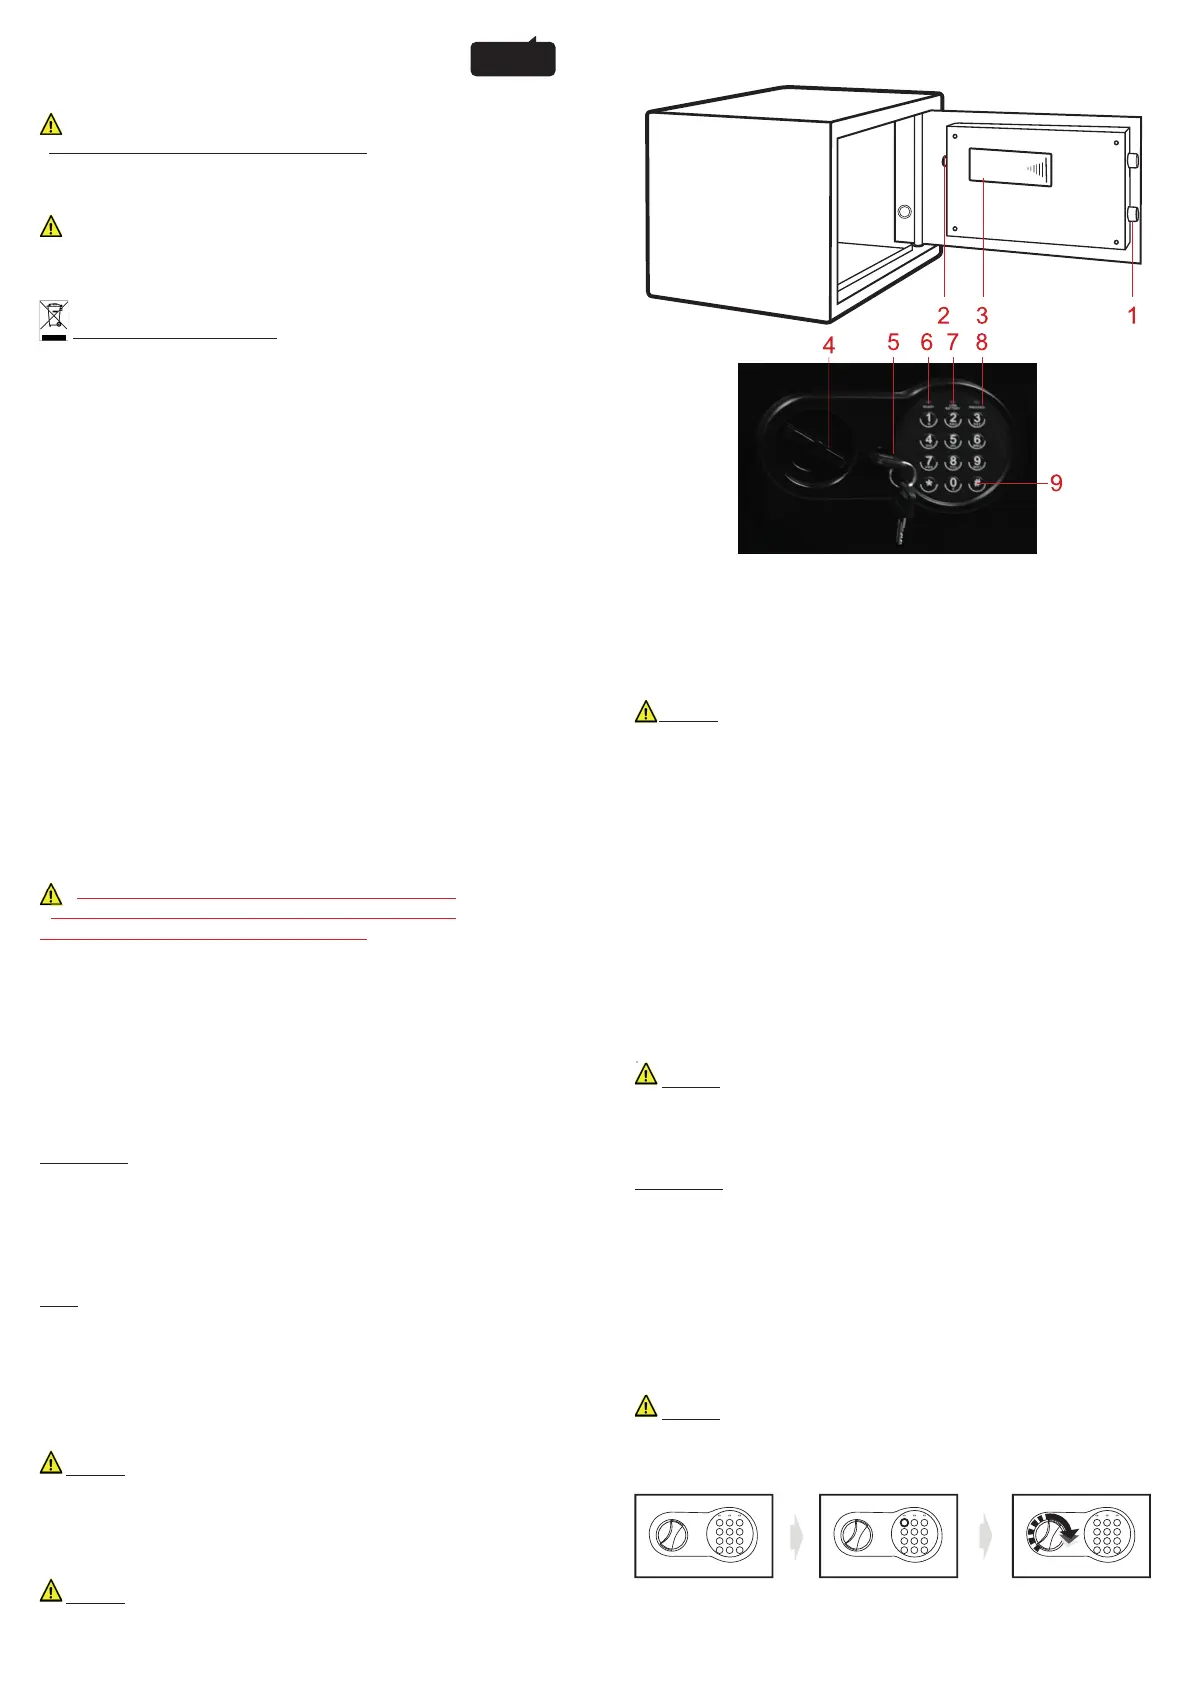
DESCRIPTION
Caution :
All drawings in this manual have been prepared based on the EA.
The exterior design or component positions of other models may be
different from what is indicated in the drawings, while the operation
is the same.
1. Bolts
2. Reset Button
3. Batteries Compartment 4xAA
4. Knob (Master Key)
5. Emergency Lock Cover
6. Green Light
7. Red Light
8. Yellow Light
9. Confi rming button
ENGLISH
HEALTH AND SAFETY INFORMATION
Always comply with the following precautions and usage tips to avoid
dangerous situations and ensure peak performance of your safe.
Warnings
- Do not desassemble or attempt to repair your safe.
This may damage the locking system.
If you notice a problem with the electronic locking system (that you cannot solve
by replacing cells), please contact SAFETOOL service center.
Caution
- Do not use a machine with damage electronic part, or with defects.
- Do not spare yourselves damaged electronic part, contact SAFETOOL service
center or an agreed professional.
Correct Disposal of this Product (Waste Electrical & Electronic Equipment)
(Applicable in the European Union and other European countries with separate
collection systems)
This marking on the product, or literature, indicates that the product should not be
disposed of with other household waste at the end of their working life. To prevent
possible harm to the environment or human health from uncontrolled waste
disposal, please separate these items from other types of waste and recycle them
responsably to promote the sustainlable reuse of material resources.
Household users should contact either the retailer where they purchased this
product, or their local government offi ce, for details of where and how they can
take these items for environmentally safe recycling.
Business users should contact their supplier and check the terms and conditions
of the purchase contract. This productshould not be mixed with other commercial
wastes for disposal.
- Please do not keep emergency keys in your safe!
- The batteries provided are used to startup, consider
replacing them with high quality batteries
Thanks you for choosing our products! You’ve taken an important
step in organizing and protecting your most valued possessions.
Every series of our safes is professionally made and designed to
provide safety. Please take time to read ans familiarize yourself with
the proper operating procedure of your new safe presented on the
following pages.
Again, thank you for choosing our products!
OPENING YOUR SAFE FOR THE FIRST TIME
SE2 & SE3 : Upon fi rst opening, users should open the safe with the
emergency key. The operation in details refers to «opening the safe
with the emergency key»
- Remove emergency lock cover, then insert the emergency key, and
turn it count clockwise.
- Turn the knob (master key) clockwise to open the door.
SE4 :
1-With the right hand, turn the wrench clockwise 1/8th of a turn and
keep it under pressure.
2-With the left hand, turn the opening knob counterclockwise 1/8th of
a turn and keep it pressed.
3-Then release the key with your right hand and turn the steel handle
clockwise 1/8th of a turn.
Caution : Finish operation, pull out the emergency key and keep it
in a safe place.
INSERTING & CHANGING BATTERIES
An under-powered or unpowered safe can be reset to Factory code
«159#».
Caution : Whenever the batteries are changed, it is preferable to
repeat a code storage procedure.
- Open the door and the compartment.
- Insert 4 AA batteries inside
- In normal use, simultaneous illumination of the red and green
lights means that the voltage (voltage) is low and the batteries need
to be replaced. Perform a test before closing the door to make sure
that the batteries have been properly installed.
- The red light on means that you need to change the batteries in
your trunk. To ensure that your batteries are operational, please
perform an open and close test before closing your trunk.
perform an open and close test before closing your trunk.
Caution : Replace 4 fresh batteries by lining them up in a manner
as indicated by the «+» and «-» signe. When outage for longer than
thirty minutes, you should reset the user’s code.
OPENING DOOR
SE2 & SE3 :
- Enter the predefi ned user code (the factory default code is 159) and
press the # key.
The green light comes on, you have 10 seconds to turn the handle
and open.
- Enter your user code (between 1 & 8 digits). Upon contact with each
key, the yellow light lights up with 1 beep to confi rm acceptance by
the microprocessor.
- Press the # button to confi rm. The green light will come on.
- Turn the handle to the right (clockwise) and pull out to open the
door. The door is open.
Caution : Re-enter the user code when the yellow light fl ashes
with a continuous beep because it means that the code entered is
incorrect. After 3 incorrect attempts, the processor blocks all entries
for 20 seconds.
The batteries provided are used to startup, consider
1 2 3
4 5 6
7 8 9
*
0 #
READYL OW
BATTERY
PROCEED
1 2 3
4 5 6
7 8 9
*
0 #
READYL OW
BATTERY
PROCEED
1 2 3
4 5 6
7 8 9
*
0 #
READYL OW
BATTERY
PROCEED
 Loading...