1
2
A
B
E
B
B
C
D
Quick Start Guide
What’s in the Box
Installation
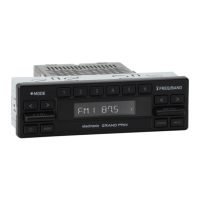
Grand Prix Radio Face
Modern Sound For Your Classic
DIN Brackets (Included with DIN Kit 296)
Hardware
x
(4)
Plug the ribbon cable from the Radio
Motor into the Radio Face.
Attach the Radio Face to the Radio Motor with the four small screws(B).
Included in your
Radio Motor box
x(8)
tech@retromanufacturing.com | help.retromanufacturing.com
3 4
E
E
A
A
C
Before attaching the DIN Brackets, feed the cable
from the Radio Face through the left DIN Bracket.
Using the 8 screws included in the Radio Motor box, install the DIN Brackets (included
with the DIN Kit) to the sides of the Radio Motor. Adjust the brackets forward until they
meet the back of the radio face. Be careful not to bend the brackets to ensure proper
fitment into the DIN Sleeve. Plug the cable from the Radio Face into the Radio Motor.
Insert the DIN Sleeve into your dash opening.
Using a screwdriver, push down the sleeve tabs on all four sides of the DIN
Sleeve to secure it into the dash opening.