INTENDED USE
For automatic on/off switching of lamps and electrical
equipment, in dry rooms, only for indoor use.
Conforms to corresponding European direc-
tives.
TECHNICAL DATA
Voltage: 230V∼, 50Hz
Switching capacity: max. 3680W, 16A,
ind. 690VA, 3A
Operating temperature: 0°C to + 35°C
Settings:
▪ Up to 16 programs are possible.
▪ 4 program options per day or week; due to block
formation (e.g. MO - FR, SA - SU etc.) up to 28 switch
operations are possible
▪ Minimum switching period 1 minute
▪ Manual switching is possible
▪ Countdown function (connected device is switched
on or off when set time expires)
▪ Random function (connected device, e.g. radio/light
is randomly switched on/off, thus giving the impres-
sion that someone is at home)
▪ Reserve in case of power failure
▪ Blue LCD display with blue backlight (can be
switched off) > 100h
▪ Child-proof lock
SAFETY INSTRUCTIONS
▪ Only a proper mains socket (230V∼, 50Hz,
with protective earth) from the public supply
network may be used.
▪ Do not operate any equipment which could
cause danger to life and limb if operated
without supervision.
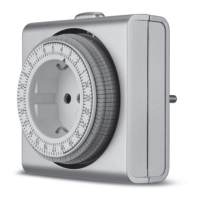
EXPLANATION OF CONTROL PANEL
Fig. [1]
MENU
▪ Switching mode between time of day,
program and countdown function
▪ Confirmation of settings
OK
▪ Setting activation of time of day, program and
countdown
+1
▪ Manual switching
▪ Program selection, forward
▪ Setting hours and minutes, forward
-1
▪ Random function
▪ Program selection, backward
▪ Setting day, hours and minutes, backward
RST
▪ Deleting all settings
RCL
▪ Deleting programs
▪ On and off switch for blue display light
Remove the timer from the socket and press RCL and
RST using a thin, electrically non-conductive object
COMMISSIONING
1. Plug timer into a 230V∼ socket. The battery requires
only approx. 6 hours charging time. If timer is not
used for an extended period, it should be connected
at least once a month for at least two hours to main-
tain battery capacity.
2. If there is no display, press the RST key.
3. The timer is now ready to be set.
LIGHT OF LCD DISPLAY
If timer is plugged into a live Schuko socket, the blue
backlight of the LCD display can be switched on or off
by pressing the key.
SETTING THE TIME OF DAY
▪ Use MENU key to select time setting
▪ Press OK key for about 3 seconds. The day of week
begins to flash; use +1 or -1 key to select the day.
▪ Press OK key, the hours are flashing; use +1 or -1
key to select the hours.
▪ Press OK key, the minutes are flashing; use +1 or -1
key to select the minutes.
▪ Press MENU key to confirm (fig. [2] ).
▪ For rapid sequence, press and hold +1 or -1 key.
SETTING/CHECKING PROGRAMS
▪ The timer can be set for daily or weekly programs.
▪ To open the individual programs, use MENU key to
access program 1 ON.
▪ Use +1 (forward) or -1 (backward) key to access the
individual programs from 1 to 16:
Program 1 ON - Program 1 OFF
Program 16 ON - Program 16 OFF
▪ For rapid sequence, press and hold +1 or -1key.
▪ You can select daily or weekly combinations:
MO = Monday, TU = Tuesday, WED = Wednesday,
TH = Thursday, FR = Friday, SA = Saturday,
SU = Sunday
or for combinations:
MO – WE – FR
TU – TH – SA
SA – SU
MO – TU – WE
TH – FR – SA
MO – TU – WE – TH – FR
MO – TU – WE – TH – FR – SA
MO – TU – WE – TH – FR – SA – SU
EXAMPLE FOR SETTING
A DAILY PROGRAM
▪ MO 8.15 On / MO 15.45 Off
▪ Use MENU key to access program 1 ON.
▪ Press OK key once until day of week is flashing; use
+1 or -1 key to select the day (e.g. MO).
▪ Press OK key, hours are flashing; use +1 key to se-
lect the hours (e.g. 8).
▪ Press OK key, minutes are flashing; use +1 key to
select the minutes (e.g. 15) (fig. [3] )
▪ Press OK key, 1 ON is flashing; use +1 key to select
program 1OFF
▪ Press OK key once until day of week is flashing
▪ Use +1 or -1 key to select the day (e.g. MO)
▪ Press OK key, hours are flashing; use +1 key to se-
lect the hours (e.g. 15).
▪ Press OK key, minutes are flashing; use +1 key to
select the minutes (e.g. 45) (fig. [4] ).
The timer will only switch on and off on Monday.
EXAMPLE FOR SETTING
A WEEKLY PROGRAM
▪ MO – Fr, 8.15 On / 15.45 Off
▪ Use MENU key to access program 1 ON.
▪ Press OK key once until day of week is flashing; use
+1 or -1 key to select weekly combination (e.g. MO
TU WE TH FR).
▪ Press OK key, hours are flashing; use +1 key to se-
lect the hours (e.g. 8).
▪ Press OK key, minutes are flashing; use OK key to
select the minutes (e.g. 15) (fig. [5] )
▪ Press OK key, 1 ON is flashing; use +1 key to select
program 1 OFF
▪ Use +1 or -1 key to select weekly combination (e.g.
MO TU WE TH FR).
▪ Press OK key, hours are flashing; use +1 key to se-
lect the hours (e.g. 8).
▪ Press OK key, minutes are flashing; use +1 key to
select the minutes (e.g. 15) (fig. [6]
Every day, from Monday through Friday, the timer
switches on and off at the same time.
Caution: To ensure that programming is activated,
AUTO ON or AUTO OFF must be displayed in time
mode. Press +1 key during time mode to access AUTO
ON / AUTO OFF (see Manual Switching).
HOW TO DISABLE PROGRAMS
▪ Use MENU key to access program 1 ON.
▪ Use +1 (forward) or -1 (backward) key to access
program to be disabled.
▪ Press RCL key; dashes appear. Please note that ON
and OFF programs must be deleted individually, fig.
[7]
COUNTDOWN TIMER
The connected device can be switched on or off after
expiration of the set time.
▪ In time mode, use +1 key to set either OFF (load is
switched on after expiration of countdown) or ON
(load is switched off after expiration of countdown).
▪ Use MENU key to access program CTD. The hours
are flashing; use +1 or -1 key to select the hours
▪ Press OK key, the minutes are flashing; use +1 or -1
key to select the minutes.
▪ Press OK key, the seconds are flashing; use +1 or -1
key to select the seconds.
▪ Press OK key to run; all other programs are disabled
during running. Display shows 0:00 after expiration.
▪ To end countdown during running, press RCL key
once, fig. [8].
RANDOM FUNCTION
▪ In time mode, use -1 key to activate random function.
Display shows RND. The display must show AUTO
OFF; if necessary, set as described under Manual
Switching.
▪ This causes a delay of the set on and off times (On-
Off programs from 1 - 16) by 4 - 32 minutes. Thus, the
connected loads (e.g. light or radio) can be switched
on or off at irregular intervals, giving unwanted visi-
tors the impression that someone is at home.
▪ To deactivate random function, press -1 again. RND
disappears from the display, fig. [9].
Caution: To prevent programs from overlapping, the
time lag between two subsequent programs must be at
least 33 minutes. If this is not observed, the connected
load remains switched on.
▪ Example: Program 1 ON is programmed for 1:00,
and program 1 OFF for 3:00. The timer randomly
switches on between 1:04 and 1:32, and off be-
tween 3:04 and 3:32.
MANUAL SWITCHING
This timer allows you to manually switch connected
loads on and off.
Press +1 key during time mode to switch as follows:
▪ ON connected load is always switched on
▪ AUTO - ON connected load is on in the program
▪ ON connected load is always switched off
▪ AUTO - OFF is switched off in the program
(fig. [10] ).
AUTOMATIC RETURN
TO TIME DISPLAY
If timer shows program or count-down mode and more
than 2 minutes have expired since key was last oper-
ated, the display automatically returns to the time dis-
play.
SUMMER / WINTER TIME
▪ Press RCL key. The hour display advances one hour
and + 1h appears on the display to indicate summer
time.
▪ To return to display of winter time, press RCL key
WEEE-REFERENCE OF DISPOSAL
In accordance with European defaults used electrical
and electronics devices may no more be given to the
unsorted waste. The symbol of the waste bin on wheels
refers to the necessity of separate collection.
Please help with environmental protection and see to
it that this device is given to the for this purpose desi-
gnated systems of waste sorting if you do not use it any
longer.
GUIDELINE 2012/19/EU of the EUROPEAN
PARLIAMENT AND the COUNCIL of July 04th
2012 about electrical and electronics old devices.
Batteries and accumulators are not to be
disposed of in the normal house waste bin.
Every user is legally obliged, to hand over all
batteries and accumulators, irrespective of
whether or not they contain harmful substances to a
communal collection point in the local town area or to
a trade dealer so that they can be disposed of in an
orderly environmentally friendly manner.
Batteries and accumulators should only be handed over
when they are completely discharged!
GB
ANL_25500.indd 2 10.08.2017 11:04:55
 Loading...