6
GB
• Only connect devices up to max. 3680W (ind. 460VA) total power!
• Do not plug one behind the other (S7)!
• Do not operate the product at, on or in the vicinity of open flames (e.g. candles)!
• Do not expose the product to direct sun and shield it from extreme heat!
• Do not operate any devices whose unattended operation could endanger life and property!
• De-energised only when the plug is pulled out (S6)!
• A conversion or modification of the product affects product safety. Caution: risk of injury! A conversion or
modification of the product must not be carried out!
The programmed switching program repeats itself every 24 hours (daily timer). The smallest switching interval is
15 minutes.
• Never operate with an open housing, or missing or damaged terminal compartment cover.
• For the connection, only use regular mains sockets (230V~, 50Hz) with protective conductors of the
public supply network which are easily accessible!
• Do not open the housing (S5)!
• The product must remain freely accessible (also when in use)!
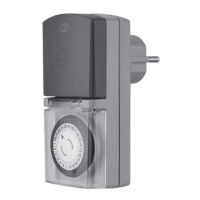
• The device is equipped with increased protection against accidental contact. The two pins of a plug can
only be inserted into the sockets at the same time.
• Product
• Do not plug in a plug device (S8)!
• Instructions
Check the delivery for completeness and perfect condition.
In the case of missing parts or damage:
• do not mount the unit!
• do not put the unit into operation!
• make a complaint to the supplier.
The deliver consists of:
SCOPE OF DELIVERY
FUNCTION
COMMISSIONING AND PROGRAM SETTING
1. The gray switch pins at the edge of the turntable are all pressed upwards when delivered, i.e. when the
pressed upwards, i.e. in the switched-off state. Turn the arrow to the time of day, now press the switch
pins down for the time to be switched.
2. Press down the switching pins at the edge of the turntable (each represents 15 minutes of switching
time) until they engage. This determines the ON switching period.
ON: Switch pins down, OFF: Switch pins up (S9).
3. Setting the time: turn the dial to the right (clockwise) until the current time
coincides with the marking arrow, then immediately plug the timer into a power outlet,
so that the mechanical time mechanism starts operating.
4. Side selector switch
Timer position: programmed ON and OFF switching
ON position: Manual ON switching
Example: The timer is to switch on a lamp from 6.00 am to 10.00 am daily. To do this, press down the
corresponding switch pins from 6.00 a.m. to 10.00 a.m. at the edge of the turntable, whereby one switch pin
corresponds to a switching time of 15 minutes.