EasyManua.ls Logo

REVELL KENWORTH W900 - User Manual

REVELL KENWORTH W900
12 pages
Print Icon
To Next Page IconTo Next Page
Loading...
KIT
1507
85150700200
The
Kenworth
W900
has
every
thing that long-haul truckers
need
to get the job done. This impres
sive
Kenworth
design
sports a
duel sleeper capped
with
an
aerodynamic
roofline which tells
everyone who
sees
it
that itis
truly
a road machine without equal.
Your Revell model features a
hood that tilts forward to show a
detailed tubocharged six cylinder
diesel engine, chrome platedsim
ulated
alloy
wheels,
duel
exhaust
stacks,
roof
mounted
horns
and
mirrors
with
antennas.
Decals
with optional stripes or
cus
tom
graphics
are
also
included.
•REPEAT
SEVERAL
TIMES
A REPETERPIUSILURS FOIS
OPTIONAL
PARTS
PIECES
EN
OPTION
READ
THIS
BEFORE
YOU
BEGIN
Study the assembly drawings.
Each
plastic
part
is identitied by a
number.
" In the
assembly
drawings,
some
parts
will be
marked by a
star
(*)
to indicate chrome
plated
plastic.
For
better
paint
and
decal
adhesion,
wash
the
plastic
parts
in a
mild
detergent
solution.
Rinse
and
let air dry.
Check the fit ol
each
piece before
cementing
in
place.
'
Use
only
cement
for
polystyrene
plastic.
' Scrape plating and paint from
areas
to
be
cemented.
Allowpaint to dry thoroughly before
handling
parts.
Any unused
parts
may be discarded.
DECAL
APPLICATION
INSTRUCTIONS
1.
Cut
desired
decal
from
sheet.
2. Dip
decal
in
water
for a few
seconds.
3. Place wet decal on paper towel.
<!.
Waituntildecal is movableon paper backing.
5. Place decal in positionon model, face up and
slide backing away.
6.
Press
out air bubblos with a soft damp cloth.
7. Milkiness that may
appear
is for bettor decal
adhesion and willdry clear. Wipe away any
excess
adhesive.
8. Do not touch decal until fullydry.
9. Allow the
decals
48
hours
to dry
before
applying clear coal.
NOTE:
Decals
arc compatible with
setting
solutions
or
solvents.
KENWORTH®
W900
CD
'
DECAL
DECAL COMANIE
ALTERNATIVE
ASSEMBLY
ENSEMBLAGE
ALTERNATIVE
•CEMENT
TOGETHER
A COLLER
REMOVE
AND
THROW
AWAY
•ARFTIRERET
JETER
DO
NOT
CEMENT
•NE
PAS
COLLFR
LIRE
CE
QUI
SUIT
AVANT
DE
COMMENCER
Etudinr los
schemas
do
montago.
Chaque
piece en plastique est identifiee par un numoro.
Sur
les
schemas
de
montage,
certaines
pieces
sont
marquees
d'une
etoile
(*)
pour
indiquer
qu'elles
sont
en
plastique
chrome.
Pour uno meilleure prise de la peinture et
des
autocollants.
laver les pieces en plastique avec une solution detergente peu
concentree.
Les
rincer
et
les
laisser
secher
a I'air.
Verifierque chaque piece s'ajuste bien avant
de la coller
en
place.
N'utiliserque de la colle pour polystyrene.
Gratter les parties a collerpourenleverlechrome et la peinture.
Laisserla peinturebiensecher avantde
manipuler
les pieces.
Toute piece inulilisee pent etre jeteo.
DIRECTIVES D'APPLICATION
DES
AUTOCOLLANTS
Decouper
I'autocollant
desire
de la feuille.
Tremper
I'autocollant
dans de leau pendantquelquessecondes.
Placer
I'autocollant
mouille
sur unoservietteen
papior.
Attondez que I'autocollant puisso
etre
deplace sur son
support
en
papier.
Mettre I'autocollant en position sur le modele face sur
le
dessus
et faire glisser le support pour I'enlever,
Appuyeravec un
chiffon
doux humidopoureliminorles bullesd'air.
La
substance
laiteuse qui peut apparaitre
est
destinee a
ameliorer
I'adhesion
de
I'autocollant
et
devient
incolore
au
sechage.
Essuyer pour enlever tout excedent d'adhesif.
Ne
pas
toucher
I'autocollant
tant
qu'il
n'est
pas
bien
sec.
Laisser
I'autocollant
secher
pendant
48
heures
avant
d'appliquor
une
couche
Iransparente.
REMARQUE:
Les
autocollants
sont
compatibles
avec
les
solutions
de lixagc ou
les
solvants.
This paint
guide
is
provided
to
complete
this
kit
as
shown
on
the
box.
Co guide de pemiurososi loumipour
wproduiw.
le
modAlo
rtfdtiiiqui iipparitil sur In Polie.
Semi
Gloss
Black
Noir
satine
Flat
Tan
Havane
mat
Gloss
Blue
Bleu
brilliant
Yellow
Jaune
Gloss
Orange
Orange
brilliant
Aluminum
Aluminum
Silver
Argent
Steel
Acier
Turn
Signal
Amber
Ambre
Transparent
Red
Rouge
Transparent
If
you
have
any
questions or
comments,
call
our
hotline
at:
(800)
833-3570
or,
please
write to:
Revell
Inc
Consumer Service
Department,
1850
Howard
Street
Unit
A,
Elk
Grove
Village,
Illinois
60007
Be
sure
to
include
the
plan
number
(85150700200).
part
number,
description,
your
return
address
and
phone
number.
Visit
our
website:
www.revell.com
Revell
Inc
Elk
Grove
Village,
IL.
Copyright
©
2009.
All
rights
reserved.
Question and Answer IconNeed help?

Do you have a question about the REVELL KENWORTH W900 and is the answer not in the manual?

Summary

Assembly Preparation and Guidance

Read This Before You Begin

Essential instructions and tips prior to starting model assembly.

Decal Application Instructions

Detailed steps for correctly applying decals to the model.

Rear Suspension Assembly

Frame and Axle Components

Parts comprising the chassis frame and suspension axles.

Fuel and Air Tank Components

Components for the fuel and air tank systems.

Suspension Support Components

Parts used to support the suspension system.

Rear Wheel Assembly

Outer Wheel and Spacer Components

Outer wheel and spacer parts for the rear wheels.

Inner Wheel Component

Inner wheel part for the rear wheels.

Front Suspension Assembly

Axle and Tie Rod Components

Axle and tie rod parts for the front suspension.

Shock Absorber Components

Shock absorber parts for the front suspension.

Drag Link Assembly

Steering Link Component

The steering link part for the drag link assembly.

Front Wheel Assembly

Outer and Inner Wheel Components

Outer and inner wheel parts for the front wheels.

Crossover and Exhaust Assembly

Crossover Pipe Component

The crossover pipe part for the exhaust system.

Exhaust Collector Component

The exhaust collector part for the exhaust system.

Engine Assembly

Engine Halves and Oil Filter

Left and right engine halves and the oil filter.

Compressor and Injection Pump

Compressor and injection pump components.

Timing Cover and Pulley Assembly

Timing cover and pulley assembly parts.

After Cooler and Head Assembly

After cooler and engine head assembly parts.

Engine to Frame Mounting

Driveshaft Assembly

Interior Assembly

Seats and Gear Shift

Model seats and gear shift lever components.

Steering Wheel and Column

Steering wheel and column components.

Dashboard Components

Dashboard assembly with dials and details.

Cab and Interior Assembly

Cab Components

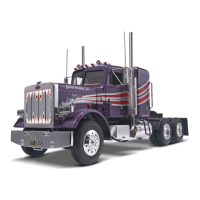
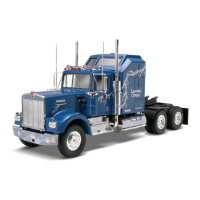
Main cab parts and body color information.

Windshield and Sleeper Window

Clear windshield and sleeper window parts.

Interior into Cab Mounting

Instructions for fitting the interior into the cab.

Cab to Frame Mounting

Steps to attach the assembled cab to the chassis.

Air Duct Components

Air duct parts for the cab assembly.

Air Cleaner Assembly

Left Air Cleaner Components

Parts for the left side air cleaner assembly.

Right Air Cleaner Components

Parts for the right side air cleaner assembly.

Air Cleaner Caps and Brackets

Chrome air cleaner caps and body color brackets.

Box Step Assembly

Battery Box Step Component

Chrome battery box step part.

Stack Assembly

Outer and Inner Stack Components

Chrome outer and inner stack parts.

Grab Handle Components

Chrome grab handle parts for the stacks.

Radiator Assembly

Radiator Front and Rear Components

Semi gloss black radiator front and rear parts.

Rear Assembly

Quarter Fender and Skid Plate

Semi gloss black quarter fender and chrome skid plate.

Fifth Wheel and Pivot Components

Semi gloss black fifth wheel and pivot parts.

Mud Flaps and Grab Handles

Semi gloss black mud flaps and chrome grab handles.

Taillights and Decals

Chrome taillights with transparent red lenses and decals.

Grille Assembly

Headlight Housing and Lens

Chrome headlight housings and clear lenses.

Grille Component

Chrome grille part.

Front Bumper Assembly

Bumper and Bumper Lights

Chrome bumper and clear bumper lights.

Final Assembly

Air Horns and Cab Lights

Chrome air horns and cab lights, some painted amber.

Side Mirrors

Chrome left and right side mirrors.

Turn Signals

Amber front turn signals and red back turn signals.

Decal Placement

Version A Decals (Gloss Blue)

Placement guide for gloss blue decals, including lightning graphics.

Version B Decals (Gloss Orange)

Placement guide for gloss orange decals.

Rear and Front Decal Placement

Decal placement for the rear and front of the model.

REVELL KENWORTH W900 Specifications

General IconGeneral
Not for children 0-3 yearsYes
TypeLand vehicle model
Scale1:25
Material-
Product typeTruck/Trailer model
Product colorGreen
Number of pieces115 pc(s)
Construction typeAssembly kit
Recommended age (min)12 yr(s)
Recommended skill level4
Weight and Dimensions IconWeight and Dimensions
Length321 mm

Related product manuals