nÄ/ox
REVOX H 1
Congratulations
on the
purchase
of
your
new REVOX hi-fi
Tape Deck H 1. We
thank
you
for
the
confidence that
you
have
placed
in
this
high-quality
product.
During
the study of these operating
instructions,
please
consult the
foldout
page.
To
prevent
damage
to the equipment,
plug
in
the
power
cord as
the
last
step
of the
installation
procedure!
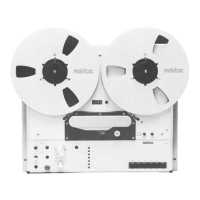
Care and
cleaning
The care
for
the
H
1
cassette
recorder is limited to
cleaning the capstan
shaft, the
pinch
rollers,
the tape
guides
and
the soundhead
(cleaning
set order
No. 39000), and
to demagnetiztng
the tape
guides
and the soundheads
with a
commercially
available
demagnetizing choke.
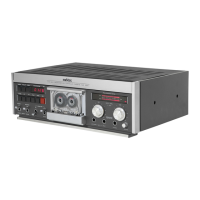
Operation
tll
POWER
Power on I
ready
(standby)
l2l
REC
The record mode is signalled
in
the display
field
[8]
by the
flashing wording RECORD.
t3l
STOP
Stop
key
(simultaneous
pressing
of STOP
and
>>/<<
causes a
fast
search
of a specific
address from
mode.
t4l
PI-AY
Playback key
(simultaneous
pressing
of
PLAY and
>>/<<
causes a
fast
search of a
specific address
from
STOP
PLAY mode.
[5/6]
>>/<<
Fastforwardorrewindkey.
l7l
PAUSE
Pause key
(only
active
in record mode).
t8l
Display field for
peak
output
levels and
various functions.
t9]
Real
time
indication. The
real
time counter always
indicates
the
elapsed time since the
start
of the tape.
You can memorize a specific
tape address and
play
it back later. Computing a
tape address of a newly
inserted cassette that
has not
been spooled back to the beginning
of the tape requires only
a
few
seconds.
[10]
lR
SENSOR
Standby
indication
(operation with
the
H
8/H
208/H 21
0
remote
controls
is
only
possible
in
conjunction
with
the
H 5 amplifier, otherwise the
B
208 remote
control
must
be used).
l11l12l
REC LEVEL
-/+
Keys adjusting the input
level. By
pressing
the
REC LEVEL +l- key,
the
level
can be
varied
in steps
until the
desired output
level is
achieved
(the
output level is indicated in
the display
field
[8].
Record from
Stop
mode:
By
pressing
the
REC
[2]
and
Play
[4]
keys
(press
REC key first,
otherwise
the
machine starts
in
play
mode),
a
recording
can be started directly from stop.
Record f rom
pause
mode:
Press
the
REC
[2]
and PAUSE
[7]
keys.
The recording can then
be
started by
pressing
the
PAUSE key
again.
To interrupt
the
recording
press
the PAUSE
key. Recording from PAUSE
mode
activates the
fade-in
or
fade-out
circuit. lf
this
is not
desired,
the
recording must be cancelled
with the STOP key.
[13/14]
BALANCE UR Keys for
shifting
the balance to the
left
or
right.
[15]
NR-SYSTEM
lf
a noise reduction system
is to be used for the
recording,
the NR-SYSTEM key must be
actuated.
Repeatedly
press
this
key
untilthe desired system appears on the display
[8].
For
new recordings, Dolby C should
preferably
be
used because it
achieves a better signal-to-
noise ratio
than
Dolby B.
Dolby B
can be used
for
playing
back existing
recordings
or
for
appending a
new recording on cassettes
recorded with Dolby B.
t16l
MPX Multiplex filter
(pilot
tone
suppression
when recording f rom the
tuner), switch-selectable
for
Dolby B
or C.
I17l
SET
LEVEL
Key for
automatic
level adjustment
for
a
recording.
Keep
the SET LEVEL key
pressed
while
the
loudest
passages
of a
selection are being
played.
The maximum
value is stored
when
this key is released.
Balance differences can be
corrected with
the
BALANCE
LIR
113114
keys.
GB
 Loading...