7
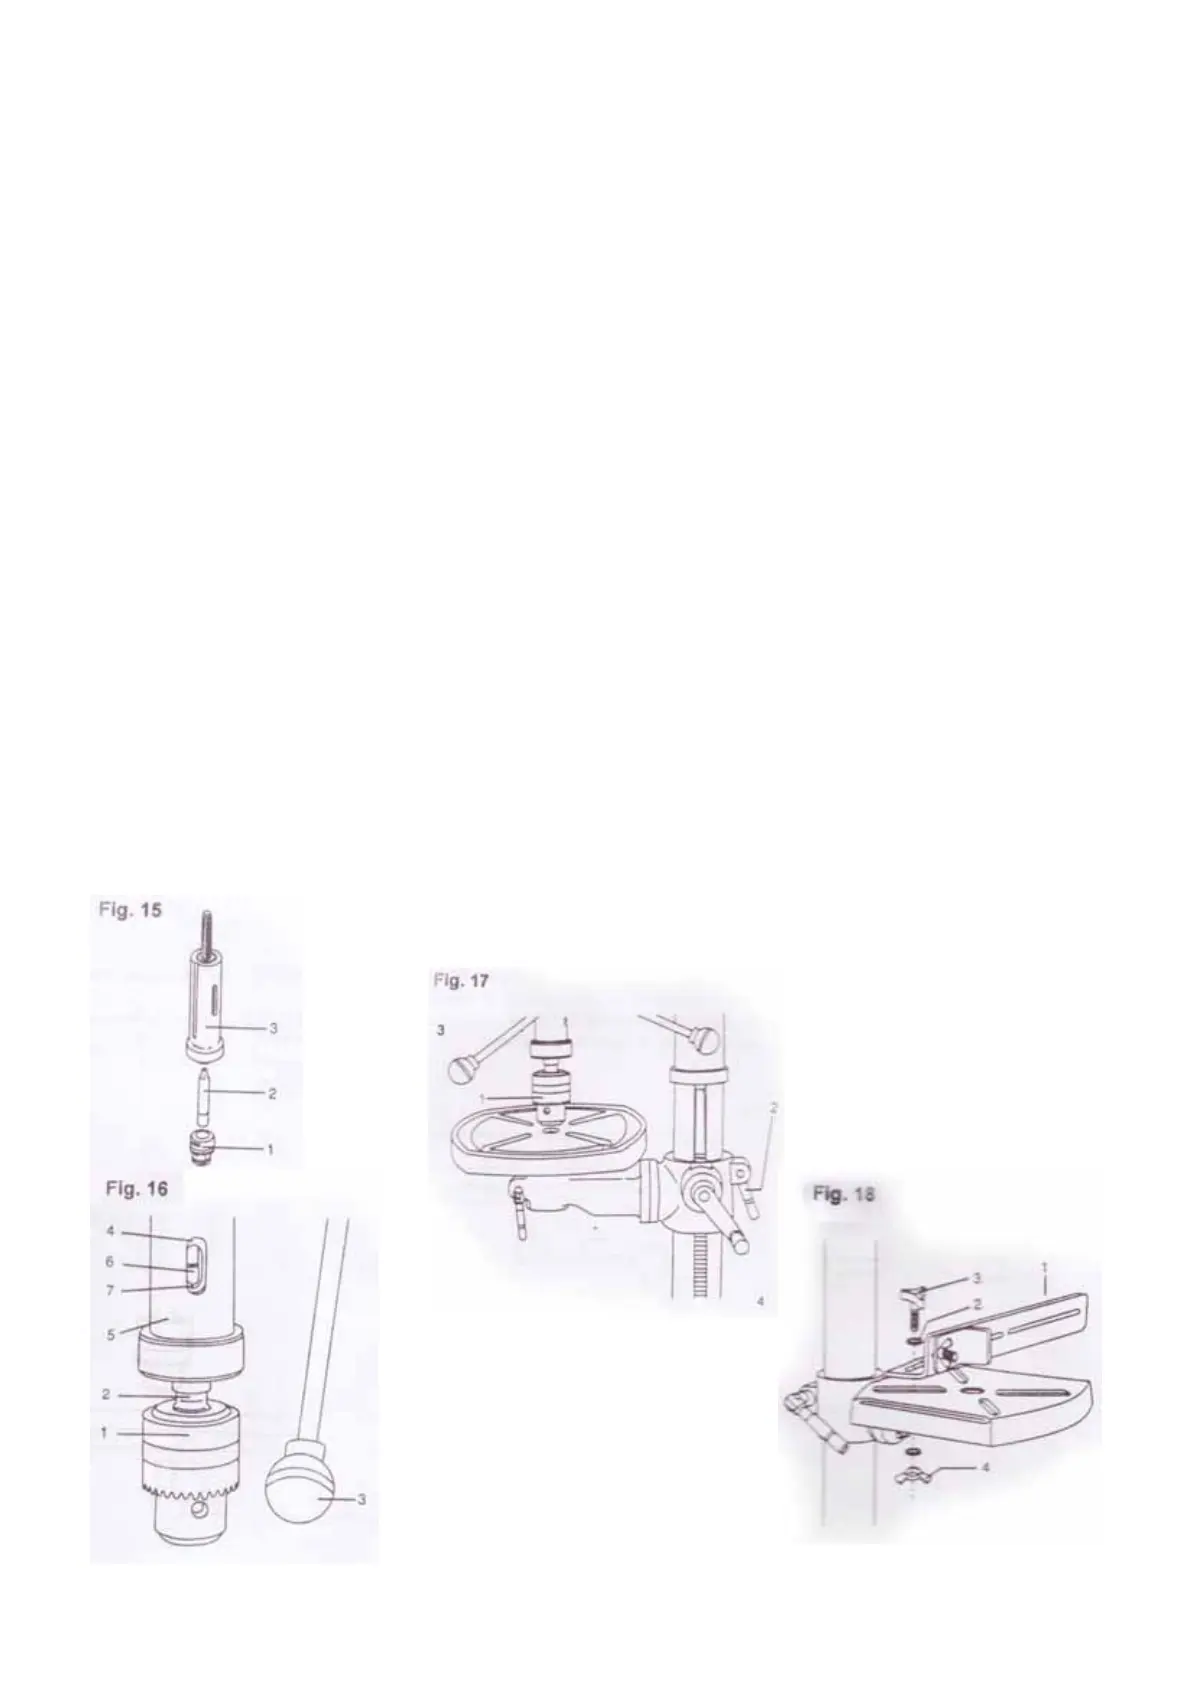
FOR THE SPINDLE WITH THE ARBOR (FIG, 15, 16, 17)
Clean out the tapered hole in the chuck(1) withe a clean
cloth (Fig. 15)
1. Clean tapered supfaces on the arbor(2) and spindle(3).
(Fig, 15)
2. Push the chuck(1) onto the spindle arbor(2). Tap gently
to ensure seat. (Fig. 16)
3. Lower the spindle(2) by turning the feed handles(3)
anticlockwise until the slot(4) appears on the quill(5). (Fig. 16)
4. Push the chcuk and spindle arbor up into the spindle,
making sure the tang(6) (upper narrow end of the spindle
arbor shank) is engaged and locked in the inner slot(7) of
the spindle. This can be seen through the outer slot(4) of the
quill by rotating the chuck and arbor until the two slots
are alligned. (Fig. 16)
5. Open the jaw of the chuck(1) by rotating the chuck sleeve
clockwise. To prevent damage, make sure the jaw are
completely receded into the chuck. (Fig. 17)
6. Unlock the table bracket lock(2) and raise the table unitl
it is 25 mm below the tip of the chuck(1). Lock the table
bracket lock. (Fig. 17)
7. Turn the feed handles(3) anticlockwise, lowering the chuck.
Force the chuck against the table until it is securely pressed
onto the spindle. (Fig. 17)
Installing the optional fence assembly
FOR THE TABLE WITHOUT OIL CHANNELS (Fig. 18)
1. Determine the desired location for the fence(1).
2. Align the mounting holes of the fence over the table top
slots.
3. Place a washer(2) on the threaded end of the knob(3).
Insert the knob through the mounting hole of the fence and
the table slot.
4. Place a washer and wing nut(4) on the knob from under
the table.
5. Repeat for the other knob and tighten.
아버와 스핀들 (그림, 15, 16, 17)
척(1)의 탭된 구멍을 깨끗한 천으로 닦아주세요. (그림. 15)
1. 아버(2)와 스핀들(3)을 깨끗하게 닦아주세요. (그림. 15)
2. 스핀들 아버(2)로 척(1)을 밀어주세요. 부드럽게 밀어 넣어
자리를 잡게 해 주세요. (그림. 16)
3. 피드 핸들(3)을 시계 반대방향으로 돌려 스핀들(2)을 슬롯(4)이
퀼(5)에 나타날 때까지 낮춰주세요. (그림. 16)
4. 척을 밀고 스핀들 아버를 스핀들에 올리세요. 탱(스핀들 아버
자루 위의 좁은 끝)은 스핀들의 안쪽 슬롯(7)에 체결되어 고정되어
야 합니다. 이는 척과 아버가 두 슬롯이 체결되어 돌아갈 때 퀼의
바깥쪽 슬롯(4)을 통해서 볼 수 있습니다.
5. 척(1)의 조를 척 슬리브를 시계방향으로 돌려 열어주세요.
손상을 예방하기 위해서 조를 완전히 물러나게 해야 합니다.
(그림. 17)
6. 테이블 브래킷 걸쇠(2)를 풀고 테이블이 척의 팁 아래 25mm가
될 때까지 올려주세요. 테이블 브래킷 걸쇠를 잠궈주세요. (그림. 17)
7. 피드 핸들(3)을 시계 반대방향으로 돌리고 척을 낮추세요.
테이블 반대편으로 스핀들에 단단히 고정될 때까지 척에 힘을
가하세요. (그림. 17)
옵션(별도 구매) 휀스 부품 설치하기
오일이 없는 테이블 (그림. 18)
1. 휀스(1)를 원하는 위치에 놓으세요.
2. 테이블 탑 슬롯 너머 휀스의 고정 구멍에 정열하세요.
3. 손잡이(3)의 끝을 통해 와샤(2)를 놓아주세요.
손잡이를 휀스와 테이블 슬롯의 고정 구멍을 통해서 삽입하세요.
4. 와샤와 윙 너트(4)를 테이블 아래의 손잡이에 놓으세요.
5. 다른 손잡이를 반복하고 조여주세요.
 Loading...