10
Adjusting the table height (Fig. 17)
1. Unlock the table bracket lock handle. (2)
2. Turn the table crank handle (4) clockwise to raise the
table; anticlockwise to lower the table to the required height.
Note:
It is better to lock the table to the column in a position so that
the tip of the drill bit is just slightly above the top of the
workpiece.
3. Tighten the table lock handle. (3)
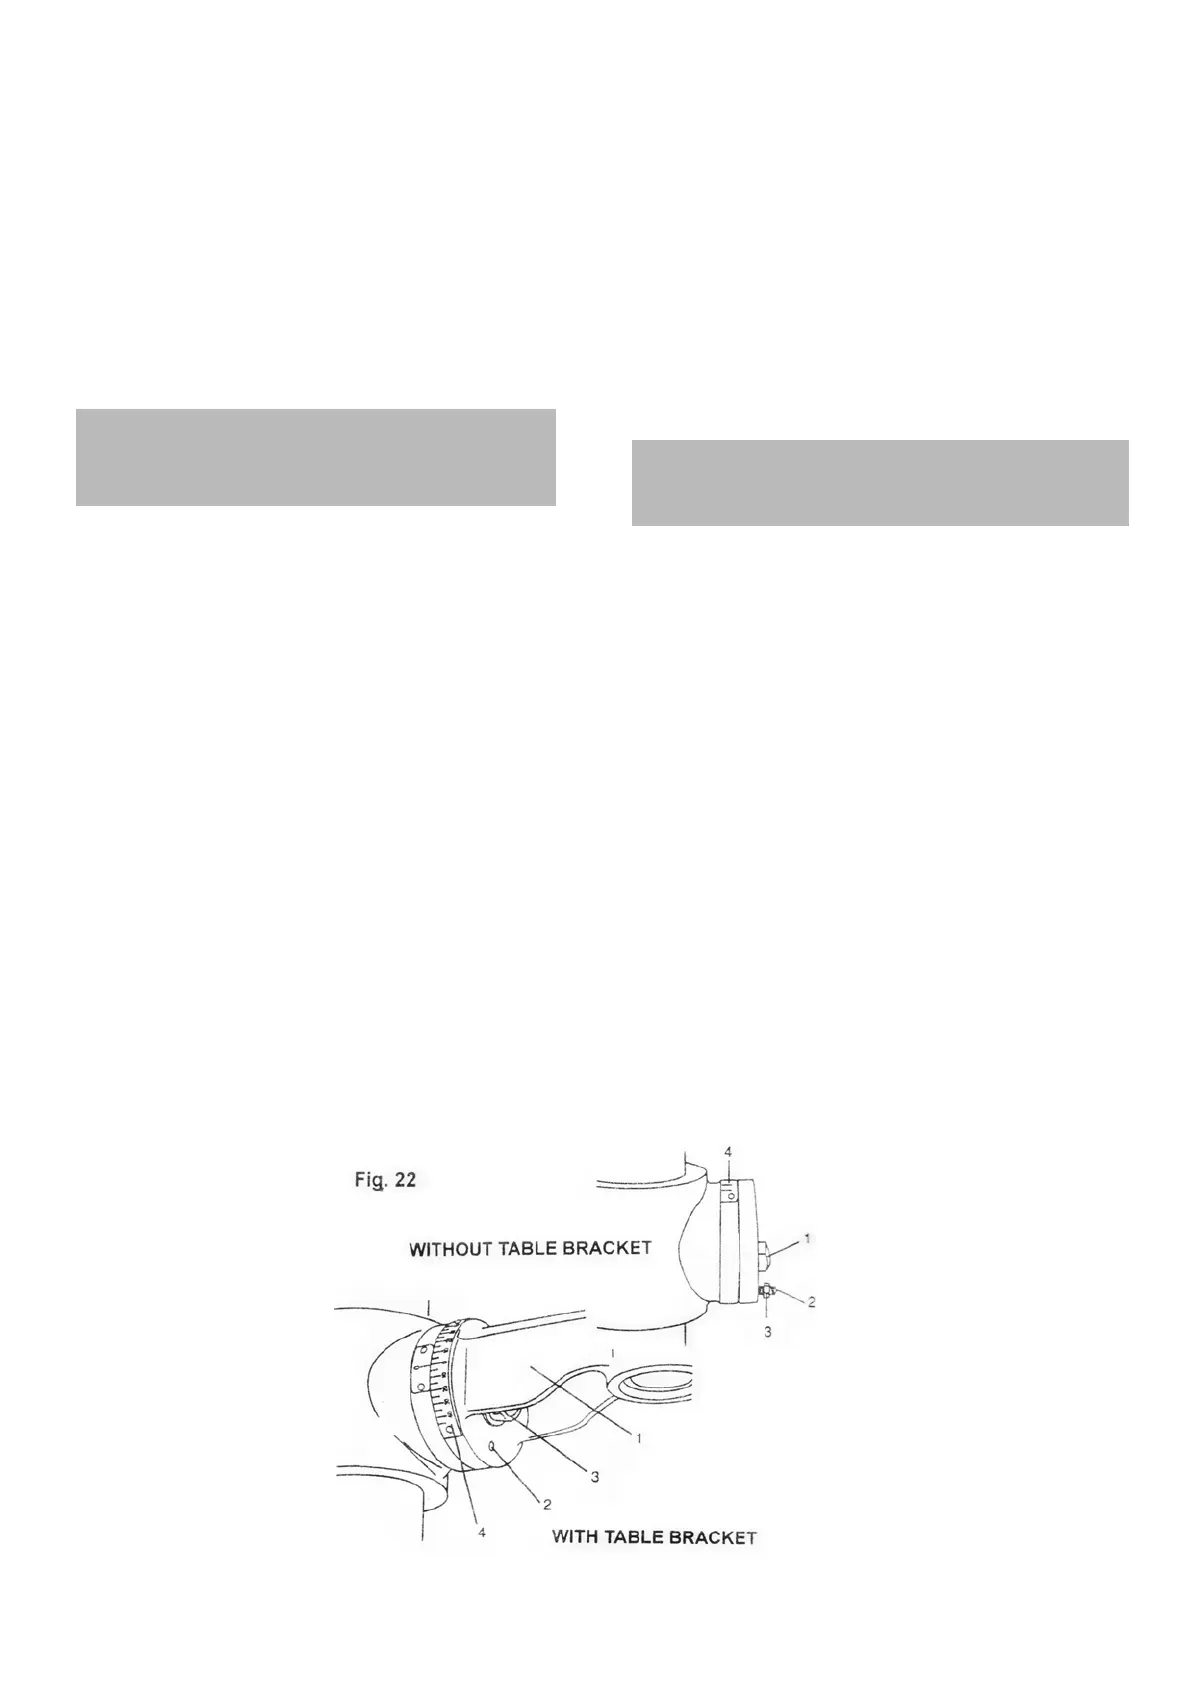
Tilting the table (Fig. 22)
WARNING! To avoid jnjury from spinning work or tools
breakage, always clamp workpiece and backup material
securely to the table before operating the drill press with
the table tilted.
FOR THE TABLE WITHOUT TABLE BRACKET
1. Turn the set screw (1) with the hex key anticlockwise
to release it from the table bracket (2).
2. Loosen the table bevel lock bolt (3) and tilt the table to the
desired angle.
3. Tighten the table bevel lock bolt.
FOR THE TABLE WITH TABLE BRACKET
1. Loosen the bevel lock (1) with a wrench.
2. Remove the horizontal locking pin (2) by turning the nut
(3) clockwise until the pin can be pulled from the hole, far
enough to allow the table to move.
3. Tilt the table to the desired angle, using the bevel scale (4)
as a basic guide.
4. Tighten the bevel lock.
5. To return the table to its original position, loosen the bevel
ORFNEROW5HDOLJQWKHEHYHOVFDOHWRWKHÛVHWWLQJ
6. Turn the nut (3) on the locking pin (2) counterclockwise to
the end of the threads.
7. Gently tap the locking pin until it is seated in the hole.
8. Tighten the bevel lock with a wrench.
Note:
7KHVHWVFUHZLVIRUWKHÛDOLJQPHQWRIWKHWDEOH
2. The bevel scale (4) is for quick bevel angle reference only.
Always check the angle before drilling.
테이블 높이 조절 (그림. 17)
1. 테이블 브래킷 고정 핸들을 풀어주세요. (2)
2. 원하는 높이의 테이블을 올리기 위해서 테이블 크랭크 핸들(4)을
시계방향으로 돌리세요. 반시계방향으로 돌리면 테이블을 내릴 수
있습니다.
알림:
기둥에 테이블을 고정시키고 드릴 비트의 팁이 작업재 살짝 위에
있을 수 있도록 해 주는게 좋습니다.
3. 테이블 고정 핸들(3)을 조여주세요.
테이블 기울이기 (그림. 22)
주의! 회전하는 공구나 작업재로부터 상해를 피하기 위해, 테이블을
기울여 드릴프레스 작업을 하기 전 언제나 작업재에 클램프를 해주고
작업재를 안정되게 고정시켜 주세요.
테이블 브래킷 없는 테이블
1. 테이블 브래킷(2)에서 스크류(1)를 풀어주기 위해 시계반대
방향으로 돌려주세요.
2. 테이블 베벨 고정 볼트(3)를 풀고 원하는 각으로 테이블을
기울여 주세요.
3. 테이블 베벨 고정 볼트를 조여주세요.
테이블 브래킷이 있는 테이블
1. 베벨 걸쇠(1)를 렌치로 풀어주세요.
2. 수평 고정 핀(2)을 핀이 구멍에서 당겨질 때까지 테이블이
움직일 수 있도록 시계방향으로 돌리세요.
3. 베이직 가이드로 베벨 스케일(4)을 사용하여 원하는 각도로
테이블을 기울이세요.
4. 베벨 락을 조여주세요.
5. 테이블을 원래 위치로 돌려 놓기 위해서, 베벨 고정 볼트(1)를
풀어주세요. 0˚로 베벨 각을 다시 조절해 주세요.
6. 고정핀(2)의 너트(3)를 시계반대방향으로 돌리세요.
7. 구멍에 고정될 때까지 고정 핀을 부드럽게 두드리세요.
8. 베벨 락을 렌치로 조여주세요.
알림:
1. 세트 스크류는 테이블에서 90˚ 조절을 위해 있습니다.
2. 베벨 스케일(4)은 베벨 각을 빠르게 보기 위해 있습니다.
드릴링을 하기 전 언제나 확인하세요.
 Loading...