12
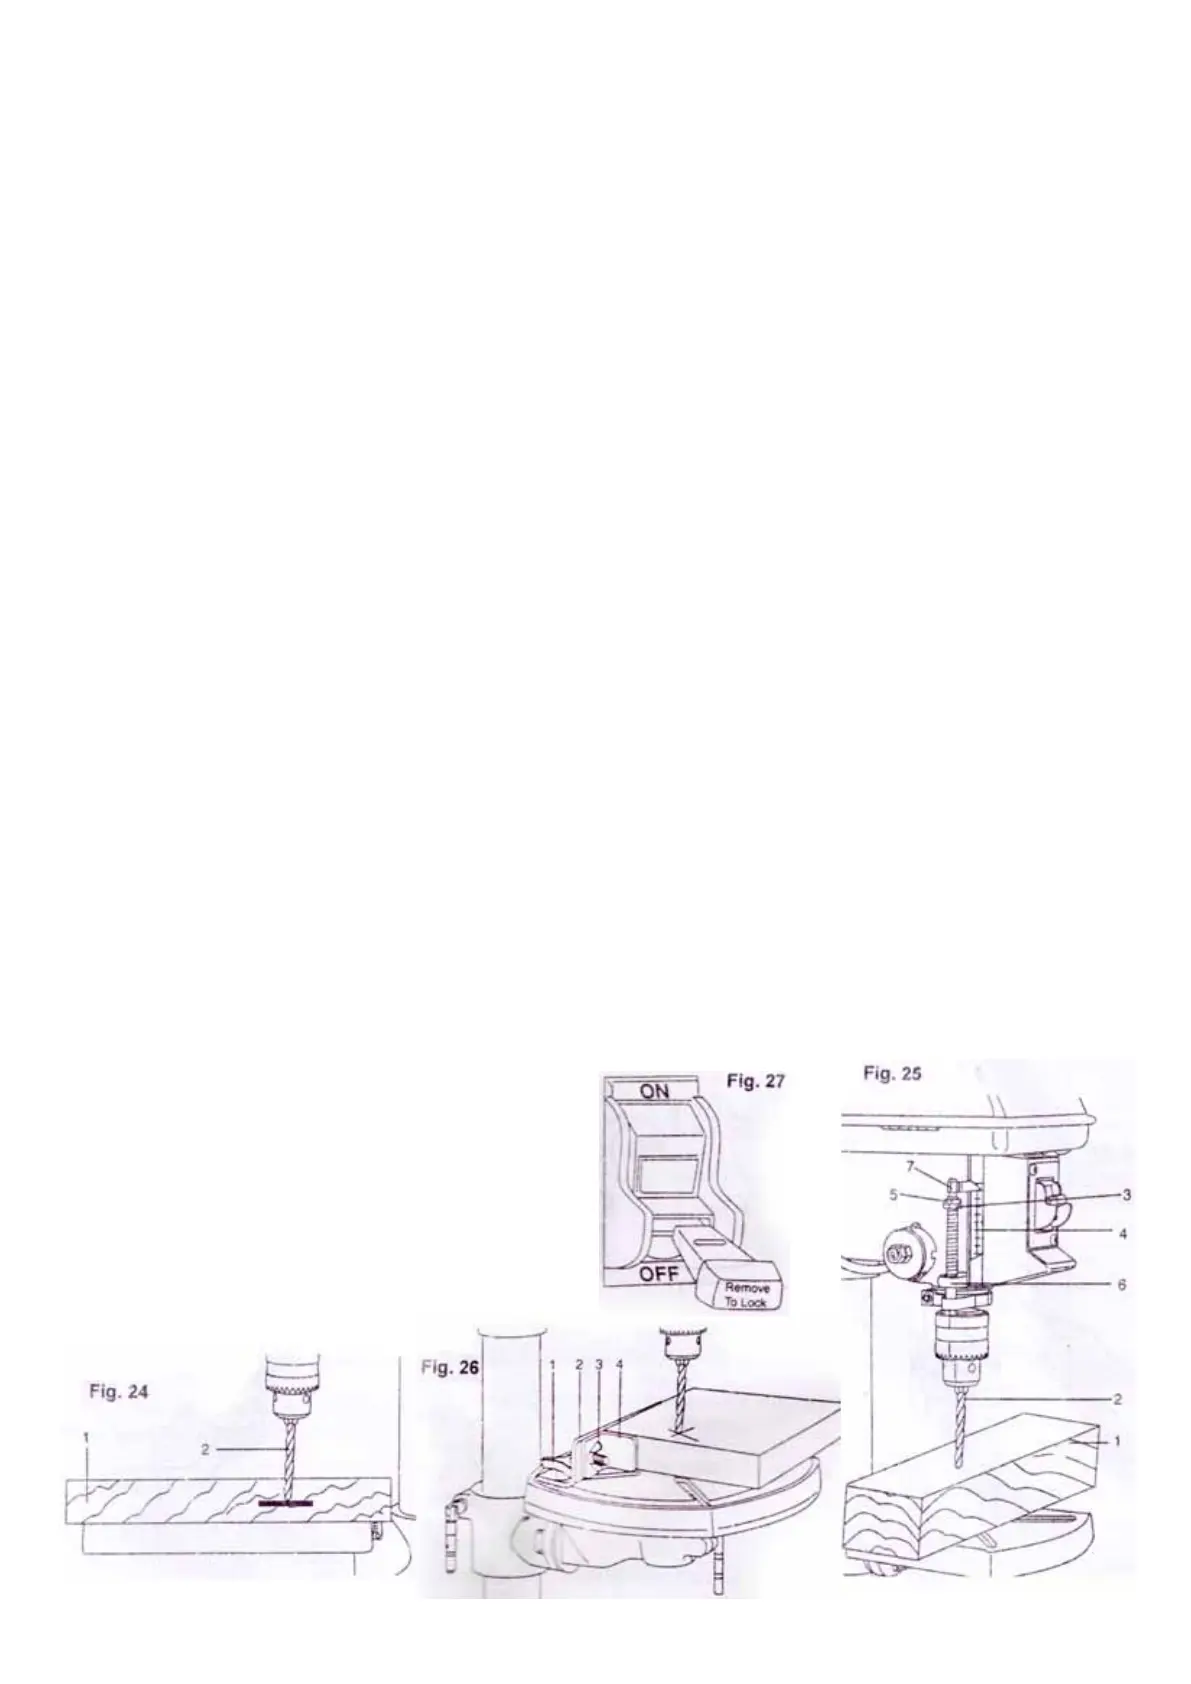
1. Turn off the drill press, turn feed handle until the depth
stop(6) points to the desired depth on the depth scale(4).
Hold the feed handles in that position.
2. Spin the lower stop nut(3) down to cantact the depth stop
(6).
3. Spin the upper stop nut(5) against the lower stop nut(3)
and tighten.
4. The drill bit will not stop after traveling the distance on the
depth scale.
Using the optional fence(Fig. 26)
Note:
The fence provides a way of accurately and quickly
setting up the workpiece for more precision or repetitive
drilling operations.
1. Use a center punch or a sharp nail to make a dent
in the workpiece where you want to drill.
2. Lower the drill bit to align with the dent on the
workpiece.
3. Loosen the knobs(1) and slide the fence back stop(2)
firmly against the long side of the workpiece.
Tighten the knob when in position.
4. Loosen the wing nut(3) and slide the end stop(4) along the
fence until it is firmly against the left side of the workpiece.
Tighten the wing nut.
5. Check the accuracy by drilling a scrap workpiece. Adjust
if needed.
6. Hold with your hand or clamp the top surface of the work-
piece firmly to prevent it from lifting off the table when the bit
is raised.
LOCKING ROCKER SWITCH (Fig. 27)
WARNING! Disconnect the drill press from the power source
before making any adjustment.
1. To turn the drill press on, insert the yellow key into the
switch housing.
2. Push the switch to the “ ON” position
3. To turn the drill press off, move the switch to the “OFF”
position.
4. To lock switch in the “OFF” position, remove the yellow key
from the switch housing. Always store the key in a safe place.
5. Never leave the drill press unattended before it has come
to a complete stop.
NO VOLT RELEASE(NVR) SWITCH(Fig. 28)
The main switch(1), No Volt Release(NVR) switch, is on the
fromt of drill head or on the side of drill head with forward/
reverse switch(2). Press “I” to turn on the power;
press “O”to turn off the power.
The 3-phase model may be equipped with a forward/
reverse switch. Be sure to turn off the main switch
before pressing the forward/reverse switch.
An interlock (micro) switch, which will cut off the
power when the lockable pulley cover is opened, is
equipped with the drill press for double protection from
the possible injury caused by the moving parts inside
the pulley cover.
1. 드릴프레스를 끄세요. 깊이 눈금을 보고 깊이 멈춤 지점(6)까지
핸들을 돌리세요. 그 위치에서 핸들을 멈추세요.
2. 아래 멈춤 너트(3)를 깊이 멈춤(6)에 닿을 때까지 돌리세요.
3. 윗 멈춤 너트(7)를 아래 멈춤 너트(3)까지 돌리고 조이세요.
4. 드릴비트가 깊이 스케일의 지점에서 더이상 멈추지 않을 겁니다.
별도 휀스 사용하기(그림. 26)
알림:
휀스는 정교하고 반복적인 드릴링 작업에서 빠르고 정확한 작업재의
세팅을 도와줍니다.
1. 센터 펀치나 날카로운 못으로 작업재의 드릴을 원하는 곳에
홈을 내 주세요.
2. 작업재의 홈으로 드릴비트를 내려 주세요.
3. 걸쇠(1)를 풀고 휀스(2)를 작업재의 긴 쪽 맞은 편 뒤로
밀어주세요. 위치를 맞췄을 때 걸쇠를 조여주세요.
4. 윙 너트(3)를 풀고 휀스를 따라서 멈춤쇠(4)를 작업재의 왼쪽
맞은편에 닿을 때까지 밀어주세요. 윙 너트를 조여주세요.
5. 드릴링의 작업재에 정확도를 확인하세요. 필요하다면 조절하세요.
6. 비트가 상승할 때 테이블에서 작업재가 들리는 것을 방지하기 위해
손이나 클램프로 작업재의 윗면을 단단히 붙잡아 주세요.
드릴프레스의 스위치(그림. 27, 28)
록커 스위치 고정(그림. 27)
주의! 조절하기 전 드릴프레스의 전원을 차단해 주세요.
1. 드릴프레스의 전원을 켜기 위해 스위치 하우징에 노란 키를
삽입하세요.
2. 스위치를 “ ON” 위치에 놓아 주세요.
3. 드릴프레스의 전원을 끄기 위해 스위치를 “OFF” 위치에
놓아 주세요.
4. “OFF”위치에 스위치를 고정시키기 위해 스위치 하우징에서
노란색 키를 제거하세요. 안전한 곳에 키를 저장하세요.
5. 드릴프레스가 완전히 멈추기 전까지 자리를 떠나지 마세요.
무전압 해방 스위치(그림. 28)
메인 스위치(1), 무전압해방 스위치(NVR)는 드릴헤드의 앞쪽이나
앞/뒤 스위치(2)와 드릴헤드의 위쪽에 있습니다. 전원을 켜기 위해
“I”를 누르세요. 전원을 끄기 위해 “O”를 누르세요.
3-phase 모델은 앞/뒤 스위치를 포함하고 있습니다. 앞/뒤 스위치를
누르기 전 메인 스위치를 확실히 꺼 주세요.
인터로크(마이크로)스위치는 풀리커버가 열려 있을 때 잠길 수
있도록 전원을 차단해줄 수 있습니다. 인터로크는 풀리커버 안에서
부품이 일어날 때 발생하는 상해를 예방하기 위해 이중 안전장치로
되어 있습니다.
 Loading...