I-RPB (04-21) 131782-A, Page 7
IMPORTANT: Top surface of curb MUST be sealed.
Refer to instructions.
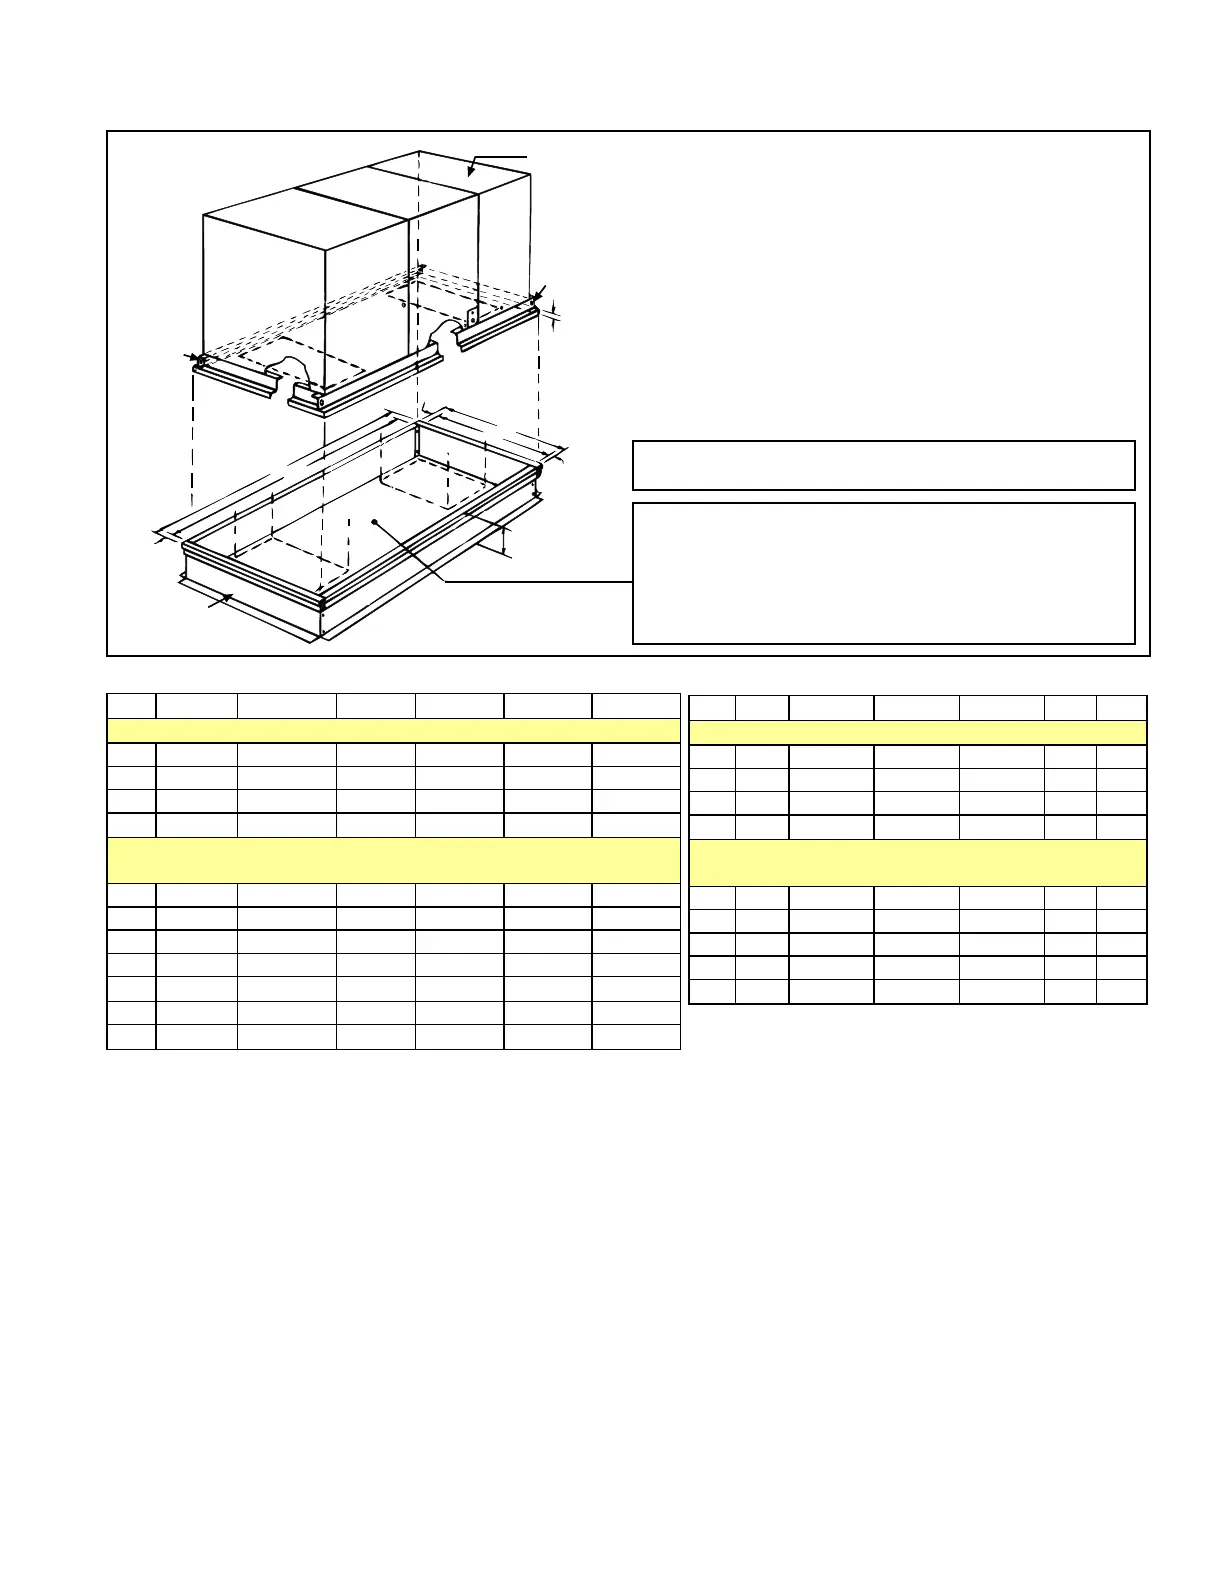
* Illustration is shown with an option AQ5
or AQ8 downturn plenum. The system
can have a variety of congurations
which aect installation.
• If the system does not have a
downturn plenum, the discharge is
horizontal.
• Downturn plenum Options AQ5 and
AQ8 are factory installed to be lifted
to the roof and set on the roof curb
as part of the packaged system.
FIGURE 3A - Optional
Roof Curb
IMPORTANT: Area enclosed by the roof curb must comply
with clearance to combustible materials. If roof is constructed
of combustible materials, area within curb must be either ven-
tilated, left open, or covered with non-combustible material
which has an "R" value of at least 5.0. If area within curb is
left open, higher radiated sound levels may result.
Roof Curb Dimensions (mm)
Size 125 150, 175 200, 225 250, 300 350 400
Option CJ1—Roof Curb for (H)RPB
A 60-5/8 60-5/8 60-5/8 60-5/8 60-5/8 60-5/8
B 24-5/16 29-13/16 35-5/16 43-9/16 49-1/16 54-1/2
C** 56-15/16 56-15/16 56-15/16 56-15/16 56-15/16 56-15/16
D** 20-9/16 26-1/16 31-9/16 39-13/16 45-5/16 50-13/16
Option CJ2—Roof Curb with Factory-Installed Downturn Plenum
Option AQ5 or AQ8
A 84-9/16 84-9/16 84-9/16 84-9/16 84-9/16 84-9/16
B 24-5/16 29-13/16 35-5/16 43-9/16 49-1/16 54-1/2
Size 125 150, 175 200, 225 250, 300 350 400
C** 80-13/16 80-13/16 80-13/16 80-13/16 80-13/16 80-13/16
D** 20-9/16 26-1/16 31-9/16 39-13/16 45-5/16 50-13/16
E 25-7/8 31-3/8 36-7/8 45-1/8 50-5/8 56-1/8
F 99-5/32 104-21/32 110-5/32 118-7/16 123-15/16 129-7/16
Size 125 150, 175 200, 225 250, 300 350 400
Option CJ1—Roof Curb for (H)RPB
A 1540 1540 1540 1540 1540 1540
B 618 757 897 1106 1246 1384
C** 1446 1446 1446 1446 1446 1446
D** 522 662 802 1011 1151 1291
Option CJ2—Roof Curb with Factory-Installed
Downturn Plenum Option AQ5 or AQ8
A 2148 2148 2148 2148 2148 2148
B 618 757 897 1106 1246 1384
Size 125 150, 175 200, 225 250, 300 350 400
C** 2053 2053 2053 2053 2053 2053
D** 522 662 802 1011 1151 1291
Roof Curb Dimensions (inches)
** C and D are roof opening dimensions.
Roof Curb Assembly
and Installation
Instructions
(FIGURES 3A and 3B)
Curbs are shipped unassembled. Field assembly and mounting on the roof are the
responsibility of the installer. All required hardware necessary to complete the assem-
bly is supplied.
Before installing roof curb, verify that the size is correct for the system being
installed.
1. Position curb cross rails and curb side rails as illustrated in FIGURE 3A. Join the
corners as illustrated in the corner detail (see FIGURE 3B).
2. Check the assembly for squareness. Adjust the roof curb so that the diagonal
measurements are equal within a tolerance of ±1/8" (3mm).
3. Level the roof curb. To ensure a good weather tight seal between the curb cap and
the roof curb, the roof curb must be leveled in both directions with no twist end to
end. Shim level as required and secure curb to roof deck before proceeding with
ashing.
4. Install eld-supplied ashing.
5. Before placing the unit into position, apply furnished 1/4" × 1-1/4" foam sealant
tape to top surface of curb, making good butt joint at corners. The unit must be
sealed to the curb to prevent water leakage into the curb area due to blown rain
and capillary action.
in this section apply to all curbs (see FIGURES 3A and 3B and the curb installation
instructions).
 Loading...