Do you have a question about the RH ST. JAMES and is the answer not in the manual?
Ensure all instructions are read carefully before beginning the assembly process.
Assembly by at least two adults is strongly advised for user safety.
Retain these assembly instructions for any future use or reference.
Utilize only the provided hardware to maintain structural integrity.
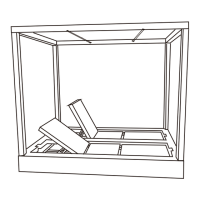
Turn bases upside down, assemble stretchers using threaded rods, washers, and nuts.
Align and secure the top stretcher with threaded rods, washers, and hex nuts.
Install the bottom stretcher using Allen bolts, lock washers, and plain washers.
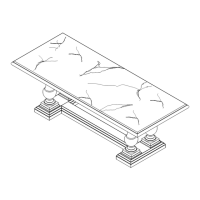
Gently lift and place the marble top onto the base, securing with Allen head bolts.
This document provides assembly instructions and care guidelines for the RH St. James 96" & 108" Marble Dining Table. It is a substantial piece of furniture designed for dining purposes, featuring a marble tabletop and a robust base structure. The table's design emphasizes stability and durability, making it suitable for regular use in a dining setting.
The RH St. James Marble Dining Table serves as a central piece of furniture for dining areas, accommodating multiple people for meals, gatherings, and other activities. Its primary function is to provide a stable and elegant surface for dining. The table's construction, involving a heavy marble top and sturdy bases connected by stretchers, ensures a solid foundation for various uses. The assembly process is designed to create a rigid structure, preventing wobbling or instability during use. The inclusion of specific hardware like threaded rods, Allen bolts, and various washers is crucial for securely joining the components, ensuring the table's long-term structural integrity. The design also incorporates locator blocks on the base's mounting plate, which are intended to facilitate the precise placement and secure attachment of the marble tabletop, ensuring it remains firmly in position.
The RH St. James Marble Dining Table is characterized by its substantial size and weight, indicating its capacity to serve as a prominent and functional piece in a dining room. The assembly instructions highlight the need for multiple people (four or more) to handle the table parts, particularly the cumbersome and heavy marble top and bases. This feature underscores the table's robust construction and the quality of materials used. The table's design, with two bases connected by top and bottom stretchers, provides excellent stability and support for the heavy marble top. The assembly sequence is logical, starting with the inverted bases and gradually building the connecting structure before the tabletop is placed. This methodical approach ensures that all components are properly aligned and secured, contributing to the table's overall stability and safety during use. The use of specific tools like wrenches and Allen wrenches, provided with the hardware, simplifies the assembly process for the user. Once assembled, the table is designed to be placed in its desired location, offering a fixed and reliable dining surface. The pre-installed locator blocks on the base's mounting plate are a thoughtful feature, simplifying the final step of attaching the marble top by guiding it into the correct position. This ensures a secure and flush fit, preventing any movement of the tabletop relative to the base. The table's aesthetic, with a marble top, suggests a sophisticated and timeless design that can complement various interior decor styles.
Maintaining the RH St. James Marble Dining Table involves simple yet specific care practices to preserve its appearance and longevity. The care instructions emphasize the use of a clean, soft, dry, and lint-free cloth for regular dusting. This gentle approach helps prevent scratches or damage to the marble surface and the lacquered finish of other components. For spills, immediate blotting with a clean, damp cloth is recommended. This quick action is crucial for marble, as it can be susceptible to staining if liquids are left to sit for extended periods. The instructions explicitly advise against the use of chemical cleansers, abrasives, or furniture polish on the lacquered finish. This is a critical maintenance feature, as harsh chemicals or abrasive materials can damage the surface, dull its shine, or strip away protective coatings. Adhering to these guidelines ensures that the table's finish remains intact and its aesthetic appeal is preserved over time. The marble top, while durable, benefits from these careful cleaning practices to maintain its natural beauty and prevent etching or discoloration. The overall maintenance philosophy for this table is geared towards gentle, non-abrasive cleaning to protect its high-quality materials and finishes.
| Category | Indoor Furnishing |
|---|---|
| Brand | RH |
| Name | ST. JAMES |
| Type | Chair |
| Frame Material | Kiln-dried Hardwood |
| Seat Fill | Foam |
| Seat Construction | 8-way hand-tied spring suspension |