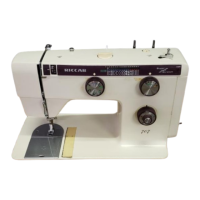
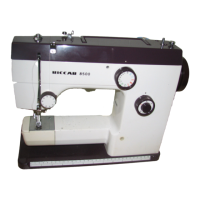
This document is an instruction manual for Riccar sewing machines, specifically models 807 (Super Z) and 707 (Stretch). It provides comprehensive guidance on the machine's parts, functions, operation, and maintenance, covering a wide range of sewing applications from basic straight stitching to intricate embroidery.
Function Description:
The Riccar 807 and 707 are zigzag sewing machines designed for various sewing tasks. They are capable of producing a wide array of stitch patterns, including straight stitches, zigzag stitches, and specialized decorative stitches. The machines are built with high-quality materials and functional design to ensure operating efficiency and dependable service. They are suitable for both basic sewing and more advanced techniques, allowing users to create professional-looking seams and embellishments.
Important Technical Specifications:
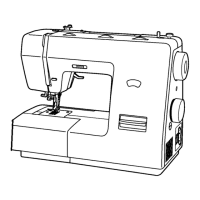
The manual details various controls and adjustments that define the machine's technical capabilities:
- Buttonhole Dial: Releases the Selector Knob for stitch pattern selection. It has specific marks ("F", blue, red) for different settings.
- Selector Knob: Used to select the desired stitch pattern, with a pointer moving along a scale.
- Stitch Length Adjuster: Varies stitch length, particularly for super zigzag stitching (patterns 13-17), allowing for diversified stitch patterns.
- Zigzag Dial: Controls the zigzag width, ranging from "O" for straight stitching to "5" for maximum width.
- Stitch Length Dial: Controls stitch length. Setting it to "O" stops fabric feeding, while larger numbers extend the stitch length.
- Reverse Feeding Button: Allows for reverse stitching as long as pressed, resuming forward sewing upon release. It can also vary buttonholing stitch length.
- Drop Feed Knob: Pulling it drops the feed dog to stop fabric feeding (for free embroidery or buttoning), while pushing it raises the feed dog for normal fabric feeding.
- Dial Tension: Regulates the tension of the upper thread.
- Bobbin Winder: Used for winding the lower thread onto the bobbin.
- Needle Compatibility: The manual provides a detailed chart for matching needle size (No. 9 to 16), fabric type (very light crepe de chine to heavy overcoat stuff), and thread type (Nos. 100-120 cotton to 30-40 silk thread, nylon thread). Ball point needles are recommended for tricot, knitted fabrics, and elastic materials to prevent damage and skip-stitching.
- Twin Needle Capability: The machines support twin needle sewing for various patterns, with specific limitations on zigzag width (never above "3" for twin-needle sewing to prevent needle breakage).
Usage Features:
The manual outlines numerous usage features and applications:
- Snap-On Sewing Table: Can be attached for a larger sewing surface or removed for free arm sewing. It also functions as an accessory box.
- Power Source Connection: Instructions for connecting the machine to power, with a safety caution to unplug when not in use.
- Lamp Switch: Controls the machine's light.
- Speed Selector Button: Allows selection between fast and slow speed ranges.
- Controller Pedal: Regulates operating speed based on pressure applied.
- Presser Foot System: Features a one-touch lever for easy removal and attachment of various presser feet. The shank can also be removed for specific tasks.
- Quilter: Can be inserted behind the shank for quilting.
- Needle Setting: Detailed instructions for correctly positioning the needle with its flat side facing away from the user.
- Bobbin Winding: Step-by-step guide for winding the bobbin, including threading and engagement on the spindle.
- Bobbin Insertion: Instructions for inserting the bobbin into the bobbin case and then into the shuttle hook, ensuring proper thread direction and tension.
- Upper Threading: A numbered sequence for threading the upper thread, emphasizing the importance of engaging all thread guides for smooth sewing.
- Drawing Up Lower Thread: Procedure to bring the lower thread up through the needle plate.
- Presser Foot Pressure Adjustment: A dial to adjust pressure based on fabric weight, from lighter (1-2) to heavier (4) fabrics.
- Stitch Pattern Selection: Guides on using the Buttonhole Dial and Selector Knob to choose from 17 different stitch patterns, categorized into Manual Zigzag, Zigzag Pattern, and Super Zigzag Pattern Stitching.
- Straight Stitching: Uses orange-colored marks on the dials. Recommends using a special needle plate for neater straight stitches.
- Changing Needle Plate: Instructions for removing and attaching needle plates.
- Starting to Sew: Basic steps for beginning a sewing project, including raising the presser foot, positioning fabric, and using the controller.
- Changing Sewing Direction: Steps for sewing corners by stopping, raising the presser foot, changing direction, and restarting.
- Reverse Stitching: Achieved by pressing the reverse feeding button, useful for securing seams.
- Removing Fabric: Instructions for safely removing fabric after sewing.
- Thread Tension Adjustment: Guidance on adjusting upper and lower thread tensions to achieve balanced stitches, with visual examples of too tight, balanced, and too loose tensions.
- Zigzag Stitching: Detailed instructions for manual, pattern, and super zigzag stitching, emphasizing thread tension adjustment for zigzag patterns.
- Manipulating Zigzag Dial While Sewing: Allows for varying zigzag width to create different patterns, useful for free embroidering.
- Satin Stitch: Achieved by dense zigzag stitches where the fabric underneath is invisible.
- Applications: The manual covers a wide range of applications, including elastic straight stitching, walking foot usage for slippery fabrics, blind stitching, elastic blind stitching, overcasting edges, cording, buttoning, buttonholing, zipper sewing and piping, hemming, shell tucking, pin tucking (straight and zigzag), bobbin-cording, smocking, applique, cutwork, drawn work, and free hand embroidery. Each application includes specific dial settings and procedural steps.
Maintenance Features:
The manual provides detailed instructions for maintaining the machine to ensure longevity and optimal performance:
- General Oiling: Recommends regular oiling (daily for heavy use, monthly for light use) using sewing machine oil or high-quality refined mineral oil. Oiling points are indicated with arrows on illustrations for the face plate area, arm, and bed.
- Cleaning: Emphasizes keeping the machine clean, especially the shuttle hook area and feed dog.
- Cleaning Shuttle Hook and Feed Dog: Instructions for removing parts (needle, presser foot, needle plate, bobbin case, shuttle race cover, shuttle hook) and cleaning them with a brush and oily cloth.
- Freeing Jammed/Entwined Thread: Steps to release jammed thread in the shuttle hook or cut entwined thread.
- Caution: Always unplug the power cord before any repair, cleaning, or oiling. Avoid pouring too much oil directly into the shuttle hook area to prevent thread oiling. Do not forcibly remove the shuttle hook.