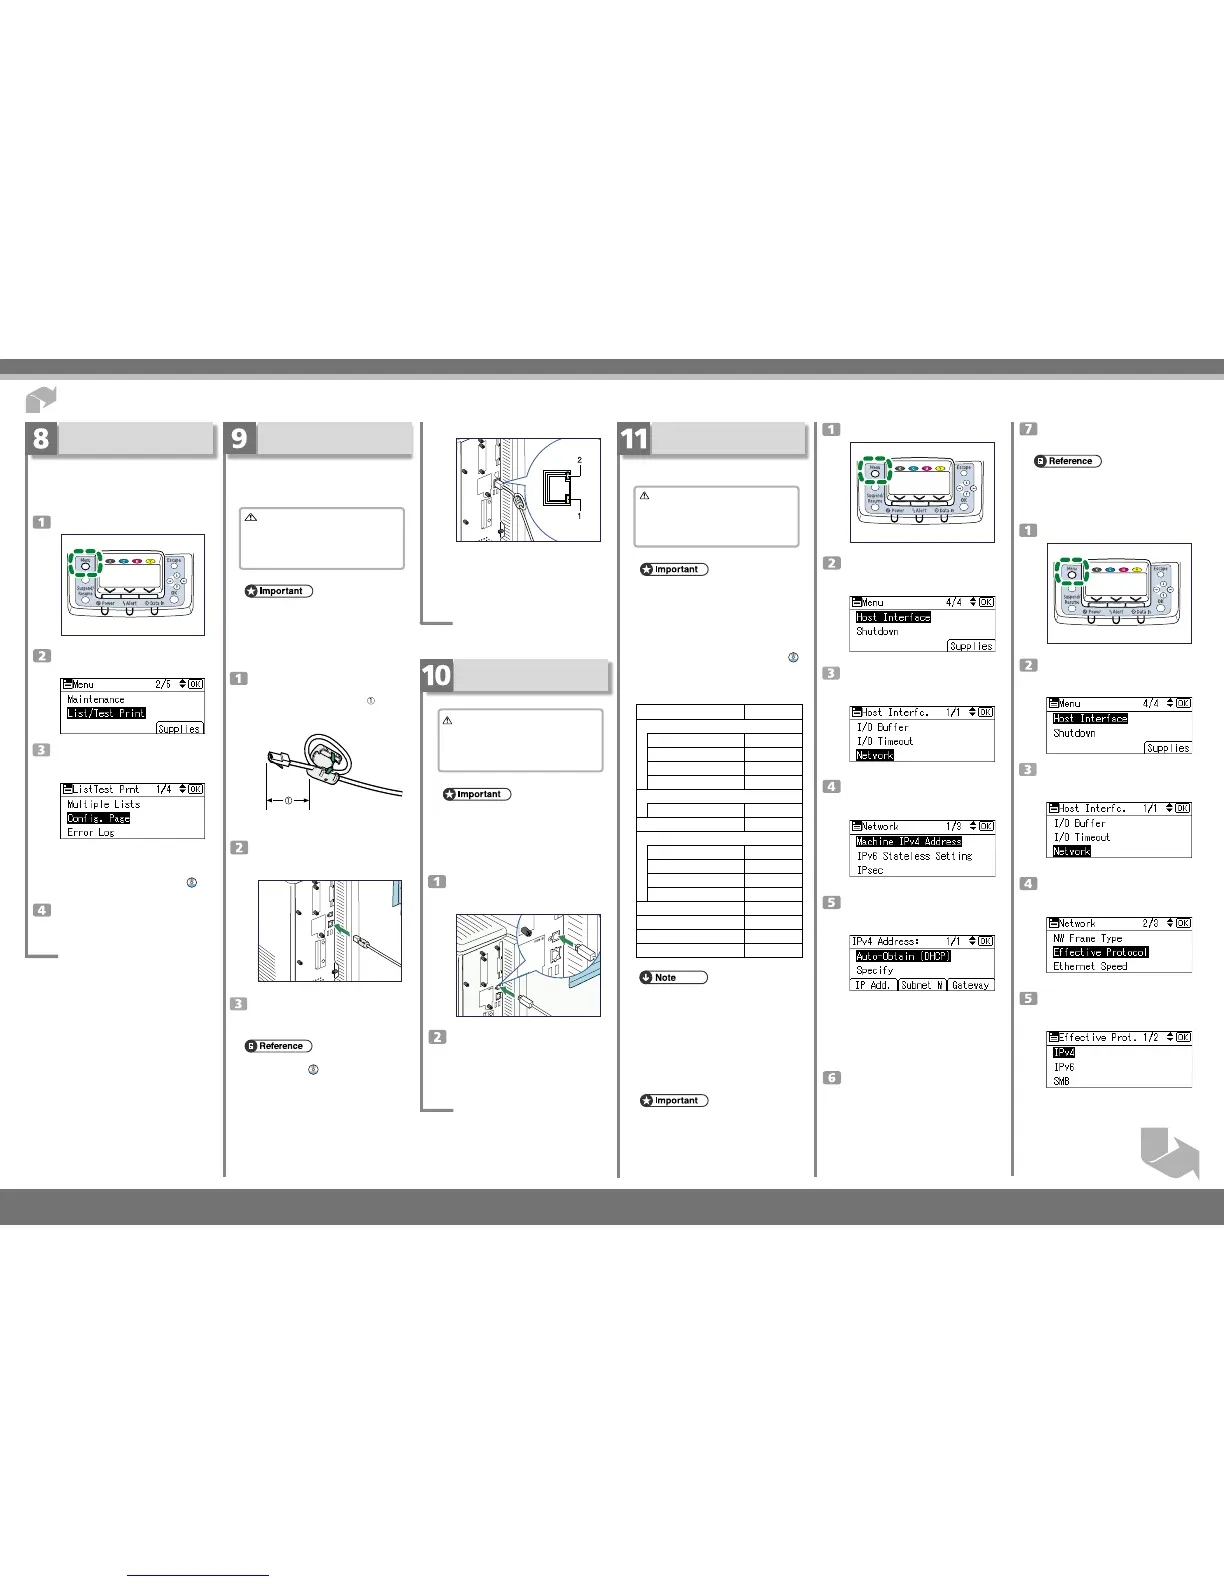
Press the
{{
{{
{▼
}}
}}
} or
{{
{{
{▲
}}
}}
} key to select
[Host Interface], and then press the
{{
{{
{
OK
}}
}}
} key.
Press the
{{
{{
{▼
}}
}}
} or
{{
{{
{▲
}}
}}
} key to select
[Network], and then press the
{{
{{
{
OK
}}
}}
}
key.
Press the
{{
{{
{▼
}}
}}
} or
{{
{{
{▲
}}
}}
} key to select [Ma-
chine IPv4 Address], and then press the
{{
{{
{
OK
}}
}}
} key.
Press the
{{
{{
{▼
}}
}}
} or
{{
{{
{▲
}}
}}
} key to select [Auto-
Obtain (DHCP)], and then press the
{{
{{
{
OK
}}
}}
} key.
The printer will automatically receive an IP address.
To check the detected addresses, press the following:
• [IP Add.] : IP address
• [Subnet M] : Subnet mask
• [Gateway] : Gateway address
Press the
{{
{{
{
Menu
}}
}}
} key to return to the
initial screen.
Network Connection
Prepare a hub and other network devices, and con-
nect the Ethernet cable to the printer. Connect
10BASE-T or 100BASE-TX cable to the printer’s
Ethernet port.
Caution
•
Properly shielded and grounded cables and
connectors must be used for connections to a
host computer (and/or peripheral) in order to
meet FCC emission limits.
• The Ethernet cable must be an Unshielded Twisted
Pair cable (UTP) or Shielded Twisted Pair cable
(STP), and Category type 5 or more.
• An Ethernet cable is not supplied with this printer.
Select your cable according to the network environ-
ment.
Attach the ferrite core supplied with this
printer at the printer end of the Ethernet
cable about 5 cm (2.5 inches) (
) from
the connector, making a loop as shown.
BBM011S
Connect the Ethernet cable to the
Ethernet port that is located on the left
side of the printer.
BMV182S
Connect the other end of the cable to the
network, for example using a hub.
• For details about network environment settings, see
Software Guide (
).
Ethernet Configuration
Configure the following network settings according
to the network environment using the control panel.
Caution
•
Properly shielded and grounded cables and
connectors must be used for connections to a
host computer (and/or peripheral) in order to
meet FCC emission limits.
• After configuring the network setting, configure the
security settings.
• We recommend that you first make the following set-
ting.
• Installing the server certificate
• Enabling SSL
• Changing the administrator’s user name and pass-
word using Web Image Monitor. For details, see
“Setting Up the Machine”, Security Guide (
).
• The following table shows the control panel
settings and their default values.
These items appear in the [Host Interface] menu.
Setting Name Default
•
Machine IPv4 Address
DHCP On
IPv4 Address 11.22.33.44
Subnet Mask 0.0.0.0
Gateway Address 0.0.0.0
•
IPv6 Stateless Setting
Stateless set Active
•
IPsec Inactive
•
Effective Protocol
IPv4 Active
IPv6 Inactive
SMB Active
AppleTalk Inactive
•
Ethernet Speed Auto Select
•
IEEE802.1X Auth.(Ethernet)
Inactive
•
Restr.IEEE802.1X Auth.Def. -
•
LAN Type Ethernet
• If DHCP is in use on your network, the IP address,
subnet mask, and gateway address are all set auto-
matically.
• If the printer is already placed on a TCP/IP-capable
environment, you can also use SmartDeviceMonitor
for Admin or a Web browser to configure IP address-
related settings.
❖
Receiving an IP Address Automatically
(DHCP)
• When [DHCP] is selected, you cannot configure set-
tings for the following items:
• IP Address
• Subnet Mask
• Gateway Address
• Consult your network administrator for information
about configuring network settings.
Quick Installation Guide
Test Printing
Print a test print in order to verify that the printer is
working normally. Test printing checks printer per-
formance only; it does not test the connection to the
computer.
Press the
{{
{{
{
Menu
}}
}}
} key.
BMW028S
Press the
{{
{{
{▼
}}
}}
} or
{{
{{
{▲
}}
}}
} key to select [List/
Test Print], and then press the
{{
{{
{
OK
}}
}}
} key.
Press the
{{
{{
{▼
}}
}}
} or
{{
{{
{▲
}}
}}
} key to select
[Config. Page], and then press the
{{
{{
{
OK
}}
}}
}
key.
The configuration page will be printed.
If printing is not normal, check if an error message
appears on the display. If there is an error message,
see “Troubleshooting”, Hardware Guide (
).
Press the
{{
{{
{
Menu
}}
}}
} key to return to the
initial screen.
❖
Reading the LED Lamps
BMV184S
1. Yellow: turns on when 100BASE-TX is in use. It
turns off when 10BASE-T is in use.
2. Green: turns on when the printer is properly
connected to the network.
USB Connection
Caution
•
Properly shielded and grounded cables and
connectors must be used for connections to a
host computer (and/or peripheral) in order to
meet FCC emission limits.
• A USB cable is not supplied with this printer. Select
your cable according to the computer.
• USB connection is possible under Windows 2000/
XP/Vista, Windows Server 2003/2003 R2/2008, Mac
OS 9, and Mac OS 10.3.3 or later.
• USB connection with Mac OS is only possible via
the printer's USB port.
Connect the square-shaped connector of
the USB cable to USB port B on the left
side of the printer.
BMV186S
Connect the opposite end's flat connector
to the desired device such as your
computer's USB interface, or a USB hub.
Print a configuration page to confirm
the settings.
• For details about printing the configuration page,
see “Test Printing”.
❖
Specifying an IP Address (No DHCP)
Press the
{{
{{
{
Menu
}}
}}
} key.
BMW028S
Press the
{{
{{
{▼
}}
}}
} or
{{
{{
{▲
}}
}}
} key to select
[Host Interface], and then press the
{{
{{
{
OK
}}
}}
} key.
Press the
{{
{{
{▼
}}
}}
} or
{{
{{
{▲
}}
}}
} key to select
[Network], and then press the
{{
{{
{
OK
}}
}}
}
key.
Press the
{{
{{
{▼
}}
}}
} or
{{
{{
{▲
}}
}}
} key to select
[Effective Protocol], and then press
the
{{
{{
{
OK
}}
}}
} key.
Press the
{{
{{
{▼
}}
}}
} or
{{
{{
{▲
}}
}}
} key to select the
appropriate network protocol, and
then press the
{{
{{
{
OK
}}
}}
} key.
CLP340D/CLP350D/C8140
N
D/C8150
N
D/
LP540
C
/LP550
C
/Aficio SP C820DN/SP C821DN

 Loading...


