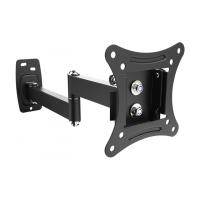
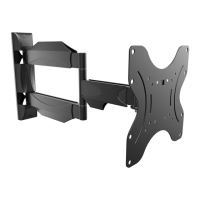
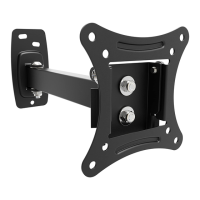
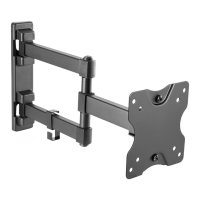
11
22
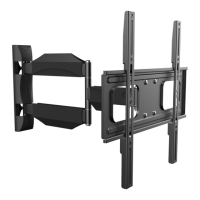
180°
Swivel
Schwenkung
±
15°
Tilt
Neigung
50 mm
10 mm
SCHRITT 3 A
STEP 3 A
Solid concrete mounting
Befestigung an der Massivbetonwand
!
Please measure distance between mounting holes!
Bitte den Lochabstand vor der Montage nachmessen!
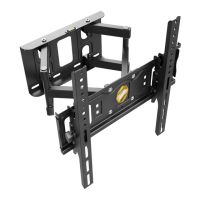
Display back
Bildschirm Rückseite
VESA-Mounting holes
VESA-Befestigungslöcher
Please check BEFORE installation distance between
mounting holes on your display!
Bitte überprüfen Sie VOR der Montage
den Lochabstand zwischen den Befestigungslöchern
an Ihrem Bildschirm
This wall mount supports the following distance between holes:
Diese Wandhalterung unterstützt folgende Lochabstände:
Horizontal / Waagerecht:
Vertical / Senkrecht:
min. 60 mm - max. 400 mm
min. 150 mm - max. 400 mm
SCHRITT 1
STEP 1
Drilling
Bohrung
SCHRITT 3 B
STEP 3 B
Wood stud mounting
Befestigung an der Holzbalkenwand
or
oder
Wood stud
Holzbalken
Stud finder
Balkenfinder
50 mm
5 mm
Drilling
Bohrung
1
2
3
SCHRITT 2
STEP 2
Affixing the bubble level
Anbringung der Wasserwaage
Wall plate
Wandplatte
S C H R IT T
S T E P 4
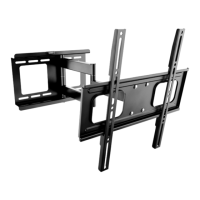
Wall mount: front view
Wandhalterung: Frontansicht
Front plate
Frontplatte
Wall plate
Wandplatte
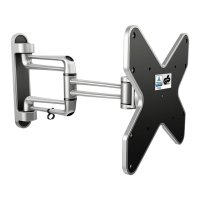
X
Y
X=Y
Alignment of front panel
Ausrichtung der Frontplatte
±
6°
±
6°
Rotation
Drehung
Scope of the delivery
Lieferumfang
Wall mount (pre-assembled)
Wandhalterung (vormontiert)
Plastic cover R1
Plastikabdeckung R1
2 pcs/Stk.
4
O
Concrete Wall
Betonwand
v.17.07
Für Erleichterung der Montage wird eine Wasserwaage mitgeliefert. Wir empfehlen jedoch den Einsatz einer professionelen Wasserwaage.
For convenience of mounting a spirit level is included. We recommend using a professional level.
Plastic cover R2
Plastikabdeckung R2
1 pcs/Stk.
Mounting rails
Montageschienen
2 pcs/Stk.
Plastic cover R3
Plastikabdeckung R3
2 pcs/Stk.
C
A
B
G
4 x
B
4 x
C
4 x
G
4 x
A
Horizontal / Waagerecht
Vertical /
Senkrecht
Place bubble level central on
the top of the wall plate
Bringen Sie die Wasser-
waage mittig oben auf der
Wandplatte an.
The installation of this product may only be carried out by skilled personnel / specialist fitter!
Warning: Supplied plastic anchors are only suitable for solid concrete walls!
Die Montage dieses Produktes darf nur durch Fachpersonal / Fachmonteur erfolgen!
Achtung: Mitgelieferte Dübel sind nur für Massivbetonwände geeignet!
Please note: The numbering on the plastic bag
may differ / completely missing!
Bitte beachten: die Durchnummerierung auf dem
Plastikbeutel kann abweichen / komplett fehlen!
!
P
Q
Allen key
Inbusschlüssel
1 pcs/Stk.
Screw plastic cap (application as required)
Schrauben-Plastikkappe (Anwendung nach Bedarf)
4 pcs/Stk.
S2644
Assembly manual
Montageanleitung
DE
EN
A B C D E F
I J K L M
G
M5 x 30MM
4 pcs/Stk.
M5 x 16MM
4 pcs/Stk.
M6 x 16MM
4 pcs/Stk.
M6 x 30MM
4 pcs/Stk.
M8 x 30MM
4 pcs/Stk.
M4 x 16MM
4 pcs/Stk.
H
Metal washer
Metallscheibe
4 pcs/Stk.
Plastik washer
Plastikscheibe
8 pcs/Stk.
M8
4 pcs/Stk.
S10
4 pcs/Stk.
Bubble Level
Wasserwaage
1 pcs/Stk.
Plain washer
Unterlegscheibe
4 pcs/Stk.
N
O
Plastic spacer
Abstandshalter
10mm
8 pcs/Stk.
Plastic spacer
Abstandshalter
5mm
8 pcs/Stk.
M8 x 50MM
4 pcs/Stk.
Loosen the shown screws in
the middle of front panel
and align the front plate making sure
that it is parallel to the wall plate.
After the alignment tighten all
4 screws at medium strength.
Lockern Sie die gezeigten
Schrauben in der Mitte der Frontplatte
und richten Sie die Frontplatte so aus,
dass diese parallel zur Wandplatte ist.
Ziehen Sie nach der Ausrichtung alle
4 Schrauben wieder mittelfest an.
Warning: Supplied plastic anchors are only suitable for solid concrete walls!
Achtung: Mitgelieferte Dübel sind nur für Massivbetonwände geeignet!
C
B
G
4 x
B
4 x
C
4 x
G
0 x
A