Do you have a question about the RIDGID RT1600 and is the answer not in the manual?
Instructions for assembling the casters and caster feet onto the dust drum.
Guide on how to attach and detach the powerhead assembly from the dust drum.
Detailed steps for inserting and removing the professional locking hose.
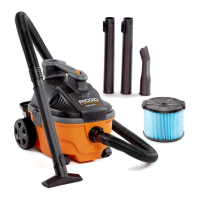
Steps to install the accessory caddy onto the dust drum.
Guidelines for effectively vacuuming dry materials using the filter.
Procedures for vacuuming liquids, including filter precautions.
Information on filter maintenance, removal, and installation for optimal performance.
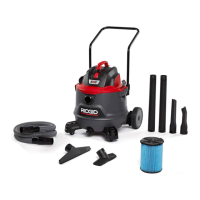
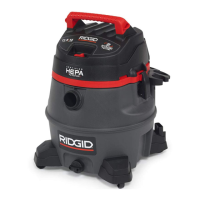
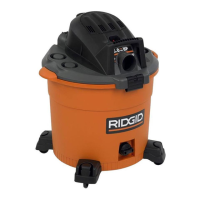
This document is an owner's manual for a RIDGID 16 U.S. Gallon / 60 Liter Detachable Wet/Dry Vac, Model Number RT16000. It provides essential information for the safe and effective operation, assembly, maintenance, and repair of the device.
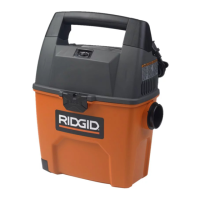
The Wet/Dry Vac is a versatile cleaning appliance designed for household use. Its primary function is to vacuum both wet and dry materials, making it suitable for a wide range of cleaning tasks. Additionally, it features a detachable blower, expanding its utility for applications like yard work, patio cleanup, and blowing dust and debris from various surfaces.
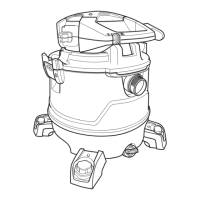
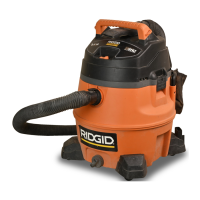
The manual details the process of getting to know the Wet/Dry Vac, identifying its various components such as the powerhead assembly, drum latches, inlet port, blowing port, caster feet/storage, casters, drain, dust drum, accessory caddy, detachable blower carry handle, power cord, power cord wrap, ON/OFF switch, and detachable blower latch.
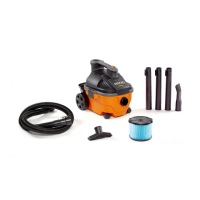
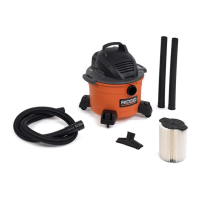
Accessories included with the vac enhance its functionality. These include a Professional Locking Hose (48mm (1-7/8") x 2.4 m (8')) for vacuuming and blowing, extension wands for added reach, a blower wand to concentrate airflow for blowing tasks, a wet nozzle for picking up liquids on smooth surfaces, a utility nozzle for general vacuuming, and a car nozzle for cleaning car interiors and upholstery.
Assembly instructions cover the installation of casters and caster feet, which involves turning the dust drum upside down, inserting caster stems into caster foot sockets, and pressing them until they snap into place. The accessory caddy is installed by aligning its tabs with slots on the rear of the dust drum and pivoting it upward until the locking tabs engage.
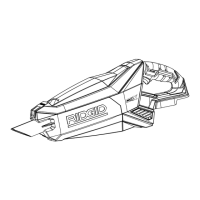
Attaching and removing the powerhead assembly to the dust drum is a straightforward process: the powerhead is placed on top of the drum, aligning its extended lip with the inlet, and then the two latches on either side of the drum are pressed until they snap into place. Removal involves pulling out the latches and lifting the powerhead.
Locking accessories are designed to prevent them from falling off during use. To connect an accessory, its nozzle ridges are aligned with the release button of an extension wand, and then pressed to secure. Disconnecting involves twisting the nozzle and extension wand to disengage the ridges or pressing the release button.
The professional locking hose is inserted by aligning its end with the drum inlet and positioning the hose release button with the ridges on the vac inlet, then pushing until it fully engages. To remove, the hose end is rotated in either direction to release the latch and then pulled straight out.
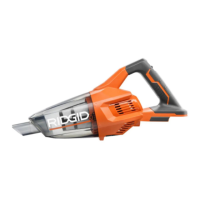
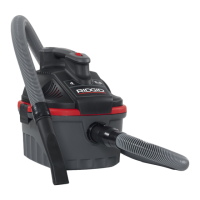
The detachable blower can be removed from the powerhead assembly by pressing down on the detachable blower latch under the handle and lifting the blower off. To replace, the blower is positioned above the indented area of the powerhead, rotated down until it stops, and then lightly pressed until the latch snaps into place.
Operation instructions emphasize safety, starting with warnings about unattended operation, flammable materials, toxic vapors, and electrical shock. The vac features a polarized plug for electrical safety. To turn on the unit, the switch is slid from "O" to "I".
For dry material vacuuming, the filter must always be correctly installed. Regular cleaning of the drum and filter is recommended for peak performance, especially with fine dust. A wet filter should not be used for dry material pickup.
When vacuuming liquids, small amounts do not require filter removal. For larger quantities, the filter should be removed, but the filter cage and float must remain in place to prevent saturation. The float mechanism will cut off airflow when the drum is full, indicated by a change in motor sound.
Emptying the drum involves unplugging the power cord, positioning the vac near a drain, removing the drain cap, lifting the powerhead assembly, and then using the dust drum handles to lift and empty the drum. The manual cautions against carrying a full vac by the detachable blower handle due to weight.
The blowing feature allows the detachable blower to be used independently. The blower wand can be inserted into the blowing port and turned clockwise to lock. Alternatively, the seven-foot hose can be installed in the blowing port, with an extension wand and/or car nozzle added to the other end for concentrated airflow. The blower is turned on by sliding its handle switch to the "I" position.
Accessory and hose storage is facilitated by placing extension wands and other accessories over the posts on the caster feet. The accessory caddy provides additional storage, with the blower wand fitting the center opening and other accessories snapping into side clips. The power cord is stored by wrapping it around the detachable blower cord wrap tabs and securing it with the cord clip on the plug. The professional locking hose can be stored around the powerhead assembly and snapped into the hose storage clip at the rear.
Maintenance instructions are crucial for prolonging the life and performance of the Wet/Dry Vac.
For the detachable blower intake, regular examination for dust and debris is recommended. To clean the foam pad under the intake shield, three screws holding the intake shield are removed, the shield and foam pad are lifted off, and the foam pad is cleaned in warm soapy water, then allowed to dry. The foam pad should be examined for reuse, and replaced if necessary. The intake shield and screws are then reinstalled. The manual explicitly warns against operating the blower without reinstalling the intake shield.
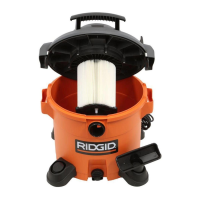
Filter maintenance is detailed for the Qwik Lock™ filter. The filter is made of high-quality paper for stopping small dust particles and can be used for both dry and small amounts of liquid pickup. Care should be taken when handling the filter to avoid creases.
To remove the filter, fingers are placed under the two filter tabs, and with a thumb on the Qwik Lock™ stud, the tabs are lifted while pushing down on the stud to release the filter from the filter cage, then slid off. Reinstalling the filter involves carefully sliding it over the filter cage, aligning the Qwik Lock™ stud with the center hole, and ensuring the rubber gasket at the bottom seats around the base of the filter cage. The integrated filter plate is then firmly pressed down until it snaps into place. Failure to properly seat the gasket and filter plate can lead to debris bypassing the filter. The manual warns against operating the vac without the filter cage and float in place to prevent liquid from damaging the motor. Frequent filter cleaning is advised for peak performance.
Cleaning a dry filter can sometimes be done by slapping the lid of the vac when it's off. For best results, the filter should be cleaned outdoors by gently tapping it against the inside wall of the dust drum to loosen debris. For thorough cleaning of fine dust, water can be run through it as described for wet filters.
Cleaning a wet filter involves running water through it from a hose or spigot, taking care not to use excessive pressure that could damage the filter. After cleaning, the filter should be checked for tears or holes, as even small damage can allow dust to escape. The filter must be allowed to dry completely before reinstalling and storing or picking up dry debris.
The manual concludes with a general warning that all maintenance, repairs, and adjustments should be performed by Authorized Service Centers using RIDGID replacement parts to ensure product safety and reliability.
| Type | Wet/Dry Vacuum |
|---|---|
| Tank Capacity | 16 gallons |
| Hose Length | 7 feet |
| Motor | Induction Motor |
| Filter Type | Fine Dust |