EasyManua.ls Logo

Rightline Gear 110907 User Manual

Default Icon
2 pages
To Next Page IconTo Next Page
Page #1 background imageLoading...
Page #1 background image
1-Lay out the tent over a at area free from rocks and
sticks.
2-Thread the top pole (with (2) plastic end caps) through
the top pole sleeve and the (2) awning pole sleeves.
3-Thread the (2) end poles through the end pole sleeves.
Line up the end poles’ bent ferules (Fig 1) with the top
pole (Fig 2).
8-Buckle the upper sleeve’s (2) top straps around the roof
rack’s rear cross bar (Fig 8). Adjust the location of the rear
cross bar if necessary. If the vehicle is without a cross bar,
clip the extension straps into the top straps and attach the
extension straps’ J-hooks to the vehicle’s windshield wipers
(Fig 9 and Fig 10).
11-Attach the A and B straps to the vehicle’s wheel well
and tighten (Fig 13).
SUV Tent Set Up Guide
Fig 2
Fig 5
Fig 9
Fig 6
7-Back up the vehicle until its bumper touches the lower
sleeve (Fig 6). Place the upper sleeve over the raised rear
hatch door (Fig 7).
Set Up The Tent
4-Place the top pole’s ends
into the awning pockets
(Fig 3).
5-Raise the tent by bending the end poles until they go
over their corresponding pole pins (Fig 4)*.
6-Attach the pole clips to the end poles (Fig 5).
9-Center the tent on the back of the vehicle. Make sure the
lower sleeve is above the vehicle’s mufer. Lower the rear
hatch door just enough to buckle the lower sleeve’s E strap
over it (Fig 11). Adjust the strap to provide a snug t when
the rear hatch door is raised again.
CAUTION: Don’t use excessive force when bending the
tent poles. Make sure the pole sleeves slide over the
poles without hanging up.
Fig 3
Fig 7
Fig 10
Fig 8
Fig 11
*If setting up solo, it may be helpful to stake down the
tent’s (4) corners before bending the end poles (remove
the stakes once the tent has been raised).
Fig 4
10-Attach the lower sleeve’s F and G straps to the inside
of the vehicle’s cargo area (Fig 12).
Fig 12
12-Run the C strap under the vehicle’s wheel well, clip it
to the D strap, and tighten (Fig 13).
13-Repeat steps 11 and 12 on the other side of the
vehicle.
Top
Pole
Bent
Ferules
End Pole
Pole Pin
Lower
Sleeve
Upper
Sleeve
Fig 13
E
F
G
F
B
A
C
D
Bent Ferule
Fig 1
End Pole
End Pole
Awning
Awning
Question and Answer IconNeed help?

Do you have a question about the Rightline Gear 110907 and is the answer not in the manual?

Rightline Gear 110907 Specifications

General IconGeneral
BrandRightline Gear
Model110907
TypeSUV Tent
MaterialPolyester
Floor MaterialPolyethylene
ColorGray
Weather ProtectionWater-Resistant

Summary

Set Up The Tent

Initial Tent Layout

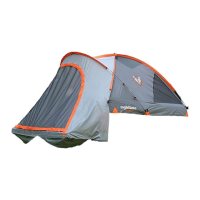
Lay out tent on a flat area, free from rocks and sticks.

Thread Top Pole and Awning Poles

Thread the top pole through its sleeve and the two awning pole sleeves.

Thread End Poles and Align

Thread end poles through sleeves and align their bent ferules with the top pole.

Insert Top Pole Ends

Place the top pole's ends into the awning pockets.

Raise Tent Structure

Raise the tent by bending end poles until they go over their corresponding pole pins.

Attach Pole Clips

Attach the pole clips to the end poles.

Position Vehicle for Hatch Attachment

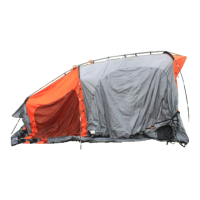
Back up the vehicle until its bumper touches the lower sleeve.

Secure Upper Sleeve to Roof Rack

Buckle the upper sleeve's top straps around the roof rack's rear cross bar.

Center Tent and Secure Lower Sleeve

Center tent, ensure lower sleeve is above muffler, buckle lower sleeve E strap.

Secure Lower Sleeve Straps

Attach lower sleeve's F and G straps to the inside of the vehicle's cargo area.

Attach Wheel Well Straps

Attach the A and B straps to the vehicle's wheel well and tighten.

Secure C Strap Under Wheel Well

Run the C strap under the wheel well, clip it to the D strap, and tighten.

Repeat Side Attachments

Repeat steps 11 and 12 on the other side of the vehicle.

Stake Tent Corners and Lines

Stake the corners, sides, and guy lines of the tent for stability.

Attach Rainfly

Add the rainfly, connecting its buckles, Velcro tabs, and elastic tensioners.

Prepare Tent for Vehicle Use

Disconnect tent sleeves from vehicle, securing them to the tent body.

Take Down The Tent

Disconnect Sleeves and Move Vehicle

Disconnect tent sleeves from the vehicle and move the vehicle away.

Secure Tent Openings

Zip up all windows and doors, leaving a small opening for air escape.

Lower Tent Structure

Release pole clips, lift poles from pins, and lower the tent to the ground.

Remove and Store Stakes

Pull out all stakes and place them securely in the stake bag.

Remove and Store Poles

Push all poles out of their sleeves and place them in the pole bag.

Fold Tent Body

Fold the sides and ends of the tent inward, leaving gaps in the middle.

Pack Tent into Carry Bag

Place pole bag, stake bag, and rainfly on tent, then roll and pack.

Limited Warranty Information

Related product manuals