1-Lay the tent over a at area, free from rocks and sticks.
3-Thread the (2) end poles (long poles) through the end
pole sleeves (Fig 1) until their leading ferrules reach the
pole pins on the opposite side (Fig 2).
4-Thread the top pole (short pole) through the top pole
sleeve and the (2) awning pole sleeves (Fig 1).
12-Buckle the upper sleeve’s (2) top straps around the ve-
hicle’s roof rack rear cross bar (Fig 10). If the vehicle is
without a cross bar, clip the (2) extension straps to the top
straps (Fig 11) and attach the extension straps’ J-hooks to
the vehicle’s windshield wipers (Fig 12 and Fig 13).
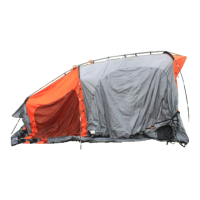
Fig1
Fig 5
Fig 12
9-Back up the vehicle until its bumper touches the lower
sleeve (Fig 8). Make sure the vehicle is centered to the tent.
Set Up The Tent
5-Place one end of the top pole into one of the awning
pole pockets (Fig 3). Bend the pole and place its oppo-
site end into the other awning pole pocket.
7-Raise the tent by bending the end poles until their trail-
ing ferrules can be placed over the pole pins (Fig 5). Make
sure to hold the end of the pole sleeves open as the poles
slide through (Fig 6).
8-Attach the pole clips to the end poles (Fig 7).
13-Lower the rear hatch door and buckle the lower
sleeve’s E strap over it (Fig 14). Adjust the E strap so the
lower sleeve is pulled tight when the rear hatch door is
raised again.
CAUTION: DON’T USE EXCESSIVE FORCE WHEN
BENDING THE TENT POLES. MAKE SURE THE POLE
SLEEVES SLIDE OVER THE POLES WITHOUT HANGING
U P.
Fig 3
Fig 9
Fig 13
Fig 10
Fig 14
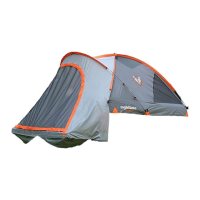
Fig 4
14-Attach the lower sleeve’s F and G straps to the inside
of the vehicle’s cargo area (Fig 15).
Fig 15
Top Pole
Sleeve
End Pole
Pole Pin
Upper
Sleeve
E
F
G
F
End Pole
End Pole
Sleeve
Awning Pole
Sleeve
SUV Tent 110907
Extension
Straps
J-hook
11-Place the upper sleeve over the raised rear hatch door
(Fig 9).
www.rightlinegear.com/setup.html
Set Up
Video:
Awning
Pole Pocket
Fig 11
Top Strap
2-Stake the (4) corners of the tent and the (2) loops on
each side. Make sure the tent’s oor is pulled smooth.
Top Pole
Awning Pole
Sleeve
End Pole
End Pole
Sleeve
6-Place the end poles’ leading ferrules over the pole pins
Fig (4).
10-Place the lower sleeve under the vehicle’s bumper but
above the vehicle’s mufer.
Extension
Strap
Top Strap
Fig 7
Pole Clip
Fig 6
Leading Ferrule
Fig 2
Fig 8
Lower
Sleeve
Leading Ferrule
Pole Sleeve
Leading Ferrule
Pole
Pin
Trailing Ferrule