H
Hector OconnorAug 16, 2025
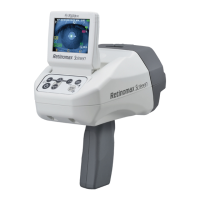
What to do if the power lamp doesn't light on my Righton Retinomax 3 Measuring Instruments Retinomax?
- RRick CarpenterAug 16, 2025
If the power lamp on your Retinomax doesn't light and the monitor screen remains off, it could be due to an uncharged battery pack, especially when newly purchased or after prolonged periods of disuse. The solution is to charge the battery pack.