5
5. Tester is now ready to take a current measurement
Note:
Always set the correct fuse rang on the tester or the result will not be accurate.
If the required rang is not shown on the display then use the nearest rang available.
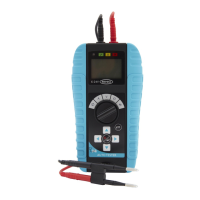
6. Place the red and black probes on the exposed metal contacts on rear of the fuse.
7. For faster tesng the probes can be connected together by sliding the two halves together to suit Mini, ATC or Maxi fuses
8. If current is detected the tester will beep once and display as shown below
9. The probes can now be removed and the HOLD funcon will retain the display
10. To cancel the HOLD funcon and test another fuse, press any key on the tester
11. If no current is detected the tester will beep connuously and display 0.00A. This can be used to conrm connuity of a fuse without removing it.
12. If an open circuit is detected, the display will show - - - as below. Check the fuse is not blown and the probe contact is good
13. If the measured current is higher than the fuse rang Over Limit will be displayed. If this happens check the correct fuse value is selected
To quickly increase or decrease
the fuse current, use
keys
Fuse rang
Measured
current
Fuse type can be changed by
pressing the
key to cycle
between MINI, ATC and
MAXI fuses
GB
10422 RMM500 Instructions UK 140x170mm 15pp MULTI LANGUAGE.indb 5 23/08/2017 17:13
 Loading...