Do you have a question about the ring Solar Steplight and is the answer not in the manual?
Guide to downloading and installing the Ring app for managing your Steplight.
Instructions for connecting your Ring Smart Lights to the app via the Ring Bridge.
Steps to detach the mounting plate from the Steplight by sliding tabs out of grooves.
Instructions on how to press a tab on the bottom to open and remove the battery cover.
Procedure for removing the included lithium-ion battery pull-tab to activate the Steplight.
How to connect a micro USB cord to a power supply to fully charge the Steplight's battery.
Guide to pushing the battery cover back onto the Steplight until the tab snaps into place.
Steps to set up the Steplight within the Ring app by tapping 'Set Up a Device'.
Using the mounting plate as a template to mark screw locations on the wall.
Instructions for drilling holes and inserting wall anchors for hard surfaces.
Attaching the mounting plate to the surface with screws, ensuring it is flush.
Placing the Steplight over the mounting plate and sliding it downward to lock it in place.
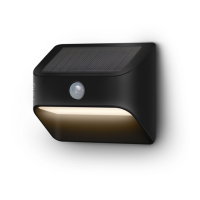
The Ring Solar Steplight is a smart lighting solution designed to illuminate steps and pathways, enhancing safety and security around your home. As a solar-powered device, it harnesses energy from the sun, making it an eco-friendly and cost-effective lighting option that requires no electrical wiring. The Steplight integrates seamlessly with the Ring ecosystem, allowing for smart control and connectivity with other compatible Ring devices through the Ring app.
To begin using your Ring Solar Steplight, the first step is to download the Ring app on your smartphone or tablet. The app is available on both the Apple App Store and Google Play Store. Alternatively, you can visit ring.com/app to find the download links. The Ring app serves as the central hub for setting up and managing your Steplight, guiding you through each step of the installation process.
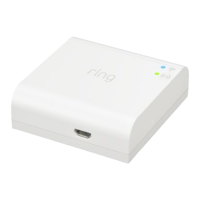
A crucial component for the functionality of your Ring Solar Steplight is the Ring Bridge. The Bridge acts as a connector, enabling your Ring Smart Lights to communicate with the Ring app and other compatible Ring devices within your smart home network. Without the Bridge, the Steplight cannot be controlled via the app or integrated into your Ring system. Instructions for setting up your Ring Bridge can be found within the Ring app or in the Bridge's user manual. It is recommended to set up the Bridge before proceeding with the Steplight installation to ensure a smooth setup experience.
Before mounting the Steplight, you'll need to prepare the device itself. Start by sliding off the mounting plate from the rear of the Steplight. This is done by sliding the tabs out of their grooves, allowing the plate to be removed. Once the mounting plate is off, you will need to access the battery compartment. Remove the battery cover by pressing in the tab located on the bottom of the cover and then lifting it to detach.
Inside the battery compartment, you will find a battery pull-tab. Carefully remove this pull-tab. This action activates the included lithium-ion battery, and your Steplight will flash twice to confirm that it has been powered on. It is important to handle the battery with care. Ring provides a warning regarding the risk of fire, explosion, or burn. To prevent these risks, do not short circuit, crush, heat the battery above 60°C, incinerate it, or attempt to disassemble it.
After activating the battery, it is highly recommended to fully charge your Steplight before installation for optimal performance. To do this, plug the provided micro USB cord into a USB power supply (which is not included with the Steplight). Then, connect the other end of the micro USB cord to your Steplight. While charging, the light will slowly turn on and off. Once fully charged, the light will glow continuously. After charging is complete, remember to remove the micro USB cord. While you can proceed with setting up the Steplight in the app without a full charge, a complete charge ensures the best initial experience and longevity of battery life.
Once the Steplight is charged, re-attach the battery cover. Push the cover back onto your Steplight, ensuring that the tab snaps firmly into place. This secures the battery and protects the internal components.
With the Steplight prepared, you can now proceed to set it up in the Ring app. Open the Ring app on your device and tap on "Set Up a Device." When prompted, select "Smart Lights" from the options provided and follow the on-screen instructions within the app to complete the setup process. The app will guide you through connecting your Steplight to your Ring Bridge and configuring its settings.
For physical installation, the first step is to mark the screw holes on your desired mounting surface. Use the mounting plate as a template to accurately mark the locations where the screws will be driven. Since this is a solar light, it is crucial to select an installation area that receives plenty of direct sunlight throughout the day to ensure efficient charging of the battery. Proper sun exposure is key to the Steplight's performance.
Depending on your mounting surface, you may need to install wall anchors. If you are installing the Steplight on a hard surface such as stucco or brick, you will first need to drill holes using a 3/16" drill bit (not included). These holes will accommodate the wall anchors, providing a secure mounting point. If your installation surface is wood or siding, you can skip the step of installing wall anchors, as screws can be driven directly into these materials.
Next, install the mounting plate. Place the mounting plate against the surface you've chosen, making sure that the arrow on the plate is pointing upwards. Drive the two mounting screws into the marked locations until the mounting plate is flush against the surface. If you are installing on a wood surface, you can use a Philips head screwdriver to drive the screws directly into the wall without the need for anchors.
Finally, mount your Steplight onto the installed mounting plate. Carefully place your Steplight over the mounting plate, aligning it correctly. Then, slide the Steplight downward. This action will lock it securely into place on the mounting plate, completing the physical installation.
For any additional assistance or troubleshooting, you can visit ring.com/help, which provides a comprehensive resource for support. If you prefer to speak with someone, Ring offers customer support via phone. You can call US 1 800 656 1918, Canada 1 855 300 7289, or Worldwide +1 310 929 7085. For a complete list of all customer support numbers, you can visit ring.com/callus. The Ring Solar Steplight is a product of Ring LLC, and all related logos are trademarks of Ring LLC or its affiliates.
| Power Source | Solar |
|---|---|
| Weather Resistance | IP65 |
| Battery Type | Rechargeable lithium-ion |
| Motion Sensor | Yes |
| Connectivity | Wi-Fi |
| Color Temperature | 3000K |