EasyManua.ls Logo

Rinstrum AxleweighR R420 - User Manual

Rinstrum AxleweighR R420
22 pages
Print Icon
To Next Page IconTo Next Page
Loading...
Presented By
Dallas HoustonAustinFt Worth
NicolScales.com
800.225.8181
Contact Us
Nicol Scales & Measurement is an ISO Accredited Calibration
Company that has provided calibration, repair and sales of all types
of weighing and measurement products since 1931.
Question and Answer IconNeed help?

Do you have a question about the Rinstrum AxleweighR R420 and is the answer not in the manual?

Summary

Overview and Interface

1.1 Overview

General introduction to the digital indicator and its functions.

1.2 User Interface and Display

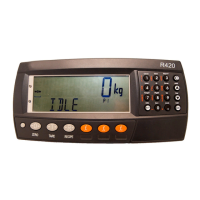
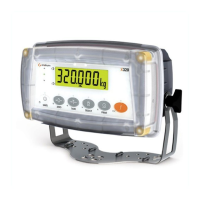
Details the R420 and R423 indicator displays and primary function keys.

Wiring & Connections

1.3 Wiring & Connections

Instructions for connecting the AC power cord to the scale indicator.

1.4 Initial Power up

Steps for powering on the scale for the first time, including display tests.

Setting Dynamic Scale Factor

1.5 Dynamic Scale

Procedure for setting the dynamic scale factor using reference weights.

1.6 Setting the Time and Date

Instructions for viewing and changing the system date and time via the clock function.

RF System

1.7 RF System

Guide to setting up the RF antenna and key fob for remote operation.

Traffic Lights

1.8 Traffic Lights

Explains the meaning of traffic light indicators and their causes.

USB Operation

1.9 USB Operation

Instructions for copying and managing data files using a USB drive.

Selecting Trucks

2.0 Selecting a Truck and Weighing

How to select a truck ID using the key fob or manual selection.

Editing Trucks

2.2 Editing Truck Data

Steps to edit existing truck data, including tare weight entry.

2.2 Selecting Farm & Field Data

Instructions for configuring farm and field data associated with trucks.

Creating a Truck

2.3 Creating a new truck

Guide to adding a new truck to the database with its details.

2.4 Printing

Information on automatic printing and reprinting the last weighed truck.

Harvest CSV File Configuration

3.1 Harvest Configuration

Guide to setting up the harvest CSV file with farm and field data.

Truck CSV File Configuration

3.2 Truck Configuration (USB)

Instructions for editing and adding truck data via the truck CSV file.

Log File Database

3.3 Data Log Output

Details the content of the log.csv file containing weight and configuration data.

Appendix

4.1 Overview

Explanation of error messages displayed during operation.

4.2 Weighing Errors

Lists status messages or errors that may occur during normal weighing.

Recommended Spare Parts

4.3 Recommended Spare Parts

Lists essential spare parts and includes information on the service kit contents.

Function Key Navigation

4.4 F2 Configuration Menu

Details the options available within the F2 configuration menu.

Definitions

Overview

This document outlines the operation and maintenance of the axleWEIGHr system, a smart weighing solution designed for efficient vehicle weight measurement and data logging. The system utilizes a precision digital indicator with advanced firmware and LUA programming to perform axle weighing and calculate the gross vehicle weight. It also records truck weights to a database for later recovery using a USB drive.

Function Description:

The primary function of the axleWEIGHr system is to accurately measure axle weights and calculate the total gross vehicle weight of trucks. This is achieved through a dynamic scale factor, which can be set and adjusted to ensure precise measurements. The system is designed for "in-motion" weighing, allowing trucks to drive across the scale at a steady 3 m.p.h. to capture their total weight.

The system also incorporates a comprehensive data management system. It records truck weights, along with associated farm and field data, to a log file in CSV format. This data can be easily retrieved and managed using a USB drive. The system allows for the creation and editing of truck profiles, including custom names, pass types (one-pass or two-pass), and tare weights. Farm and field configurations can also be set up and updated, ensuring detailed record-keeping for agricultural or logistical operations.

A key feature is the integration of an RF system, which allows for remote identification of trucks using a key fob. This streamlines the weighing process, as the truck ID can be entered at the controller or via the remote key fob. Traffic lights provide visual cues during the weighing process, indicating idle status, weighing in progress, or error conditions.

Usage Features:

The user interface is designed for ease of use, primarily through the R420 and R423 digital indicators. The R423, a stainless indicator, is mounted on the front of the axleWEIGHr.

  • Initial Power Up: Upon initial power, the scale performs a display test and then displays "PLEASE WAIT" for 20 seconds. After this, the primary weight screen appears. Users should press the [C] Cancel Key and then the [ZERO] key to set the scale to zero for the first time.
  • Dynamic Scale Factor Setting: With the scale at zero, the dynamic scale factor can be set. This involves obtaining a reference weight from a certified truck scale and then driving across the axleWEIGHr. The dynamic scale adjustment (D) is calculated using the formula K/R=D, where K is the known weight and R is the average of 4-5 weighments from the axleWEIGHr. The factor can be entered via the configuration menu (accessed by holding [F2] for 2 seconds).
  • Setting Time and Date: A long press of the #1 key (Clock) allows viewing and changing the system date and time using the number pad and the [OK] key.
  • Selecting Trucks: Trucks can be selected by a short press of [F1] (TRUCK KEY), allowing navigation through the truck list using the [UP] and [DOWN] arrow keys. Alternatively, a remote key fob can be used, activating the GREEN lights when pressed, signaling the truck to proceed across the scale. The display will show different screens depending on whether a one-pass (empty weight specified, weighed full) or two-pass (weight not specified, weighed twice) system is configured.
  • Editing Truck Data: To edit truck data, first select the desired truck. Then, press and hold the [TRUCK] key. Users can select ONE.PASS or TWO.PASS using the [ARROW KEY] and enter the tare weight using the keypad, confirming with [OK]. The [C]ancel key returns to IDLE mode.
  • Selecting Farm & Field: A short press of [F3] allows for Farm & Field configuration, applicable to all trucks.
  • Creating a New Truck: Press and hold the [UP] arrow key. Enter the truck name using the number pad, select 1 or 2 pass, and enter the tare weight if it's a one-pass system.
  • Printing: Printing occurs automatically when a truck is selected via the key fob or [F1] key. If no truck is selected, printing will not occur, and the database will not be updated.
  • Re-Print: Pressing [F2] will reprint a copy of the last truck that weighed.
  • USB Operation: The system supports USB drives for data transfer.
    • TO USB: Sends the log.csv file to the USB drive (creates a copy, original remains on console).
    • FROM USB: Duplicates files from the USB drive, overwriting existing truck and harvest configurations if modified.
    • EJECT USB: Prepares the console for safe USB drive removal.
  • Configuration Menu (F2 Long Press):
    • DISCARD: Sets the time allowed for truck ID selection after weighment (default 10 sec).
    • TIMEOUT: Sets the time between axles before the controller times out and completes axle captures (default 20 sec).
    • DYN.SCL: Dynamic scaling factor for "in-motion" calibration adjust (see page 6).
    • ZERO/SPAN: Zero and span calibration capture (do not use).
    • MVV: Displays raw millivolt reading from the scale base.
    • VERSION: Displays app name and version.

Maintenance Features:

  • Printer Paper Loading: The TG2460 receipt printer uses thermal paper (PN# A10066). Paper is loaded by removing the outer white paper ring.
  • Printer Adjustment: To ensure optimal operation and prevent paper jamming, the cover spring should be adjusted for maximum tension. This can be done using needle-nose pliers or a small screwdriver.
  • CSV File Configuration:
    • Harvest.csv: This file contains farm and field data. The header (data inside the yellow box) should not be changed. Farm and field names can be customized, but field names must all be different. Crop and Variety columns need to be updated yearly based on crop data. A "NONE" farm can be created for non-harvest weighing.
    • Trucks.csv: This file allows for editing and adding trucks with custom names. The header ("id", "truck", "pass", "tare") should not be altered, but the data below is configurable. The 'id' and 'truck' columns need to be unique, and 'id' numbers should be sequential. The 'pass' column indicates one-pass (tare weight entered) or two-pass (tare weight zero).
  • Error Codes: The system displays various error messages to warn of operations outside acceptable limits. These include:
    • (U.LOAD): Weight below minimum allowable reading. Resolution: Increase weight or decrease minimum allowable reading.
    • (O.LOAD): Weight above maximum allowable reading. Resolution: Check load cell connections and for damaged mechanical scale elements.
    • (ERROR) (RANGE): Weight reading beyond limit for Zero operation. Resolution: Increase Zero Range or use the key.
    • (ERROR) (MOTION): Scale motion prevented ZERO or TARE operation. Resolution: Try again when scale is stable.
    • (ERROR) (ADC): ADC error prevented ZERO or TARE operation. Resolution: Ensure load cell cabling is correct.
    • (E2000): Cable error – 4/6 mode not selected. Resolution: Check for broken wires and 4-way connection.
    • (NOT FOUND): No truck data found in database. Resolution: Create truck using up arrow or USB drive.
  • Recommended Spare Parts: A list of recommended spare parts is provided, including Thermal Paper Roll (A10066), 10T Load cell (LSB2-B01-010T), Key Fob (290094), and R423 Main board (780207).
  • Service Kit: A service kit is included with the controller, containing a RinDriver (screwdriver for terminations), RinLink Cable (magnetic USB cable for R423 interface via laptop), Simulator Cap (1.1 Millivolt Simulator cap), and a 2G USB Drive (containing manuals and software).

The axleWEIGHr system is a robust and user-friendly solution for dynamic vehicle weighing, offering comprehensive data management and remote operation capabilities, all designed to enhance efficiency and accuracy in weighing and measurement tasks.

Rinstrum AxleweighR R420 Specifications

General IconGeneral
CategoryScales
ManufacturerRinstrum
ModelR420
Power Supply12-24V DC
DisplayLCD
Operating Temperature-10°C to +50°C
CommunicationRS232

Related product manuals