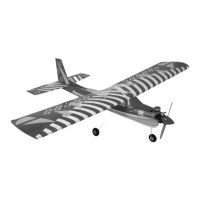
The Ripmax WOT 4 Mk2 ARTF is an Almost Ready to Fly (ARTF) version of the classic WOT 4 sports aerobatic model, designed by Chris Foss. It is described as one of the most exciting sports aerobatic models of all time, designed for quick assembly and offering versatile flight performance suitable for a range of pilot skill levels, from those transitioning from trainers to experienced aerobatic enthusiasts.
Function Description:
The WOT 4 Mk2 is a radio-controlled (R/C) model aircraft primarily designed for sports aerobatics. Its robust design and versatile flight characteristics allow for a wide range of maneuvers, from gentle cruising to advanced aerobatic stunts. The model is powered by an internal combustion engine (engine not included, but mounting provisions are made) and controlled via a multi-channel radio system (servos, receiver, and transmitter not included, but installation steps are detailed). The aircraft features a conventional layout with a main wing, tailplane, fin, ailerons, elevator, and rudder, all controlled by servos to manipulate flight surfaces. The "Almost Ready to Fly" designation means that the main airframe components are pre-built and covered, requiring the user to assemble the major sections, install the engine, radio equipment, and perform final setup and balancing.
Important Technical Specifications (derived from the manual):
- Centre of Gravity (C/G or Balance Point): 82mm (3-1/4") back from the leading edge of the wing at the root. This is a critical specification for stable flight and must be achieved with the fuel tank empty.
- Control Throws (recommended for initial flights, measured at the widest point of the surface):
- Elevator: 9-15mm up, 9-15mm down
- Rudder: 45mm left, 45mm right
- Ailerons: 6-9mm up, 6-9mm down
- Engine Mount: Two-part design, with the front of the prop driver positioned exactly 100mm in front of the rear face of the mount.
- Construction: The airframe appears to be primarily wood (balsa and plywood) construction, pre-covered with a film material.
- Undercarriage: Aluminium main undercarriage with wheels and a pre-bent tailwheel assembly.
- Fuel Tank: Designed for internal combustion engines, with provisions for feed, vent, and pressure lines.
- Radio System: Requires multiple servos (aileron x2, elevator x1, rudder x1, throttle x1), a receiver, and a transmitter. Servo extension leads (300mm) are recommended for ailerons.
Usage Features:
- Assembly: The manual provides step-by-step instructions for assembly, including fitting ailerons, installing the undercarriage, tailplane, fin, radio equipment (servos, receiver), engine, and throttle linkage.
- Flight Performance: The WOT 4 Mk2 is highly versatile. With reduced control throws and a lower-end engine, it serves as an excellent first aileron model, suitable for pilots transitioning from trainers. With recommended throws, it performs as a capable sports model, executing loops, rolls, flicks, and spins. Experienced pilots can increase throws and use powerful engines for advanced aerobatics and impressive vertical performance.
- Pre-Flight Checks: The manual emphasizes critical pre-flight checks:
- Fully charge transmitter and receiver batteries.
- Verify all screws are tight and components are well bonded.
- Double-check the Centre of Gravity.
- Confirm correct control surface throw and direction, ensuring free movement without binding.
- Ensure the receiver aerial is fully extended.
- Verify wing bolts are tight.
- Safety: The manual stresses the importance of correct balancing for stable and safe flight, warning that an unbalanced model can be unstable or unflyable, leading to damage or injury. It also recommends that initial flights, especially for less experienced pilots, be test-flown and supervised by a competent pilot at a recognized club in a safe location.
- Engine Installation: Detailed steps are provided for mounting the engine to the firewall and connecting the throttle linkage, including ensuring proper alignment to prevent undesirable engine thrust.
- Fuel System: Instructions for assembling and installing the fuel tank, including proper routing of fuel lines and ensuring the clunk tube moves freely.
Maintenance Features:
- Hinge Installation: Hinges are loose-fitted and secured with thin cyanoacrylate (cyano) glue, requiring careful application to ensure proper bonding and free movement.
- Adhesive Use: Various adhesives are used during construction: thin cyano for hinges, rapid setting epoxy for wing joining brace, and epoxy for tailplane and fin installation. Masking tape is recommended to protect covering during epoxy application.
- Screw and Nut Security: Threadlocking compound is recommended for nuts on the closed loop horn to prevent loosening due to engine vibration. Cyano glue is also suggested for additional security on crimps in the closed loop wire.
- Covering Repair/Trimming: Instructions involve trimming excess film covering from root ribs, servo lead holes, and around mounting slots for the tailplane, fin, and undercarriage. This requires a sharp knife and careful execution to avoid weakening the airframe.
- Parts Availability: Spare parts for the WOT 4 ARTF are available from Ripmax stocked model shops, and contact information is provided for product queries or locating stockists.
The WOT 4 Mk2 ARTF is a comprehensive kit designed for model aircraft enthusiasts who enjoy the building process and desire a high-performance aerobatic model. Its design reflects Chris Foss's extensive experience in aeromodelling and competition, offering a product that is both stylish and functional.