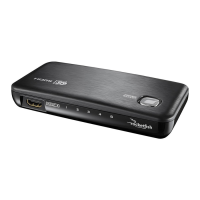
HDMI input
Input LEDs/
buttons
Power LED/
button
Power
port
HDMI
output
HDMI
inputs
1234
INPUT 1
INPUT 4OUTPUT INPUT 3 INPUT 2
DC5V
POWER
ON/OFF
SELECT
MODES
RF-G1501
1
3
2
4
Power
Input selectors
HDMI
Input 1
HDMI
Input 3
Power
adapter
HDMI
Output
HDMI
Input 4
FRONT
BACK
Note: When the switch is turned on, it automatically switches to the last
input that was used.
3 To select a source device:
• Press the number on your remote that matches the input of the
source device you want.
OR
• Tap the number on your switch that matches the input
your source device is connected to.
The corresponding input LED lights.
4 Use your source device as usual to play video and audio.
5 When nished, press and hold (power) to turn o your switch.
Note: You may leave the power on while not in use.
Before using your new product, please read these instructions to prevent any damage.
QUICK SETUP GUIDE
RF-G1501 / RF-G1501-C, 4-Port HDMI Switch with 4K Compatibility
REMOTE
4K
Blu-ray
Satellite
Receiver
4K UltraHD
TV
DVD
Player
FEATURES
Your 4-Port HDMI Switch supports 4K video and next-generation audio.
• Resolution – 480p, 720p, 1080p, and 4K (4096 X 2160)
• Frame Rate – Up to 4k at 60 Hz (1080p at 120 Hz)*
• Color – Deep Color, HDR, and other enhanced color specications
• Audio – Works with Dolby TrueHD, DTS-HD, and all audio formats
supported by the HDMI 2.0 standard
• Auto Switch – When a source device is turned on, the switch
automatically detects and switches to that device's input
*Note: TVs with high internal refresh rates (such as 240 Hz) are compatible.
The specications refer to source signal and not TV refresh rate.
SETTING UP YOUR HDMI SWITCH
1 Connect HDMI cables from your source devices to the
switch’s INPUT ports.
2 Connect an HDMI cable from your TV (or projector) to the
switch’s OUTPUT port.
3 Connect the power adapter from the DC 5V port to a power outlet.
The power LED and an input LED light up.
Note:To fully support 4K resolution, connect the input and output channels
using HDMI PREMIUM Certied cables (within 3 meters).
Optional wall-mounting: Install two screws 4 in. (10.2 cm) apart into your wall,
then hang the switch on the screws. Mounting hardware is not included.
USING YOUR HDMI SWITCH
1 Turn on your TV and source device.
2 To turn on your switch:
• Press POWER ON/OFF on your remote control.
OR
• Tap the (power) symbol on your switch.
Game
Console
HDMI
Input 2
PACKAGE CONTENTS
• 4-Port HDMI Switch
• Power adapter
• Remote control
• Quick Setup Guide
1234
INP
UT
1
RF-G1501_RF-G1501-C_20-0404_QSG_V7_EN_ Final.ai 1 8/27/2020 10:43:29 AM