12
7. At Drilling Locations A5 and A6 on the wall, drill 3/16"
pilot holes for the 1/4" x 3" Washer-Head Lag Bolts (KK).
Remember, each Wall Bracket (HH) MUST attach to the
wall with TWO lag bolts (KK). Fig. 7.
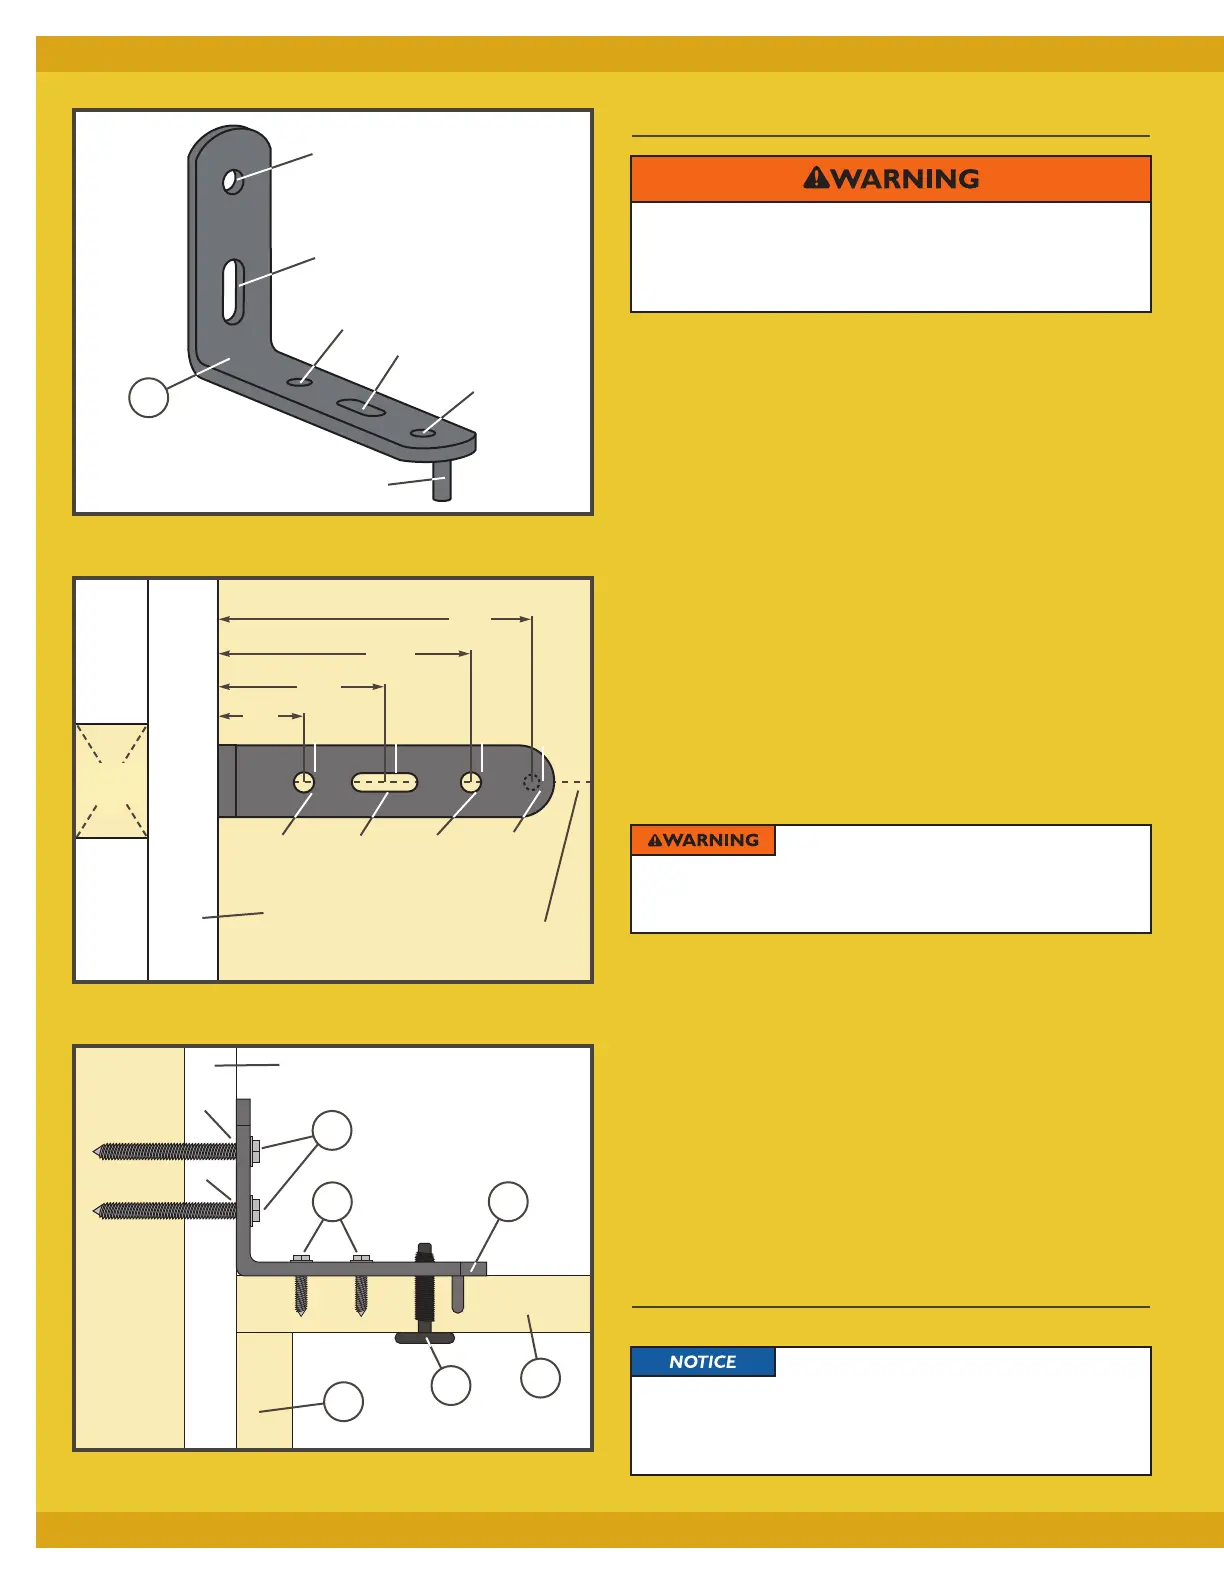
8. Return the Wall Brackets (HH) onto the cabinet Top. Secure
each bracket to the cabinet Top with two #12 x 3/4" Washer
Head Screws (JJ). Secure each bracket to the wall by driving
two 1/4" x 3" Washer-Head Lag Bolts (KK). Fig. 7.
9. Working from inside the cabinet, insert a 1/4" x 20 Allen
Head Screw (II) into the hole on the underside of the cabinet
Top at each bracket location and thread it into the tapped
hole in the Wall Bracket (HH). Tighten the bolt with the
#4 Allen Key (NN). Fig. 7.
Assemble the Bed Frame
All steps in this section use Frame Exploded View.
Fig. 7 - Side View of Lag Bolts and Screws Installed
Fig. 6 - Wall Bracket Top View
Fig. 5 - Wall Bracket Hole Drilling Locations
A6
A4
A3
A2
Steel dowel (Drilling Location A1)
A5
2
3
⁄4"
4"
1
1
⁄2"
Wall
4
5
⁄8"
A1
(Steel
Dowel)
A2
A3
A4
Stud Line
Wood
Stud
Wall
A6
A5
Top of
Cabinet
Wood
Stud
1. Carefully working from a step stool or ladder, determine
and mark the centerlines of the wall studs above the cabinet
usng a stud finder and extend the marks 90˚ out onto the
cabinet Top (2). (Mark at least three stud locations for all
sizes of horizontal wall beds.)
2. Along each stud centerline drawn in Step 1, mark drilling
location A1. Fig. 5.
3. Drill a 13/64" diameter x 5/8" deep hole at each A1
location, taking care not to drill all the way through the
cabinet Top (2).
4. Position a Wall Bracket (HH) at each location, inserting the
steel dowel in the hole. Mark Drilling Locations A2, A3 and
A4 on the cabinet Top and Drilling Locations A5 and A6 on
the wall. Fig. 5.
5. Drill a 5/16" diameter hole through the cabinet Top (2) at
Drilling Location A2 on each centerline. Fig. 6.
6. At Drilling Locations A3 and A4 on each stud centerline, drill
a 1/8" diameter x 5/8" deep pilot hole, taking care not to drill
all the way through the cabinet Top. Fig. 6.
Install the Wall Brackets
> Each Wall Bracket (HH) MUST be mounted flush on the
cabinet top and flush to the wall with no gap with all six
screws. Failure to do so increases the risk of cabinet
failure and serious personal injury.
Do NOT use an impact driver to drive
fasteners; the added torque of an impact driver increases
the risk of stripping the pilot holes and weakening
connections. Do NOT overtighten screws.
Make sure all mounting tabs on frame
components are flat to the work surface during assembly.
Do not fully tighten fasteners until frame parts have
been assembled.
HH
KK
JJ
HH
II
2
3


 To Next Page