EasyManua.ls Logo

rockymounts TomaHawk User Manual

rockymounts TomaHawk
4 pages
To Next Page IconTo Next Page
Page #1 background imageLoading...
Page #1 background image


Guidelines



 





Parts Included



 









1

l












 





Question and Answer IconNeed help?

Do you have a question about the rockymounts TomaHawk and is the answer not in the manual?

rockymounts TomaHawk Specifications

General IconGeneral
Brandrockymounts
ModelTomaHawk
CategoryAutomobile Accessories
LanguageEnglish

Summary

Guidelines

Parts Included

Assembly Instructions

Install Rear Tray

Step to attach the rear tray to the load arm assembly using M6 bolts.

Open Mounting Brackets

Process to prepare front mounting brackets for vehicle attachment.

Tighten Mounting Brackets

Securing the rack to the vehicle's crossbars with multiple bolts.

Install Wheel Straps

Attaching wheel straps to the tray for securing bicycle wheels.

Install Back Stop

Installing the back stop component with M5x10 bolts for bike positioning.

Loading Bikes

Place Bike on Rack

Positioning the bicycle onto the wheel tray against the back stop.

Secure Front Wheel

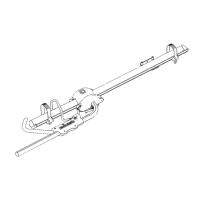
Tightening the load arm hook around the front fork with minimal gap.

Tighten Wheel Straps

Feeding and buckling wheel straps for both front and rear wheels.

Fat Bike Installation

Using extensions on wheel straps for mounting wider fat bike tires.

Lock Core Installation Instructions

Pry Off Lock Cap

Removing the plastic protective cap covering the lock mechanism.

Install Lock Core

Inserting and securing the lock core with the key for theft deterrence.

Passenger Side Installation Instructions

Remove End Cap

Detaching the end cap and stopper from the load arm assembly.

Remove Load Arm

Disengaging the load arm from its bearings by loosening M6 bolts.

Flip Load Arm

Reversing the load arm orientation and reinstalling with M8x15 bolt.

Mounting

Securing the rack to the vehicle after passenger side configuration.

Warnings

Related product manuals