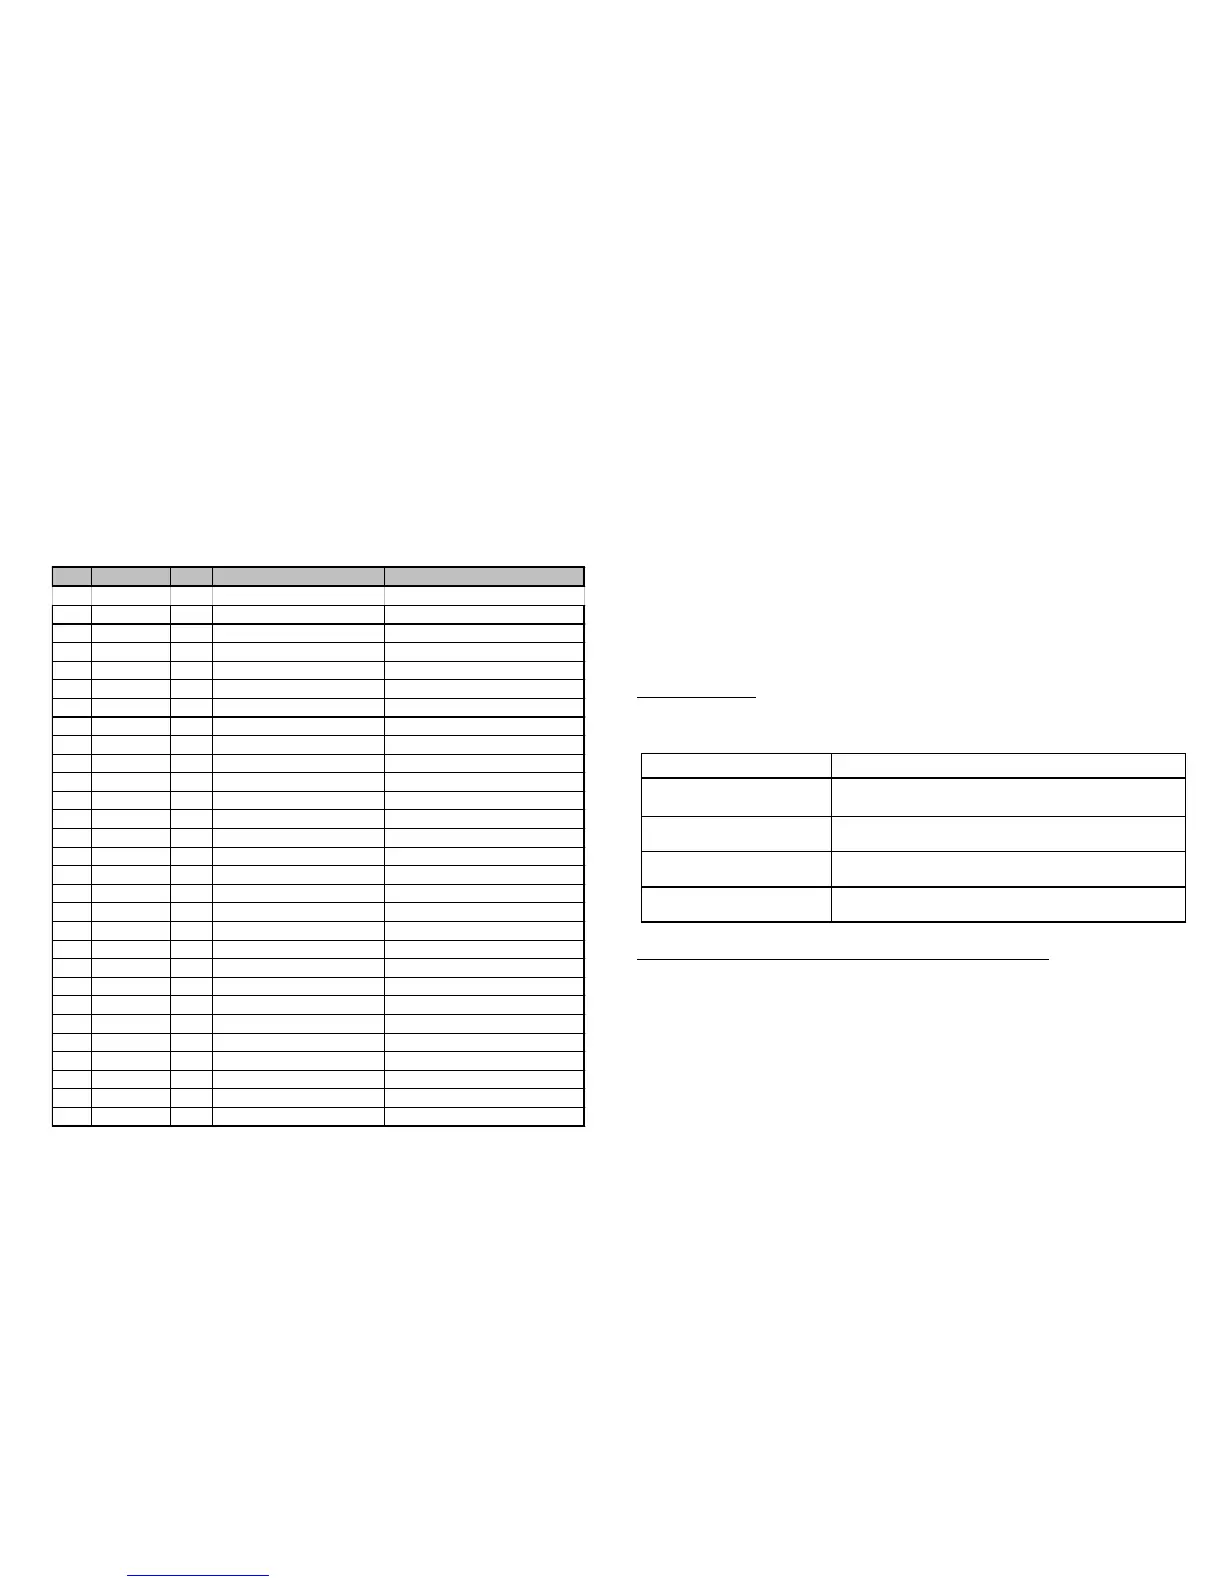
Rep Code Qty Pièce Spare part
1 A15008 2 Poignée de plaque supérieure Top plate handle
2 D02096 2 Résistance haute Top heating element
3 37022 2 Guide plaque supérieure Top plate guide
4 37006 2 Cache ressort Spring protection
5 D02095 2 Résistance basse Bottom heating element
6 A16014 1 Bornier 6 trous Six holes domino
7 A16012 2 Bornier 2 trous Tw o holes dimono
8 A06032 2 Thermostat Thermostat
9 37262 1 Bac à sauce Sauce lid
10 A07025 2 Interrupteur Sw itch
11 A14078 2 Bouton Knob
12 A08003 2 Voyant orange Orange pilot light
13 A08009 2 Voyant vert Green pilot light
14 A13003 4 Pied Foot
15 A10032 1 Presse étoupe diam 16 Cord closer diam 16
16 C01045 1 Cable d'alimentation Cord
17 C04008 2 Gaine ressort Spring girdle
18 B04027 4 Bride poignée Handle strap
19 C04007 1 Isolant Insulation
20 F01020/27 1 Jeu 2 poignées Handle assembly
21 B02019+PTR 2 Plaque supérieure rainurée Top grooved cast iron plate
B02034+PTR 2 Plaque supérieure lisse Top flat cast iron plate
22 37021 2 Capot inox Stainless steel cover
23 B02017+PTR 1 Plaque inférieure rainurée Bottom grooved cast iron plate
B02022+PTR 1 Plaque inférieure mixte Bottom mixed cast iron plate
B02021+PTR 1 Plaque inf érieure lisse Bottom flat cast iron plate
B07015 2 Ressort Spring
37090 1 Racloir Scraper
First cleaning
Clean the device before the first use. (Cf 6 Cleaning)
Connection of the device
- Check that the tension and the frequency of the electricity network suit to the values
indicated on the descriptive plate.
- Make sure that every control knob is positioned on 0.
- Check that neither the cord nor the plug are damaged
- Unwind completely the electric power cable and connect it in a plug connected with
the earth.
- The device is connected.
NB: in case of connection of the device in a plug without earth protection or directly
on the electricity network, confide its connection to a qualified person .
c) Use of device :
Elements of command and display
Never use the machine without its drip tray (n°5 on picture).
Putting on
- Turn on the switch (n°1 on picture). The green pilot light (n°3 on picture) of control is
on.
- Turn on the thermostat control knob (n°2 on picture) on the wished position: the or-
ange pilot light (n°4 on picture) ignites. The machine is warming up. Once orange pi-
lot light (n°4 on picture) is off, the machine reached the wished temperature.
- Grease the plates before each cooking.
Command/Display Function
Thermostat (n°2 on picture) Temperature setting
Green pilot light
(n°3 on picture)
Machine on (pilot light on)
Machine off (pilot light off)
Orange pilot light
(n°4 on picture)
Machine is heating (pilot light on)
Temperature reached (pilot light off)
On/Off switch
(n°1 on picture)
On/off position
 Loading...