EasyManua.ls Logo

ROOMS TO GO 78-159 - User Manual

ROOMS TO GO 78-159
2 pages
Print Icon
To Next Page IconTo Next Page
Loading...
A.- (1) HEADBOARD
B.- (1) FOOTBOARD
C.- (1) LEFT SIDE RAIL
D.- (1) RIGHT SIDE RAIL
E.- (1) WOOD CENTER SUPPORT
F.- (1) SUPPORT
G.- (4) SLATS
H.- (4) 5/16"-18 X 80MM FLAT HEAD BOLTS
I.- (4) 5/16"-18 X 5/8" CROSS DOWEL NUTS
J.- (1) 5MM ALLEN WRENCH
K.- (4) 5/16"-18 X 60MM FLAT HEAD BOLTS
L.- (8) 1 1/4" SCREWS
1.- BEFORE YOU START, CAREFULLY UNPACK AND IDENTIFY EACH COMPONENT AND PIECE OF HARDWARE TO MAKE SURE YOU HAVE EVERYTHING YOU NEED FOR
ASSEMBLY.
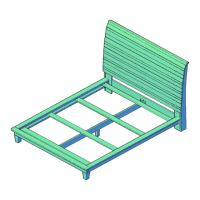
2.- ASSEMBLE SLEIGH BED, USING ONE HEADBOARD (A), ONE FOOTBOARD (B), ONE LEFT SIDE RAIL (C) AND ONE RIGHT SIDE RAIL (D).
3.- INSERT TWO DOWEL NUTS (I) INTO THE LEFT AND RIGHT SIDE RAIL ONLY ONE SIDE,SEE THE HOLES, MAKE SURE THE GROOVE IS HORIZONTAL, SEE FIG.3
4.- ATTACH THE SIDE RAIL INTO THE HEADBOARD ( A ), INSERTING TWO 80MM FLAT HEAD BOLTS ( H ) IN THE BACK HOLES OF HEADBOARD, ALIGNED WITH THE
HOLES OF SIDE RAIL, USE THE 5MM ALLEN WRENCH (J) TO TIGHTEN BOLTS, SEE FIG.4
5.- LATER, ATTACH SIDE RAIL IN THE FOOTBOARD, ALIGN THE SIDE RAIL HOLES WITH THE FOOTBOARD HOLES, INSERTING TWO 60MM FLAT HEAD BOLTS (K), ( FIG.A )
USING 5MM ALLEN WRENCH (J) TO TIGHTEN ALL BOLTS, SEE FIG.4
6.- TURN AROUND, WOOD CENTER SUPPORT ( E ) UPSIDE DOWN, INSERT THE SCREW BOLT INSTALLED IN THE SUPPORT ( F ), TO TIGHTEN THE OPOSSITE
OF CLOCKWISE (FIG.B), THEN PLACED THE WOOD SUPPORT, FIRST IN SLOT OF FOOTBOARD AND THEN IN SLOT OF HEADBOARD, SEE FIG.5
TOOLS NEEDED
PHILLIPS HEAD SCREWDRIVER ( NOT INCLUDED )
SLEIGH BED ASSEMBLY INSTRUCTIONS ( 78-159,78-161 )
LIST OF CONTENTS
SLEIGH BED HEADBOARD BOX (78-159,78-161) FIG.1
PLEASE CONTACT YOUR RETAIL STORE WITH SERVICE OR PARTS REPLACEMENT REQUEST
PLATFORM BED FOOTBOARD BOX (78-112,78-113) FIG.2
HARDWARE PACK
(HPK00105)
5MM ALLEN WRENCH ( INCLUDED )
THANK YOU FOR YOUR PURCHASE !
RECLAIM COLLECTION
YES,
HORIZONTAL GROOVE
NO
A
D
G
E
FIG.1
MAKE SURE ALL BOLTS ARE
TIGHTENED COMPLETELY
FIG.2
F
FIG.3
C
B
TO ASSEMBLE THIS SLEIGH BED REQUIRES
TWO PERSONS
I
H
HARDWARE PACK
HPK00105
J
K
L
FIG.4
FIG.A
REV 01 19/09/2016
PAGE 1 OF 2
KIS01133
Question and Answer IconNeed help?

Do you have a question about the ROOMS TO GO 78-159 and is the answer not in the manual?

Summary

Sleigh Bed Headboard Box Components

Headboard Component

The main headboard piece (A) for the sleigh bed assembly.

Platform Bed Footboard Box Components

Footboard Component

The main footboard piece (B) for the platform bed.

Side Rail Components

Includes left (C) and right (D) side rails for the bed frame.

Center Support and Support Components

Wood center support (E) and support (F) for the bed frame.

Slats Component

Four (G) slats to support the mattress.

Hardware Pack Contents

Flat Head Bolts

80mm (H) and 60mm (K) flat head bolts for assembly.

Cross Dowel Nuts

Cross dowel nuts (I) used with bolts for connections.

Allen Wrench

5mm Allen wrench (J) included for tightening bolts.

Screws

1 1/4" screws (L) for fastening slats.

Tools Needed for Assembly

Required Tools

Phillips head screwdriver (not included) and 5mm Allen wrench (included).

Sleigh Bed Assembly Steps

Step 1-2: Preparation and Initial Assembly

Unpack components, identify parts, and begin assembling frame with headboard, footboard, and side rails.

Step 3-4: Attaching Side Rails to Headboard

Insert dowel nuts into side rails and attach to headboard using 80mm bolts.

Step 5: Attaching Side Rails to Footboard

Connect side rails to footboard using 60mm bolts.

Step 6: Installing Wood Center Support

Install wood center support (E) and support (F) into footboard and headboard slots.

Step 7: Placing and Fastening Slats

Position slats (G) on side rail cleats and secure with screws (L).

Important Warnings and Tips

Mattress Support Warning

Slats alone do not support a mattress; a slat pack or bunkie board is required.

Allen Wrench Usage Tips

Tips for using the Allen wrench (J) for loose fastening and final tightening.

ROOMS TO GO 78-159 Specifications

General IconGeneral
BrandROOMS TO GO
Model78-159
CategoryIndoor Furnishing
LanguageEnglish

Related product manuals