EasyManua.ls Logo

rosseto EZ-PRO H1B - User Manual

rosseto EZ-PRO H1B
3 pages
Print Icon
To Next Page IconTo Next Page
Loading...
Assembly Instructions for EZ-PRO H1B / H2B / H3B
1. Carefully remove all parts from packaging:
• 1 Stand
• 1, 2 or 3 PRO H Containers
I. PRO H Lid (1)
II. 6WR PRO Silicon Paddle Wheel (2)
III. Regular Nozzle (3)
IV. Container (4)
V. Name Tag (5)
VI. PRO Handle & Pin (6)
VII. Mini 1.5mm Screw for Handle (7)
VIII. PRO Fresh Lid (8)
2. Remove all PRO H Containers (B) from individual
packaging and foam protection
3. Remove all PRO H Lids (1) from cardboard insert
before discarding container packaging
4. Insert back of container into PRO Stand (A), making
sure it locks into place
Tip:
insert bottom rectangle into frame first,
and snap top rectangle into frame for easiest
and most secure assembly
5. Repeat Step 4 for the remaining containers
6. Fill containers with desired dry product
7. Place all lids on each corresponding container
8. Dispense as you please!
9. Fasten PRO Fresh Lid (8) onto Nozzle when unit is
not in use to maximize the freshness of your dry
goods
(1)
(2)
(3)
(4)
(8)
(6)
(7)
(5)
Question and Answer IconNeed help?

Do you have a question about the rosseto EZ-PRO H1B and is the answer not in the manual?

Summary

EZ-PRO H1 B H2 B H3 B Assembly Instructions

Dispenser Cleaning Instructions

PRO Container Disassembly Steps

Procedure for taking apart the PRO H container for cleaning.

PRO Container Reassembly Steps

Procedure for putting the PRO H container back together after cleaning.

Rosseto Dispenser Spare Parts Guide

JUMBO Dispenser Parts

List of spare parts for the JUMBO series Rosseto dispensers.

DIVIDED Dispenser Parts

List of spare parts for the DIVIDED series Rosseto dispensers.

PRO Dispenser Parts

List of spare parts for the PRO series Rosseto dispensers.

ROUND Dispenser Parts

List of spare parts for the ROUND series Rosseto dispensers.

TOPPING KIT Parts

List of spare parts for the TOPPING KIT accessory.

TALL Dispenser Parts

List of spare parts for the TALL series Rosseto dispensers.

Overview

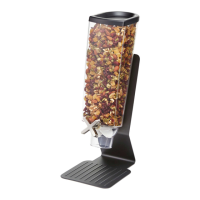
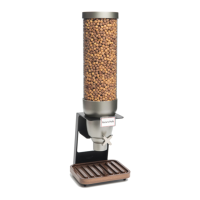
This document outlines the assembly, cleaning, and spare parts for the Rosseto EZ-PRO dispenser series, including models H1B, H2B, and H3B, designed for dispensing dry goods. The system is modular, allowing for easy setup and maintenance, and is suitable for various dry products, from cereals to candies.

Function Description:

The Rosseto EZ-PRO dispenser is a gravity-fed system designed for controlled dispensing of dry bulk foods. It consists of a stand, one or more transparent containers, lids, a paddle wheel mechanism, and a handle for operation. The primary function is to provide a hygienic and portion-controlled method for serving dry goods, minimizing waste and maintaining freshness. The transparent containers allow for easy monitoring of product levels, while the paddle wheel ensures a smooth, consistent dispense without crushing or damaging the contents. Different paddle wheel designs and nozzle types are available to accommodate various product sizes and dispensing needs, from small grains to larger items like nuts or candies. The system is designed for both commercial and home use, offering a professional and clean presentation of dry foods.

Usage Features:

The EZ-PRO dispenser is designed for straightforward assembly and user-friendly operation.

  1. Assembly: The process begins by carefully unpacking all components, including the stand (A) and the PRO H Containers (B). Each container comes with a PRO H Lid (1), a 6WR PRO Silicon Paddle Wheel (2), a Regular Nozzle (3), the Container itself (4), a Name Tag (5), a PRO Handle & Pin (6), a Mini 1.5mm Screw for Handle (7), and a PRO Fresh Lid (8). The containers are designed to lock securely into the PRO Stand (A). A key tip for assembly is to insert the bottom rectangle of the container into the frame first, then snap the top rectangle into place, ensuring a secure fit. This modular design allows for easy addition or removal of containers as needed.
  2. Filling: Once assembled, the containers can be filled with the desired dry product. The wide opening of the containers facilitates easy pouring and minimizes spills.
  3. Lid Placement: After filling, the PRO H Lids (1) are placed on each corresponding container to maintain freshness and protect the contents from environmental factors.
  4. Dispensing: To dispense, the user operates the PRO Handle & Pin (6). The internal paddle wheel (2) rotates, allowing a controlled amount of product to fall through the nozzle (3). The design of the paddle wheel and nozzle ensures that product is dispensed smoothly without clumping or excessive force, preserving the integrity of delicate items.
  5. Freshness Control: For extended freshness when the unit is not in use, the PRO Fresh Lid (8) can be fastened onto the nozzle. This feature is particularly useful for products susceptible to moisture or air exposure, helping to maintain their quality over time.
  6. Customization: The system offers various components to adapt to different needs. For example, different paddle wheel types (e.g., 6-wing, 12-wing) and nozzle sizes (regular, narrow) are available to optimize dispensing for various product consistencies and desired portion sizes. Name tags (5) can be used to label the contents of each container, enhancing organization and user experience.
  7. Modular Design: The ability to use one, two, or three containers on a single stand provides flexibility for different serving capacities and product variety. This makes it suitable for diverse environments, from breakfast buffets to candy stores.

Maintenance Features:

The Rosseto EZ-PRO dispenser is designed for easy disassembly and cleaning to ensure hygiene and longevity.

  1. Disassembly for Cleaning: The cleaning process begins by gently disassembling all parts. This involves carefully removing the PRO H Container (B) from the stand, then removing the PRO Lid (1) and any remaining product. The PRO Handle & Pin (6) can be gently pulled to remove it, allowing the Name Tag (5) to be loosened and the 6WR PRO Silicon Paddle Wheel (2) to stand freely inside the container. Finally, the Name Tag, Paddle Wheel, and Regular Nozzle (3) are removed from the container.
  2. Washing: All disassembled parts should be washed in warm, soapy water. It is crucial to avoid using abrasive sponges or cloths, as these can scratch or damage the components. Gentle cleaning helps preserve the aesthetic and functional integrity of the dispenser.
  3. Drying and Reassembly: After washing, all parts must be completely dry before reassembly. This prevents moisture buildup, which could affect product quality or lead to mold. Reassembly follows the reverse order of disassembly, ensuring all parts are correctly placed and secured. For instance, the Regular Nozzle (3) is placed into the bottom of the container, followed by the 6WR PRO Silicon Paddle Wheel (2), ensuring its holes align with the container's front. The Name Tag (5) is then positioned, and the PRO Handle & Pin (6) is inserted through the Name Tag, container, and paddle wheel, securing the pin at the back. Finally, the container is fastened back onto the PRO Stand (A), ensuring it locks securely into place.
  4. Spare Parts Availability: A comprehensive spare parts guide is provided, detailing components for various dispenser types (Jumbo, Divided, PRO, Round, Tall) and a Topping Kit. This ensures that individual parts, such as lids, paddle wheels, handles, nozzles, and containers, can be replaced if damaged or lost, extending the lifespan of the entire unit. This modular approach to spare parts reduces the need to replace the entire dispenser, making it a sustainable and cost-effective solution.
  5. Customer Support: Rosseto offers customer support for any assembly questions, comments, or concerns, providing an additional layer of assistance for maintenance and troubleshooting.

rosseto EZ-PRO H1B Specifications

General IconGeneral
ModelEZ-PRO H1B
BrandRosseto
Capacity1000ml
Dimensions200 x 100 x 150 mm
Weight0.5 kg
UsageCommercial

Related product manuals