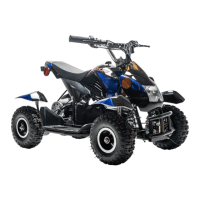
The Rosso E-Quad S is an electric ATV designed for recreational use, primarily for younger riders, with a strong emphasis on safety and proper supervision. It is an electric-powered vehicle, meaning it is intended to move, and riders must be aware of the inherent dangers, including loss of control or falling off, which can lead to serious injury or death. The manufacturer, Rosso Motors, stresses the importance of reading the manual thoroughly, following all safety instructions, and maintaining the product to ensure rider safety.
Function Description
The Rosso E-Quad S is an electric all-terrain vehicle (ATV) that provides a riding experience for children. It is powered by an electric motor and controlled via a throttle on the right handlebar. Braking is achieved by squeezing both brake levers. The ATV features a forward/reverse gear switch, allowing for directional changes, and a 3-speed switch to adjust the maximum speed. It also includes headlights and a horn for added functionality. The vehicle is designed for use on private property and closed courses, not on public streets or sidewalks, to ensure a safe riding environment away from pedestrian and vehicle traffic.
Important Technical Specifications
- Weight Limit: Do not exceed 90 pounds. This limit is crucial for maintaining control and ensuring the ATV's proper function.
- Motor: 500W electric motor.
- Battery: The battery requires 6-8 hours for a full recharge. It is recommended to fully charge the battery before first use and immediately after each ride. For extended storage, the battery should be fully charged and then recharged every 4-6 weeks to prevent damage and maintain battery life.
- Run Time: Up to 120 minutes of continuous ride time. Actual run time may vary based on riding conditions, rider weight, climate, and maintenance. Frequent stopping and starting can shorten the ride time.
- Tire Pressure: Recommended tire pressure is 7 PSI (Maximum: 20 PSI). The tires are designed for off-road conditions; riding on concrete, asphalt, or pavement will cause additional wear.
- Speed Settings: The 3-speed switch allows for adjustable speeds:
- Low (L): 4-8 km/hr (3-5 MPH)
- Medium (M): 11-13 km/hr (8-9 MPH)
- High (H): 16-20 km/hr (11-13 MPH)
- Ignition: Features both a manual ignition switch with a key and a remote start/stop function via a key fob.
- Alarm: The key fob also includes an alarm function that sounds if the ATV is moved or the key is inserted into the ignition when activated. The fob requires one CR2032 battery (pre-installed).
Usage Features
- Handlebar Installation: Handlebars are placed on the steering column bracket, secured with a top handlebar bracket, nuts, and bolts. The ignition switch plate slides between the brackets. Proper adjustment and tightening are critical to prevent loss of control.
- Fender Installation: Fenders are attached to brackets near each wheel by aligning holes and reinstalling bolts with nuts on the inside of the fender.
- Battery Connection: The battery connection is located within the ATV's body and involves clipping two connectors together.
- Brake Lever Adjustment: Brake levers can be adjusted to the rider's preferred position by tightening a single bolt.
- Throttle Control: Gently twist the throttle on the right handlebar to accelerate. Release the throttle and squeeze both brake levers to stop.
- Gear Shifter: A knob located between the rider's legs allows switching between forward, reverse, and neutral (off) gears. The vehicle must be at a complete stop before changing gears to prevent damage to the switch.
- Parking Brake: Engaged by squeezing the front brake lever and pressing down the parking brake knob. Disengaged by squeezing the brake lever until the knob pops up.
- Headlight/Horn: The green button on the left handlebar activates the horn, and the red switch beneath it turns the headlights on and off.
- Pre-Ride Checklist: Before each ride, riders must check brakes for proper function, inspect tires for wear and correct pressure, examine the frame and handlebars for damage, and secure all fasteners.
- Riding Environment: Intended for private property and closed courses. Avoid public streets, sidewalks, and areas with pedestrian or vehicle traffic. Do not ride in wet, icy, muddy, or rough conditions, or at night/limited visibility.
- Safety Gear: Always wear an approved safety helmet, elbow pads, knee pads, long-sleeved shirt, long pants, gloves, and athletic shoes (lace-up with rubber soles). Never ride barefoot or in sandals.
Maintenance Features
- Battery Care: Fully charge the battery before first use and after every ride. For storage, fully charge and then recharge every 4-6 weeks. Do not leave charging unattended overnight. Store in temperatures above freezing.
- Charger Inspection: Regularly examine the charger for damage to the cord, plug, enclosure, and other parts. Do not use a damaged charger. Chargers have built-in over-charge protection.
- Brake Adjustments: Periodically inspect and adjust brakes. Cable play on both front and rear brake levers can be adjusted. Calipers can be adjusted by loosening the anchor nut, pulling the brake cable until pads are almost touching the rotor, and then retightening the nut.
- Wheel Alignment: If wheels are not straight, adjust the tie rod. Loosen the securing nuts on both tie rod ends, then turn the center rod to adjust the wheel's position. Retighten the securing nuts once alignment is achieved.
- Chain Maintenance: The chain is chain-driven and should be periodically lubricated with lithium spray. Inspect, maintain, or adjust the chain before each ride. To tighten a loose chain, loosen the four nuts securing the motor to the frame, then adjust the tensioners in front of the motor by turning the nut on each tensioner clockwise, ensuring equal adjustment on both sides. Retighten the motor securing nuts.
- Troubleshooting Guide: The manual includes a troubleshooting section for common issues such as power failure, ATV not moving, low travel distance, and charging problems, with possible causes and solutions.
- Warranty: Rosso Motors offers a 6-month warranty against manufacturing defects from the date of purchase. The warranty does not cover normal wear and tear (tires, tubes, cables) or damage from improper assembly, maintenance, storage, or use. The warranty is void if the product is used for purposes other than recreation, modified, or rented.