Removal
1 Chock the front wheels, remove the wheel
trim and slacken the rear wheel nuts. Jack up
the rear of the car and support it on axle
stands. Remove the rear roadwheel and
ensure that the handbrake is released.
2 Undo the three bolts securing the
handbrake linkage cover, and remove the
cover from the side of the caliper.
3 On the left-hand caliper, disconnect the
pad wear warning light wiring plug (where
fitted) and release the wiring from the support
clip.
4 Undo the two bolts and remove the front
half of the handbrake linkage cover.
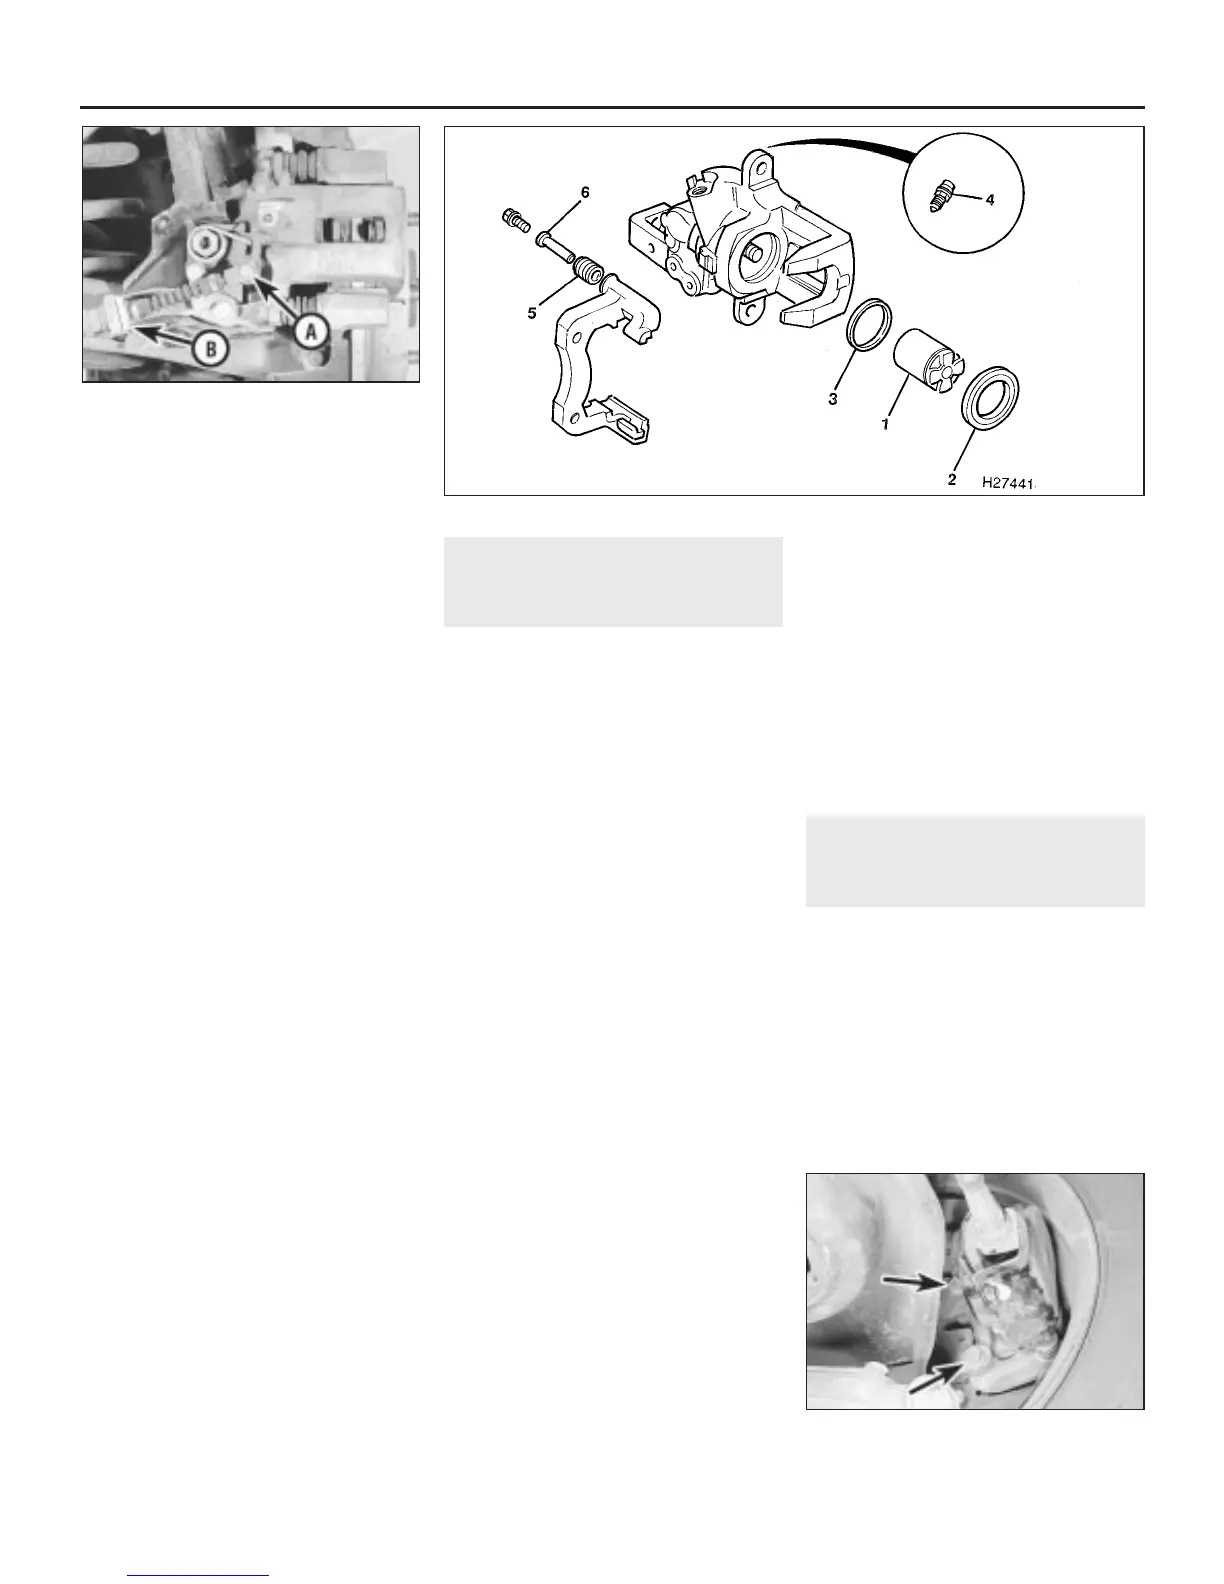
5 Extract the retaining clip and withdraw the
clevis pin from the end of the handbrake cable
(see illustration).
6 Prise off the handbrake cable retaining clip
and withdraw the cable from the mounting
bracket.
7 To minimise fluid loss, clamp the flexible
hose using a brake hose clamp, or self-
locking wrench with protected jaws.
8 Wipe clean the area around the brake hose
connection at the caliper then unscrew the
brake hose banjo union bolt at the caliper
body, and recover the two copper washers.
Tape over the hose union and caliper orifice to
prevent dirt ingress.
9 Using a spanner, unscrew the upper and
lower guide pin bolts.
10 Withdraw the caliper and handbrake
linkage assembly from the brake pads and
carrier bracket, and remove it from the car.
11 If the carrier bracket is to be removed,
undo the two bolts securing it to the hub
carrier, and remove the bracket complete with
brake pads. The pads can be removed, if
required, with reference to Section 7.
Refitting
12 Refitting is a reversal of removal, but
tighten all bolts to the specified torque. Use
new copper washers on the brake hose banjo
union, and bleed the hydraulic system as
described in Section 2. Do not apply the
handbrake until the rear brakes have been
bled otherwise incorrect brake operation will
result.
9 Rear brake caliper -
overhaul
4
1 Remove the caliper from the car as
described in the previous Section.
2 With the caliper on the bench wipe away all
traces of dust and dirt, but do not inhale it, as
it is injurious to health.
3 Undo the two bolts and remove the
handbrake linkage bracket assembly from the
caliper.
4 Using a pair of angled circlip pliers or other
similar tool, turn the piston anti-clockwise to
unscrew it from the caliper.
5 Remove the dust cover from the piston
(see illustration).
6 Using a blunt instrument such as a knitting
needle, carefully extract the piston seal from
the caliper bore.
7 Clean all the parts in methylated spirit, or
clean brake fluid, and dry with a lint-free cloth.
Inspect the piston and caliper bore for signs
of damage, scuffing or corrosion, and if these
conditions are evident, renew the caliper
assembly complete. Renew the guide pins in
the carrier bracket if they are bent or
damaged, or if their rubber boots are split or
perished.
8 If the components are in a satisfactory
condition, a repair kit consisting of new seals
and dust cover should be obtained.
9 Thoroughly lubricate the caliper bore,
piston, piston seal and dust cover with clean
brake fluid, and carefully fit the seal to the
caliper bore.
10 Position the dust cover over the innermost
end of the piston, so that the caliper bore
sealing lip protrudes beyond the base of the
piston. Using a blunt instrument, if necessary,
engage the sealing lip of the dust cover with
the groove in the caliper. Screw the piston
into the caliper bore until the other sealing lip
of the dust cover can be engaged with the
groove in the piston. With the piston screwed
in all the way, make sure that the dust cover is
correctly located in the piston and caliper
grooves.
11 Remove the guide pins from the carrier
bracket, if not already done, and smear them
with high-melting-point brake grease. Fit new
rubber boots to the guide pins and refit them
to the carrier bracket. Ensure that the guide
pin with the rubber insert is fitted in the
rearmost position.
12 Attach the handbrake linkage bracket
assembly to the caliper and secure with the
two bolts.
13 The caliper can now be refitted to the car
as described in the previous Section.
10 Rear brake disc - inspection,
removal and refitting
2
Note: Before starting work, refer to the
warning at the beginning of Section 7
concerning the dangers of asbestos dust.
Inspection
1 Chock the front wheels, remove the wheel
trim and slacken the rear wheel nuts. Jack up
the rear of the car and support it on axle
stands. Remove the rear roadwheel and
ensure that the handbrake is released.
2 Undo the two bolts securing the brake
caliper carrier bracket to the rear hub carrier
(see illustration).
9•8 Braking system
10.2 Carrier bracket-to-rear hub carrier
retaining bolts (arrowed)
9.5 Rear brake caliper components
8.5 Handbrake cable clevis pin (A) and
cable retaining clip (B)
1380 Rover 800 Series Remake
1 Piston
2 Dust cover
3 Piston seal
4 Bleed screw
5 Guide pin rubber boot
6 Guide pin


 To Next Page
 Loading...
