are not available separately. If the master
cylinder is in a serviceable condition, and is to
be re-used, a new primary piston assembly is
included in the repair kit.
11 With the master cylinder dismantled,
clean all the components in methylated spirit,
or clean hydraulic fluid, and dry with a lint-free
cloth.
12 Carefully examine the cylinder bore and
secondary piston for signs of wear, scoring or
corrosion, and if evident, renew the complete
master cylinder assembly.
13 If the components are in a satisfactory
condition, obtain a repair kit consisting of new
seals, springs and primary piston assembly.
14 Lubricate the cylinder bore, pistons and
seals thoroughly in clean hydraulic fluid, and
assemble them wet.
15 Using your fingers only, fit the front seal to
the secondary piston, followed by the washer,
rear seal, seal retainer and spring.
16 Fit the washer, seal housing and seal to
the primary piston.
17 Insert the secondary piston into the
cylinder bore, using a circular rocking motion
to avoid turning over the lips of the seals.
18 Fit the primary piston in the same way.
19 Fit a new O-ring seal to the groove in the
cylinder bore, then refit the washer and circlip.
20 Push the primary piston down the bore,
and refit the stop-pin to the secondary inlet
port.
21 Fit two new seals to the reservoir fluid
inlet ports, then push the reservoir firmly into
place.
22 Fit a new seal to the reservoir filler cap,
then refit the master cylinder to the car as
described in Section 11.
13 Master cylinder (ABS
models) - overhaul
4
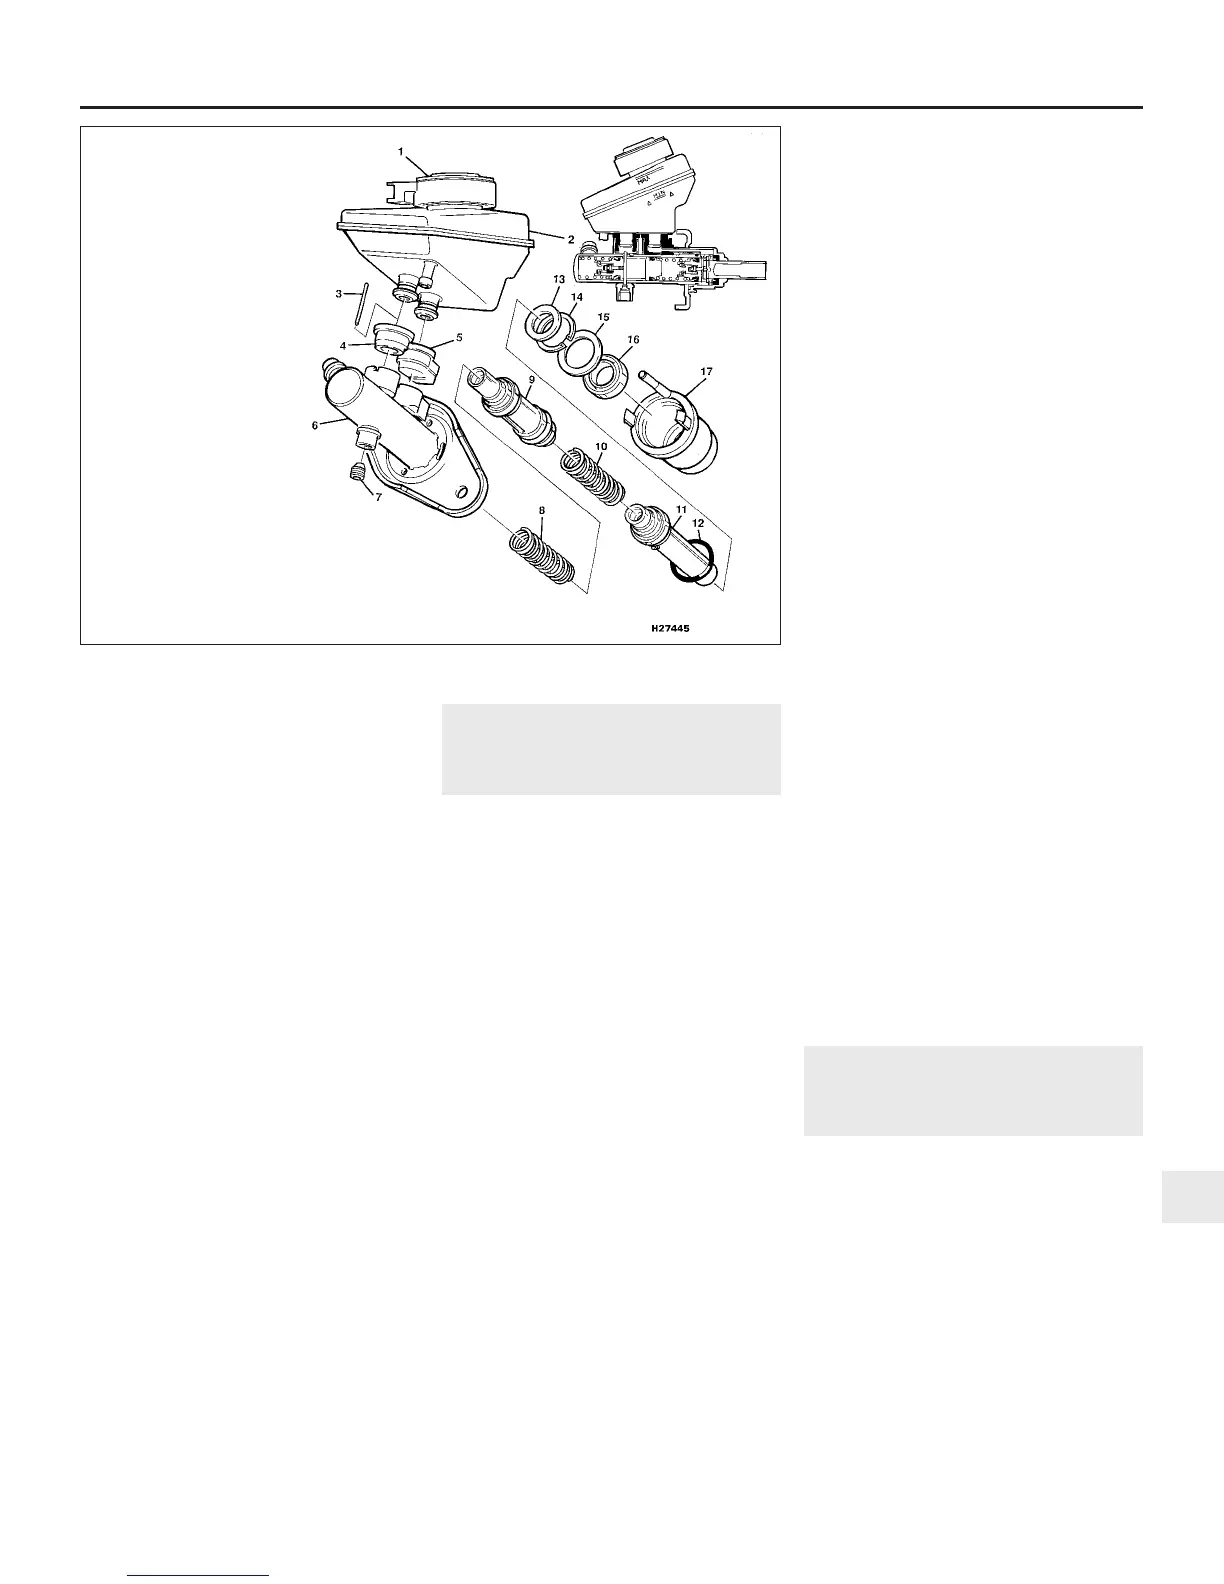
Note: Two different types of master cylinder
have been fitted to ABS equipped Rover
models covered by this manual (see
illustrations). The following procedures are
mainly applicable to the early unit fitted until
approximately October 1991. The later unit is
similar, but at the time of writing no specific
overhaul information was available from the
manufacturer.
1 Remove the master cylinder from the car as
described in Section 11. Drain any fluid
remaining in the reservoir, and prepare a
clean, uncluttered working surface ready for
dismantling.
2 Hold the cylinder body firmly, and push the
reservoir sideways to release it from its seals.
Lift the reservoir off, and remove the two seals
from the fluid inlet ports.
3 Push the primary piston down the cylinder
bore slightly, and hold it there. Locate the
stop-pin in the secondary inlet port, and
withdraw the pin using pointed-nose pliers.
4 With the piston held down, extract the
circlip, using circlip pliers, from the cylinder
bore end, and remove the washer behind the
circlip.
5 Using a small blunt screwdriver, hook out
the O-ring seal from the groove in the cylinder
bore.
6 Remove the primary piston.
7 Lubricate the cylinder bore with clean
hydraulic fluid to aid removal of the secondary
piston.
Braking system 9•11
9
1380 Rover 800 Series Remake
13.0b Exploded view of the later type master cylinder -
ABS models
1 Reservoir filler cap
2 Reservoir
3 Stop-pin
4 Reservoir secondary
circuit seal
5 Reservoir primary
circuit seal
6 Cylinder body
7 Stop-pin retaining
screw
8 Secondary piston
spring
9 Secondary piston
assembly
10 Primary piston spring
11 Primary piston
assembly
12 O-ring seal
13 Spacing washer
14 Circlip
15 Vacuum seal packing
ring
16 Vacuum seal
17 Transfer housing
8 Tap the cylinder body on a block of wood
to release the secondary piston, then
withdraw the piston from the cylinder bore.
9 Remove the seal housing, seal and washer
from the primary piston. Do not dismantle
either of the pistons further as seals are not
available separately. If the master cylinder is
in a serviceable condition, and is to be re-
used, a repair kit including new primary and
secondary piston assemblies will be required.
10 With the master cylinder dismantled,
clean all the components in methylated spirit,
or clean hydraulic fluid, and dry with a lint-free
cloth.
11 Carefully examine the cylinder bore for
signs of wear, scoring or corrosion, and if
evident, renew the complete master cylinder
assembly.
12 If the components are in a satisfactory
condition, obtain a repair kit and two new
piston assemblies.
13 Lubricate the cylinder bore, pistons and
seals thoroughly in clean hydraulic fluid, and
assemble them wet.
14 Fit the washer, seal housing and seal to
the primary piston.
15 Insert the secondary piston into the
cylinder bore, using a circular rocking motion
to avoid turning over the lips of the seals.
Align the slot in the piston with the
stop-pin hole in the cylinder secondary inlet
port.
16 Fit the primary piston in the same way.
17 Fit a new O-ring seal to the groove in the
cylinder bore, then refit the washer and
circlip.
18 Push the primary piston down the bore,
and refit the stop-pin to the secondary inlet
port.
19 Fit two new seals to the reservoir fluid
inlet ports, then push the reservoir firmly into
place.
20 Fit a new seal to the reservoir filler cap,
then refit the master cylinder to the car as
described in Section 11.
14 Pressure-reducing valve -
general information, removal
and refitting
3
Note: Before starting work, refer to the
warning at the beginning of Section 2
concerning the dangers of hydraulic fluid.
General information
1 The pressure-reducing valve is mounted on
the left-hand side of the engine compartment
behind the battery.
2 The purposes of the valve is to distribute
brake fluid to the front and rear brakes (rear
brakes only on cars fitted with ABS), and to
limit the fluid pressure supplied to the rear
brakes under heavy braking.
3 The operation of the valve may be suspect
if one or both rear wheels continually lock
under heavy braking. It is essential, however,


 To Next Page
 Loading...
