steering column, and move the column to its
lowest position (see illustration).
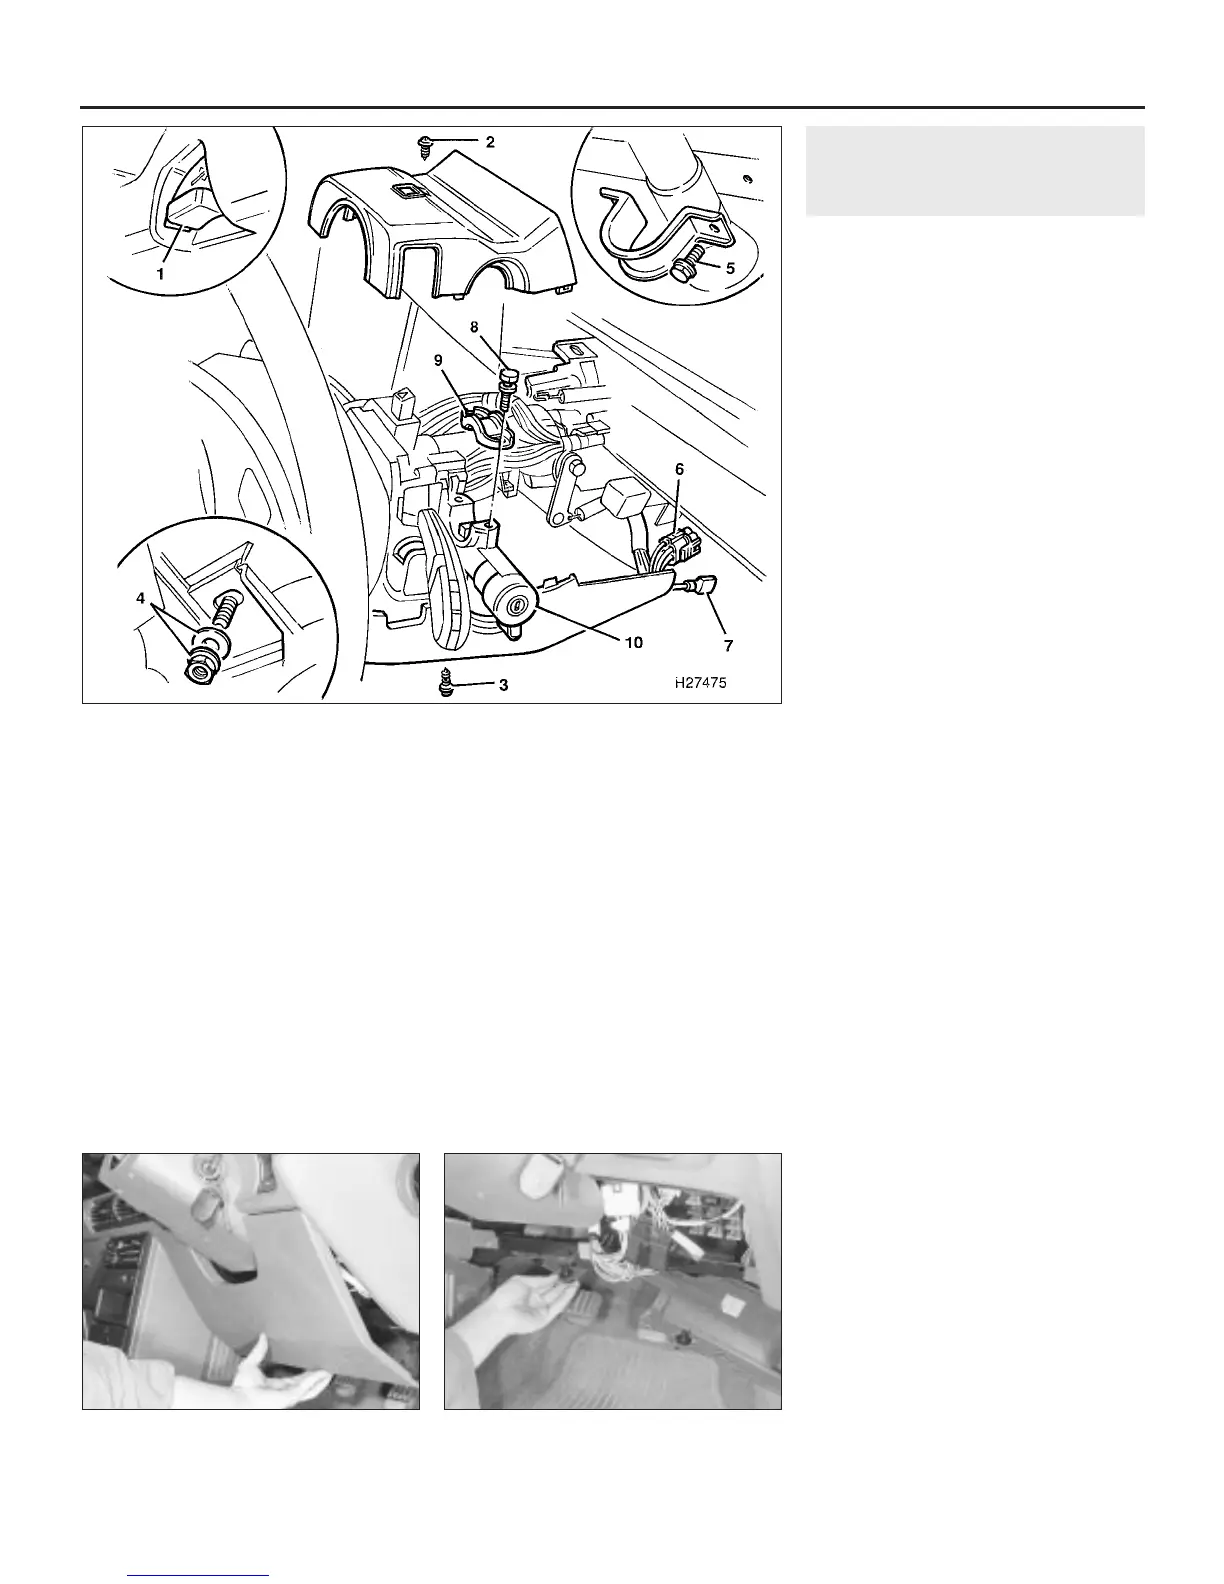
4 Undo the single upper screw and the three
lower screws, and remove the upper and
lower steering column shrouds.
5 Undo the two nuts and remove the washers
from the steering column upper mounting.
6 Undo the two bolts and remove the
mounting strap from the column lower
mounting. Lower the column slightly, and
support it in this position.
7 Disconnect the two ignition switch wiring
multiplugs from the fusebox.
8 Centre-punch the steering column lock
shear-bolts, then drill off the bolt heads.
9 Remove the lock saddle, then withdraw the
lock from the column.
10 With the lock removed, unscrew the
shear-bolt studs with a self-locking wrench or
a pair of grips on the protruding bolt ends.
Refitting
11 Refitting is a reversal of removal, but
tighten all the mounting bolts and nuts to the
specified torque. Use new shear-bolts to
secure the lock, and tighten them until the
heads shear off, but check the operation of
the lock before doing this.
21 Steering column -
removal and refitting
3
Removal
1 Disconnect the battery negative (earth) lead
(refer to Chapter 5, Section 1).
2 Remove the steering wheel and, where
fitted, the rotary coupler as described in
Sections 18 and 19 respectively.
3 From inside the car, release the turnbuckles
and lift out the trim panels over the clutch,
brake and accelerator pedals (see
illustrations).
4 Release the rake lock on the side of the
steering column, and move the column to its
lowest position.
5 Undo the single upper screw and the three
lower screws, and remove the upper and
lower steering column shrouds.
6 At the base of the steering column, release
the two retaining clips and slide the cover up
over the column shaft universal joint (see
illustration).
7 Move the carpets aside to gain access to
the floor-mounted cover plate.
8 Prise out the retaining studs to release the
cover plate and gasket from the floor.
9 Undo the clamp bolt securing the universal
joint to the steering gear pinion.
10 Undo the two nuts and remove the
washers from the steering column upper
mounting (see illustration).
11 Undo the two bolts and remove the
mounting strap from the column lower
mounting (see illustration). Lower the column
slightly, and support it in this position.
12 Release the flasher unit from its bracket
above the fusebox.
13 Disconnect the two ignition switch wiring
multiplugs from the fusebox and, where
applicable, the additional multiplugs at the
base of the column. Release the multiplugs
and wiring from the column brackets as
necessary.
14 Lift the column assembly upwards to
disengage the universal joint from the steering
gear pinion, then remove the column from the
car.
15 If the universal joint is to be removed,
mark the joint in relation to the column shaft.
Undo the clamp bolt and slide the joint off the
shaft.
Refitting
16 Before refitting the column, set
the roadwheels to the straight-ahead
position.
17 Refit the universal joint to the column
shaft (if previously removed), ensuring that the
marks made during removal are aligned.
18 Engage the universal joint with the
steering gear pinion, and push it fully home.
19 Reconnect the wiring multiplugs and refit
the flasher unit.
10•14 Suspension and steering systems
21.3b . . . and lower trim panel over the
pedals
21.3a Remove the upper trim panel . . .
20.3 Steering column lock attachments
1 Steering column rake lock
2 Upper shroud retaining screw
3 Lower shroud retaining screws
4 Column upper mounting nut and washer
5 Column lower mounting bolts
6 Ignition switch wiring multiplug
7 Additional switch lead
8 Shear bolt
9 Lock saddle
10 Steering column lock
1380 Rover 800 Series Remake


 To Next Page
 Loading...
