and wiring, connect the window lift
motor to the battery and close the window
fully.
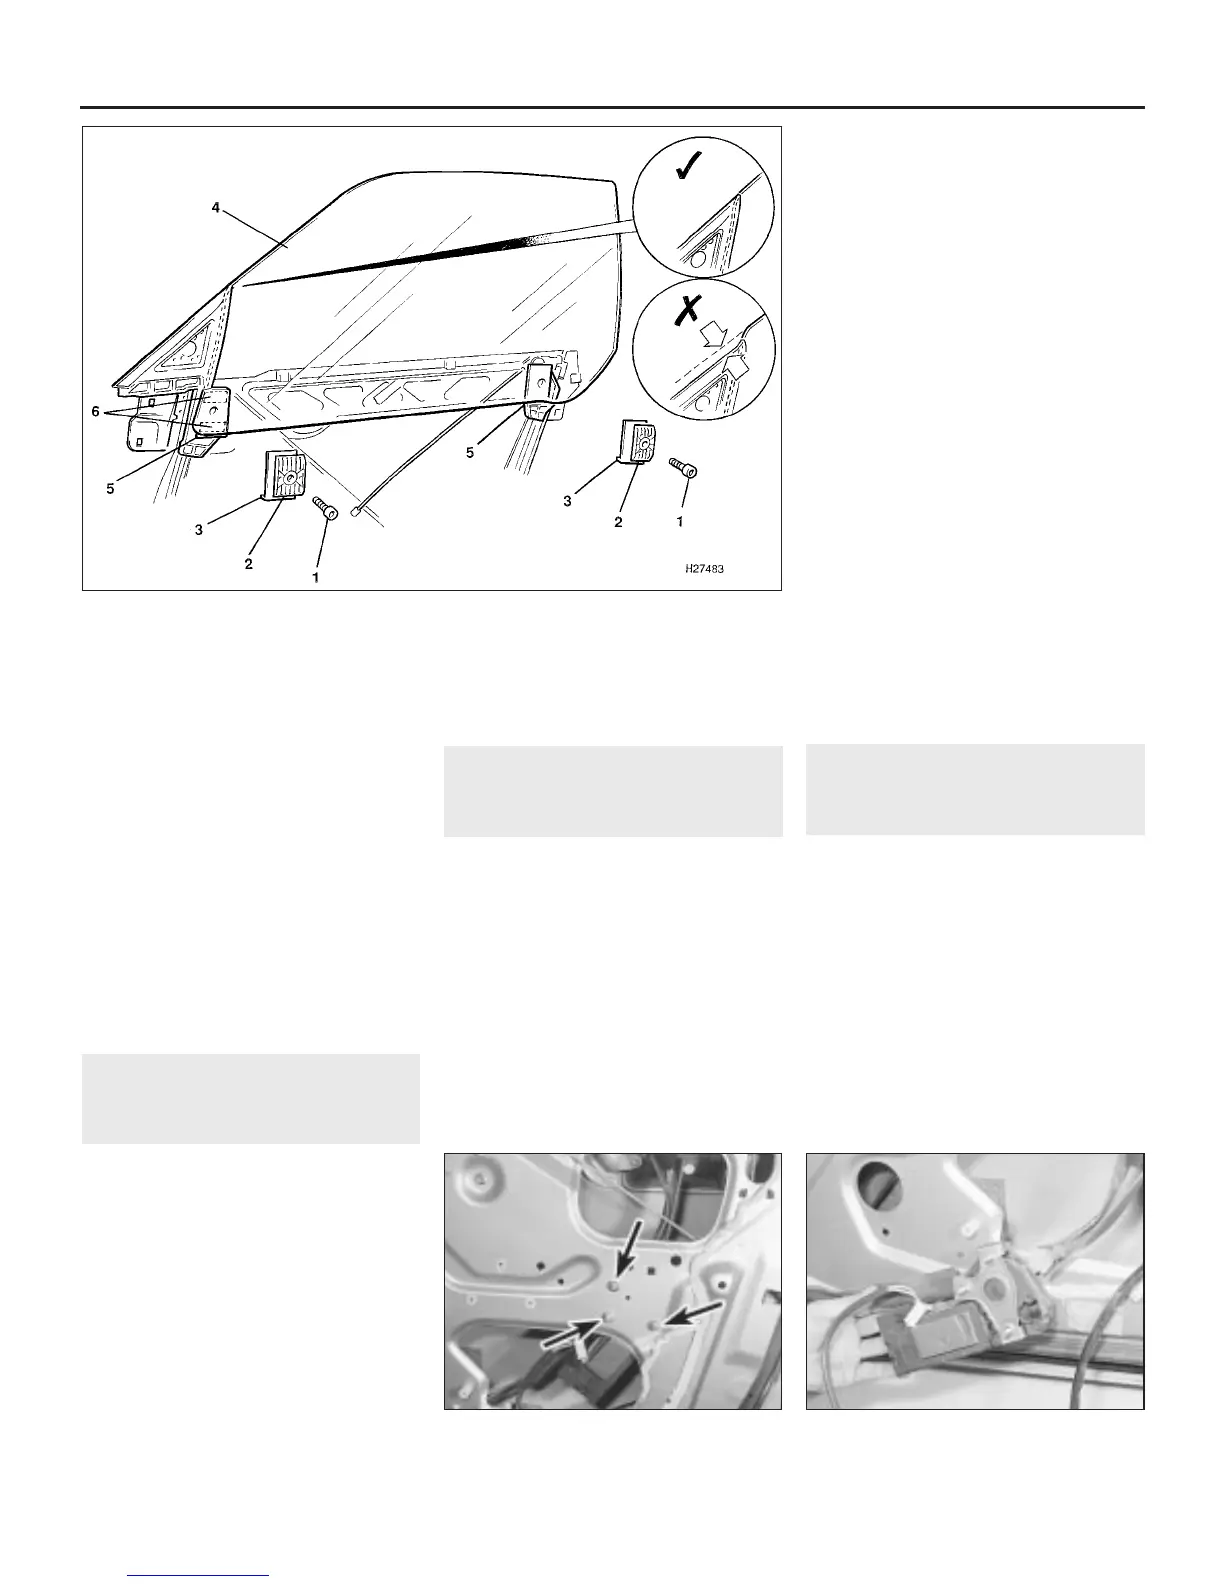
18 With the window closed, check that the
front edge of the glass and the cheater panel
are flush, forming a smooth curve (see
illustration 27.13). If this is not the case, it will
be necessary to obtain additional metal
spacers and position these behind the top or
bottom of the front lifting plate shims as
necessary, on a trial and error basis.
19 Once the initial adjustment is correct, refit
the cassette assembly as described in
Section 29.
28 Front door window lift motor
- removal and refitting
2
Removal
1 Remove the front door window glass as
described in Section 27.
2 Disconnect the motor wiring multiplug.
3 Undo the two lower bolts and one
upper bolt securing the lifting channel to the
door.
4 Undo the three motor-to-door securing
nuts, and manipulate the motor and lifting
channel through the lower aperture (see
illustrations).
Refitting
5 Refitting is a reversal of removal.
29 Front door cassette
assembly (Coupe models) -
removal and refitting
5
Note: Once the door cassette assembly is
disturbed, it will be necessary to carry out an
elaborate adjustment procedure after refitting,
to ensure that a leak, noise and draught free
seal is obtained when the window glass is
closed. This adjustment entails the use of
Rover special tools and gauges and can only
be successfully carried out by a suitably
equipped dealer.
Removal
1 Remove the door inner trim panel as
described in Section 21.
2 Remove the door mirror as described in
Section 31.
3 Remove the door speaker, referring to
Chapter 12 if necessary.
4 Undo the three screws and remove the
inner trim panel attachment bracket.
5 Carefully prise out the clips securing the
wiring multiplugs to the door.
6 Release the two clips and remove the
plastic condensation barrier.
7 Undo the three screws and release the
interior handle from the door.
8 Release the window lift motor wiring
multiplug from the door clip and disconnect it.
9 Undo the three nuts and release the
window lift motor studs from the door.
10 Undo the two bolts securing the lower
edge of the cassette assembly to the door.
11 At the top, undo the three bolts at the
front, and two at the rear securing the
cassette assembly to the door.
12 With the help of an assistant, carefully lift
the cassette assembly out of the door. Take
care not to lift or support the cassette
assembly using the cheater panel in front of
the window glass as this may cause the panel
to move out of alignment.
Refitting
13 Refitting is a reversal of removal, but have
the cassette assembly and door glass
accurately adjusted by a Rover dealer on
completion.
30 Front door window cable and
drum assembly (Coupe
models) - removal and refitting
2
Removal
1 Remove the door window glass as
described in Section 27.
2 At the bottom front corner of the cassette
assembly, note the fitted position of the outer
cable retainer in the support bracket. Turn the
retainer through 90º to release it from the
bracket.
3 Bend the guide tabs away from the lower
front pulley and slip the cable off the pulley.
4 Release the lifting plate from the front
runner.
5 Release the cable from the front upper
pulley.
11•14 Bodywork and fittings
28.4b . . . and remove the motor from the
door
28.4a Undo the three window lift motor
retaining nuts (arrowed) . . .
27.13 Front door glass attachment details on Coupe models
1 Clamping plate retaining
screws
2 Clamping plates
3 Clamping plate plastic
shims
4 Door glass
5 Lifting plate plastic
shims
6 Lifting plate plastic shim
metal spacers (where fitted)
Inset shows correct and
incorrect door glass-to-
cheater panel adjustment
1380 Rover 800 Series Remake


 To Next Page
 Loading...
