6 At the top rear corner of the cassette
assembly, note the fitted position of the outer
cable retainer in the support bracket. Turn the
retainer through 90º to release it from the
bracket.
7 Bend the guide tab away from the lower
rear pulley and slip the cable off both rear
pulleys.
8 Release the outer cable from the clip.
9 Detach the cable ends from the glass rear
lifting plate.
10 Mark the position of the cable exit points
on the cable drum cover plate, then undo the
screws and lift off the plate.
11 Taking care not to allow the cable to
become detached from the drum, lift the cable
and drum assembly out of the cassette
assembly.
Refitting
12 Refitting is a reversal of removal bearing
in mind the following points.
(a) Lubricate the pulleys with Molykote PG65
prior to refitting.
(b) Refit the outer cable retainers to the same
positions in the support brackets as noted
during removal.
(c) Ensure that the diagonal cable run is
positioned over the outer cable and motor
assembly, between the inner cable and
the window glass.
31 Front door mirror -
removal and refitting
1
Manually controlled mirror
Removal
1 Remove the front door inner trim panel as
described in Section 21.
2 Carefully prise off the triangular trim panel
from the upper corner of the door.
3 Undo the three mirror retaining screws,
release the cables from their retaining strap
inside the door, and remove the mirror and
cables from the door.
Refitting
4 Refitting is a reversal of removal.
Electrically controlled mirror
Removal
5 Remove the front door inner trim panel as
described in Section 21.
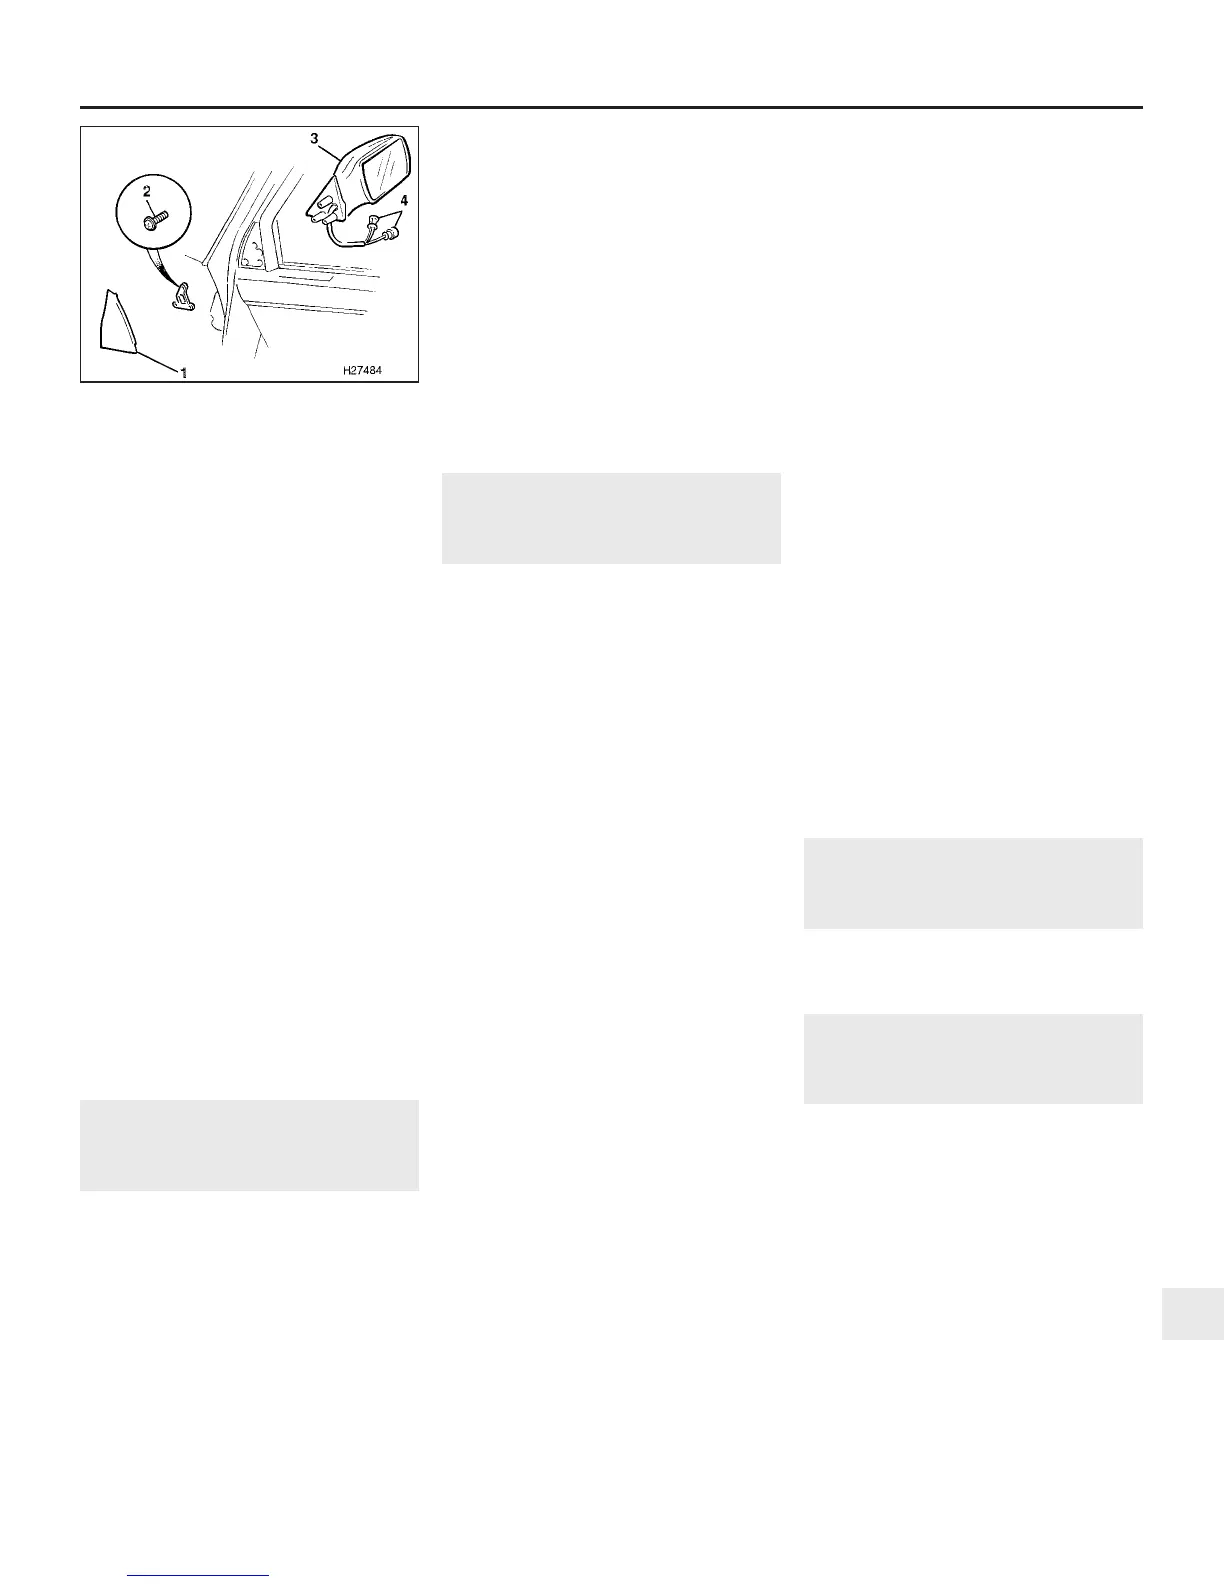
6 Carefully prise off the triangular trim panel
from the upper corner of the door (see
illustration).
7 Peel back the condensation barrier as
necessary to gain access to the mirror wiring
multiplugs, then disconnect them.
8 Undo the three mirror retaining screws and
withdraw the mirror from the door.
Refitting
9 Refitting is a reversal of removal.
32 Rear door inner trim panel -
removal and refitting
1
Note: Many of the attachment points and
component fittings are similar to those of the
front door inner trim panel. Refer to Sec-
tion 21 for useful photographic details.
Models with electrically
operated rear windows
Removal
1 Insert a small screwdriver or similar tool into
the slot at the rear of the interior locking
button, and prise apart the outer moulded half
of the locking button. Lift off the outer half,
then remove the inner half from the locking
rod.
2 Prise out the door inner handle centre
finisher trim, and undo the two screws
securing the trim surround to the door.
3 Pull the door handle outwards, and
manipulate the trim surround off the handle
and door panel.
4 Carefully prise out the blanking plate or
interior light from the bottom of the panel. If
applicable, disconnect the wiring and remove
the light.
5 Lift off the plastic caps and undo the two
screws around the lower rear portion of the
panel.
6 Working through the blanking plate or
interior light aperture, undo the screw in the
recess.
7 Undo the screw at the top of the door pull
below the interior handle.
8 Using a flat tool or your fingers, release the
studs securing the panel to the door by
prising the panel out, or sharply pulling it out,
in the vicinity of each stud. Lift the panel
upwards and withdraw it from the door.
9 Disconnect the wiring multiplug at the rear
of the window lift switch and remove the
panel.
Refitting
10 Refitting is a reversal of removal.
Models with manually operated
rear windows
Removal
11 Insert a small screwdriver into the slot at
the rear of the interior locking button, and
prise apart the outer moulded half of the
locking button. Lift off the outer half, then
remove the inner half from the locking rod.
12 Prise out the door inner handle centre
finisher trim, and undo the two screws
securing the trim surround to the door.
13 Pull the door handle outwards, and
manipulate the trim surround off the handle
and door panel.
14 Push in the escutcheon behind the
window regulator handle, extract the handle
retaining clip and withdraw the handle from
the spindle.
15 Undo the screw from the bottom of the
door pull finger grip, and remove the finger
grip from the panel.
16 Lift off the plastic caps and undo the two
screws around the lower rear portion of the
panel.
17 Using a flat tool or your fingers, release
the studs securing the panel to the door by
prising the panel out, or sharply pulling it out,
in the vicinity of each stud. Lift the panel
upwards and withdraw it from the door.
Refitting
18 Refitting is a reversal of removal. Locate
the regulator handle retaining clip in the
handle groove before fitting the handle to the
door.
33 Rear door - removal, refitting
and adjustment
The procedure for the rear door is virtually
identical to that for the front door, and
reference should be made to Section 22.
34 Rear door exterior handle -
removal and refitting
1
Removal
1 Remove the rear door inner trim panel as
described in Section 32.
2 Release the masking tape and carefully
peel back the polythene condensation barrier
as necessary for access to the door lock area.
3 Remove the access plug from the rear of
the door.
4 Undo the screw securing the interior lock
button control rod bellcrank.
5 Withdraw the bellcrank from the door, and
disconnect the door lock control rod.
6 Undo the bolt securing the rear glass
channel to the door, and remove the glass
channel.
7 Undo the three screws securing the door
lock to the rear face of the door.
Bodywork and fittings 11•15
1 Trim panel
2 Retaining screws
3 Mirror
4 Wiring multiplugs
31.6 Electrically controlled front door
mirror attachments
11
1380 Rover 800 Series Remake


 To Next Page
 Loading...
