8 Release the door lock control rod from the
plastic guide on the inner face of the door.
9 Move the door lock aside, and undo the
bolts securing the exterior handle to the door.
10 Withdraw the exterior handle, release the
collar and remove the control rod from the
exterior handle lever.
11 Remove the exterior handle from the
door.
Refitting
12 Refitting is a reversal of removal.
35 Rear door lock -
removal and refitting
1
Removal
1 Remove the rear door exterior handle as
described in Section 34.
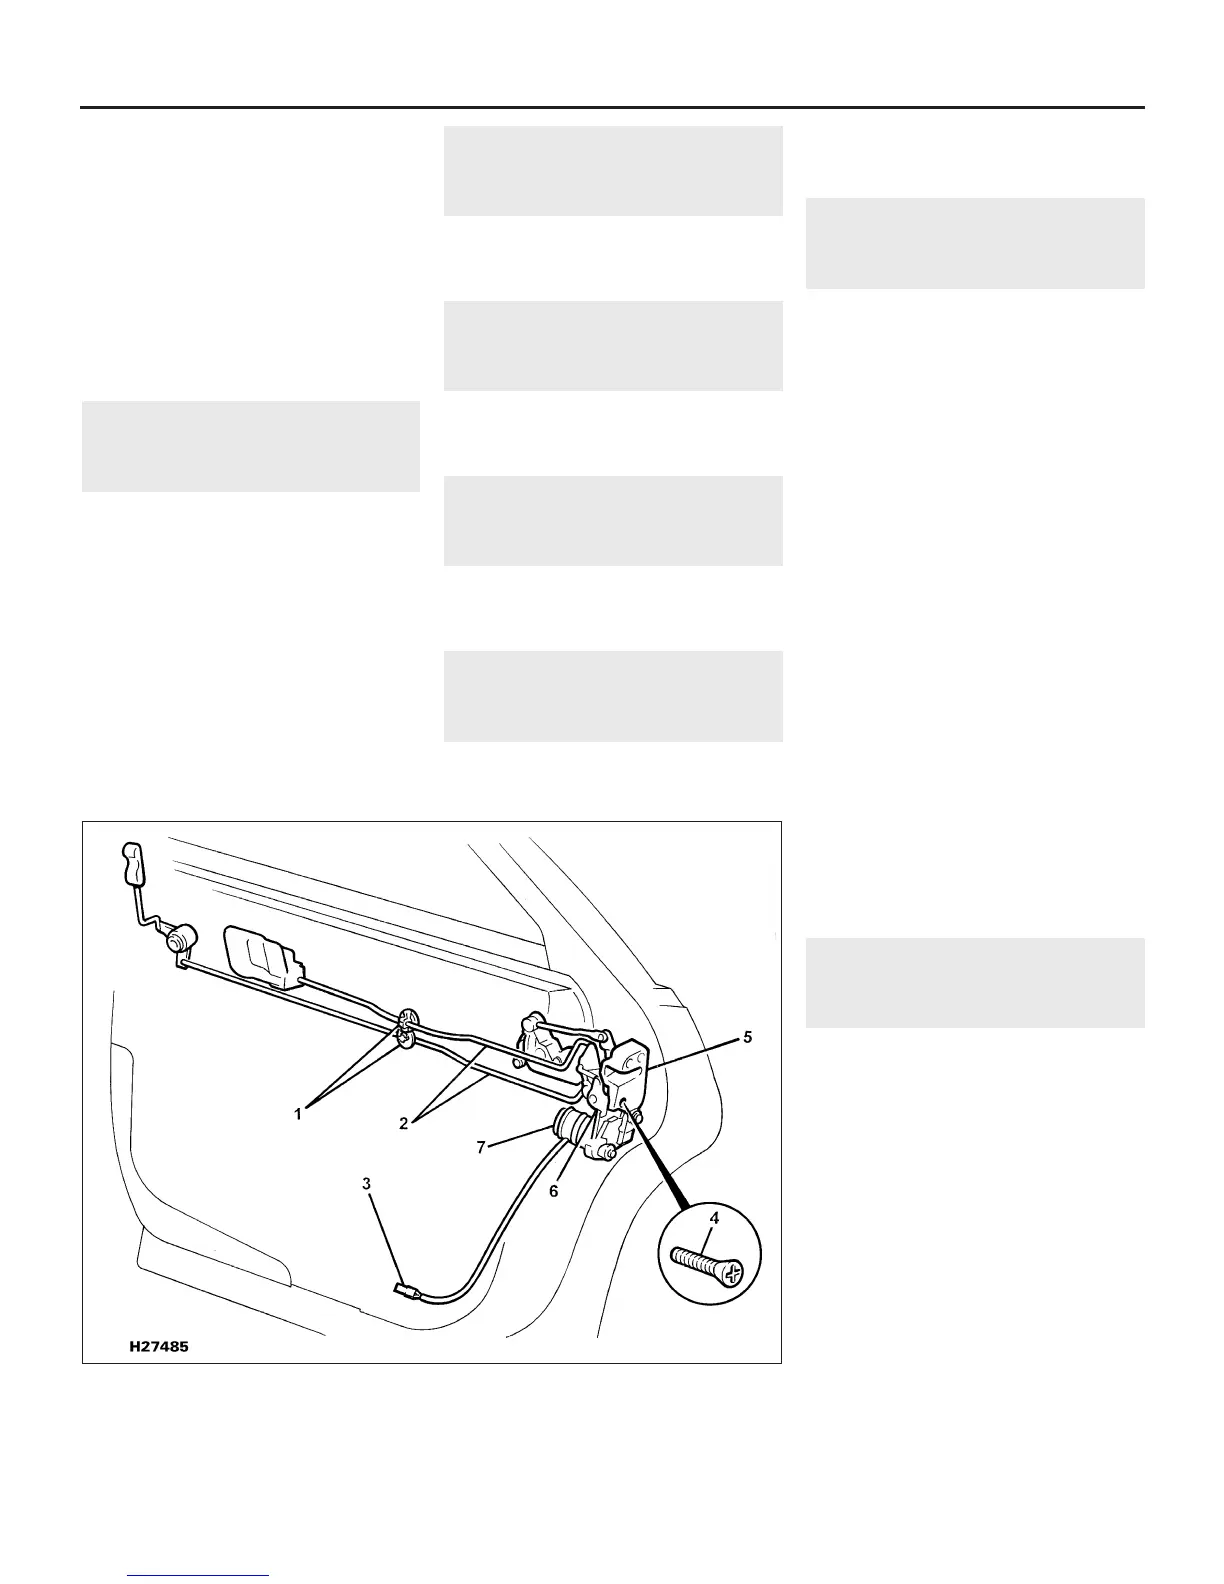
2 Release the door inner handle control rod
from its plastic guide on the inner face of the
door (see illustration).
3 Carefully prise out the two control rods
from their respective levers on the door lock.
4 Disconnect the central locking motor wiring
multiplug, and manipulate the lock assembly
from the door.
Refitting
5 Refitting is a reversal of removal.
36 Rear door interior handle -
removal and refitting
The procedure for the rear door is virtually
identical to that for the front door, and
reference should be made to Section 26.
37 Rear door window glass -
removal and refitting
The procedure for the rear door is virtually
identical to that for the front door, and
reference should be made to Section 27.
38 Rear door window lift motor
- removal and refitting
The procedure for the rear door is virtually
identical to that for the front door, and
reference should be made to Section 28.
39 Rear door window lift
manual regulator -
removal and refitting
The procedure is virtually identical to that
for the front door with electric lift motor,
except that the regulator is secured to the
door with two bolts, and there are no wiring
multiplugs to disconnect. The complete
procedure is covered in Section 28.
40 Rear quarter light glass
(Coupe models) -
removal and refitting
1
Removal
1 Remove the rear seat cushion and squab as
described in Section 43.
2 Carefully ease the door weatherstrip away
from the door pillar in the vicinity of the lower
trim panel.
3 Lift off the plastic caps and undo the lower
trim panel retaining screw at the upper front
edge of the panel. Repeat this procedure with
the remaining three screws, two at the bottom
and one at the upper rear of the panel.
4 Using a flat tool or your fingers, release the
six studs securing the lower trim panel to the
body by prising the panel out, or sharply
pulling it out, in the vicinity of each stud. Lift
away the panel.
5 Prise off the cap and undo the seat belt
upper anchorage bolt.
6 Undo the three lower screws securing the
upper trim panel to the body.
7 Using the same procedure as for the lower
trim panel, release the ten panel retaining
studs and remove the panel from the car.
8 Undo the eight nuts securing the quarter
light glass in position and carefully ease the
glass from the body aperture.
Refitting
9 Refitting is a reversal of removal, but clean
the aperture and the glass thoroughly prior to
refitting.
41 Bumpers -
removal and refitting
1
Front bumper
Removal
1 Refer to Chapter 12 and remove the
headlight lens units, and where fitted, the
headlight washer jets.
2 On pre-1992 model year vehicles, remove
the radiator grille as described in Section 19.
3 Undo the bolt and two screws securing the
access panels below the front of each
wheelarch. Remove both panels (see
illustration).
4 Where fitted, disconnect the wiring
multiplugs from the driving lights.
5 Where fitted, undo the retaining screw and
move the ambient air temperature sensor to
one side.
6 Undo the two nuts securing the bumper
moulding to the frame at the front. Withdraw
the washers and clamp plates.
7 Release the wheelarch liners from the
11•16 Bodywork and fittings
35.2 Rear door lock attachments
1 Control rod and guide
2 Control rod attachments
3 Wiring multiplug
4 Lock retaining screws
5 Door lock
6 Central locking motor
retaining screws
7 Central locking motor
1380 Rover 800 Series Remake


 To Next Page
 Loading...
