the engine is still at normal operating
temperature, just after a run; warm oil and
sludge will flow out more easily. Park the
vehicle on firm, level ground, apply the
handbrake, then select 1st or reverse gear
(manual transmission) or the “P” position
(automatics). Open the bonnet and remove
the engine oil filler cap from the valve cover,
then remove the oil level dipstick.
6 Raise the front of the vehicle, and support it
securely on axle stands. Remove the front
right-hand roadwheel, then remove the plastic
panel under the wheelarch to provide
additional access to the oil filter.
Warning: To avoid personal
injury, never get beneath the
vehicle when it is supported by
only by a jack. The jack provided
with your vehicle is designed solely for
raising the vehicle to remove and refit the
roadwheels. Always use axle stands to
support the vehicle when it becomes
necessary to place your body underneath
the vehicle.
7 Being careful not to touch the hot exhaust
components, place the drain pan under the
drain plug, and unscrew the plug. If possible,
try to keep the plug pressed into the sump
while unscrewing it by hand the last couple of
turns. As the plug releases from the threads,
move it away sharply, so the stream of oil
issuing from the sump runs into the pan, not
up your sleeve! Allow the oil to drain into the
drain pan, and check the condition of the
plug’s sealing washer; renew it if worn or
damaged.
8 Allow some time for the old oil to drain,
noting that it may be necessary to reposition
the pan as the oil flow slows to a trickle. When
the oil has completely drained, wipe clean the
drain plug and its threads in the sump and
refit the plug, tightening it securely.
9 On all engines except the 2.5 litre V6, the oil
filter renewal procedure is relatively simple;
proceed as follows. Reposition the drain pan
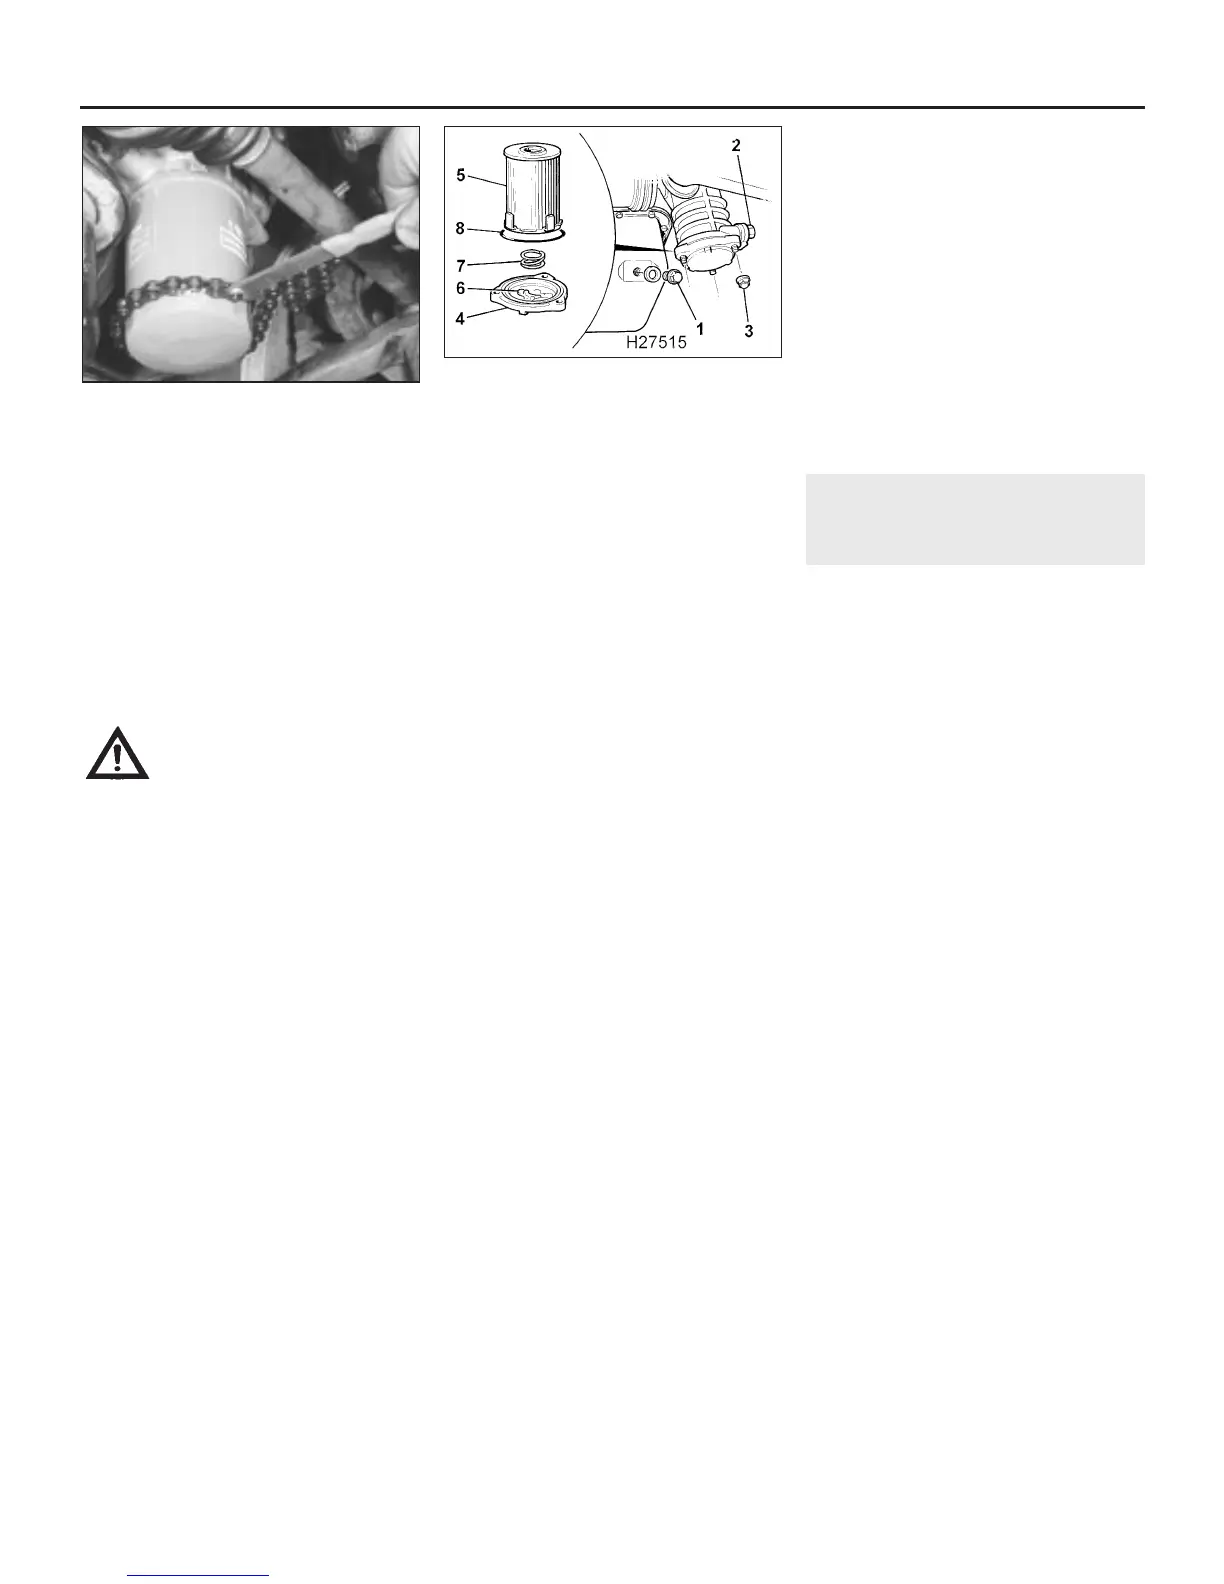
under the oil filter then, using a filter removal
tool, unscrew the oil filter from the housing; be
prepared for some oil spillage (see
illustration). Check the old filter to make sure
that the rubber sealing ring hasn’t stuck to the
engine; if it has, carefully remove it. Withdraw
the filter, taking care to spill as little oil as
possible.
10 Using a clean, lint-free rag, wipe clean the
cylinder block around the filter mounting. If
there are no specific instructions supplied
with it, fit a new oil filter as follows. Apply a
light coating of clean engine oil to the filter’s
sealing ring. Screw the filter into position on
the engine until it seats, then tighten it through
a further half- to three-quarters of a turn only.
Tighten the filter by hand only - do not use any
tools.
11 On 2.5 litre V6 engines the filter is a
cartridge contained within the filter housing.
12 Reposition the drain pan under the filter
assembly and first, drain the filter by
unscrewing the drain plug on the side of the
housing (see illustration). Refit the plug when
the filter has drained. Now undo the three
retaining nuts and withdraw the baseplate
from the filter assembly. As you do this be
prepared for oil spillage and catch the filter
cartridge and its components, which will fall
out and probably land in the oil as the
baseplate is removed. Retrieve the filter lower
spring and the sealing ring on the baseplate.
13 Clean the baseplate thoroughly and wipe
around the inside of the filter housing using a
clean lint-free rag.
14 Locate the new sealing ring in the
baseplate, then fit the spring to the locating
lugs in the baseplate. Locate the filter in the
housing, and refit the baseplate. Screw on the
three nuts and tighten them securely.
15 Remove the old oil and all tools from
under the vehicle, refit the access panel and
roadwheel, then lower the vehicle to the
ground.
16 Refill the engine with oil, using the correct
grade and type of oil, as given in the
“Lubricants, fluids and capacities” Section of
this Chapter. Pour in half the specified
quantity of oil first, then wait a few minutes for
the oil to fall to the sump. Continue adding oil
a small quantity at a time, until the level is up
to the lower notch on the dipstick. Adding
approximately 0.5 to 1.0 litre will raise the
level to the dipstick’s upper notch.
17 Start the engine. The oil pressure warning
light will take a few seconds to go out while
the new filter fills with oil; do not race the
engine while the light is on. Run the engine for
a few minutes, while checking for leaks
around the oil filter seal and the drain plug.
18 Switch off the engine, and wait a few
minutes for the oil to settle in the sump once
more. With the new oil circulated and the filter
now completely full, recheck the level on the
dipstick, adding more oil as necessary.
19 Dispose of the used engine oil safely, with
reference to “General repair procedures” in
the Reference Section of this manual.
8 Underbonnet check for fluid
leaks and hose condition
2
Caution: Renewal of air conditioning hoses
must be left to a dealer service
department or air conditioning specialist
who has the equipment to depressurise
the system safely. Never remove air
conditioning components or hoses until
the system has been depressurised.
General
1 High temperatures in the engine
compartment can cause the deterioration of
the rubber and plastic hoses used for engine,
accessory and emission systems operation.
Periodic inspection should be made for
cracks, loose clamps, material hardening and
leaks.
2 Carefully check the large top and bottom
radiator hoses, along with the other smaller-
diameter cooling system hoses and metal
pipes; do not forget the heater hoses/pipes
which run from the engine to the bulkhead.
Inspect each hose along its entire length,
replacing any that is cracked, swollen or
shows signs of deterioration. Cracks may
become more apparent if the hose is
squeezed.
3 Make sure that all hose connections are
tight. A leak in the cooling system will usually
show up as white- or rust-coloured deposits
on the areas adjoining the leak; if the spring
clamps that are used to secure the hoses in
this system appear to be slackening, they
should be renewed to prevent the possibility
of leaks.
4 Some other hoses are secured to their
fittings with clamps. Where clamps are used,
check that they haven’t lost their tension,
allowing the hose to leak. If clamps aren’t
used, make sure the hose has not expanded
and/or hardened where it slips over the fitting,
allowing it to leak.
5 Check all fluid reservoirs, filler caps, drain
plugs and fittings etc, looking for any signs of
leakage of oil, transmission and/or brake
hydraulic fluid, coolant and power steering
1•12 Every 6000 miles
7.12 Oil filter cartridge components on
2.5 litre V6 engines
1 Engine oil drain plug
2 Oil filter housing drain plug
3 Baseplate retaining nuts
4 Baseplate
5 Oil filter cartridge
6 Spring locating lugs
7 Spring
8 Sealing ring
7.9 Using a filter removal tool, unscrew
the oil filter from the housing
1380 Rover 800 Series Remake
 Loading...