9 Timing belt tensioner and
sprockets - removal,
inspection and refitting
4
Tensioner
Removal
1 Remove the timing belt as described in
Sections 7, or 8, according to engine type.
2 On the “M” series engine, the tensioner will
have been removed together with the timing
belt; proceed to paragraph 6.
3 On the “T” series engine, slacken the
tensioner retaining bolt and allow the
tensioner to move fully under the action of the
spring.
4 Unhook the tensioner spring from the
anchorage stud.
5 Remove the tensioner retaining bolt, lift off
the tensioner and remove the spring.
Inspection
6 Spin the tensioner, and ensure that there is
no roughness or harshness in the bearing.
Also check that the endfloat is not excessive
and there is no sign of free play. Check the
surface of the tensioner for any signs of
roughness, nicks or scoring which may
damage the timing belt. Renew the tensioner
if worn.
7 On “T” series engines, measure the free
length of the tensioner spring. If the free
length is greater than that specified, renew the
spring.
Refitting
8 Refitting is a reversal of removal.
Camshaft sprockets
Removal
9 Remove the timing belt as described in
Sections 7, or 8, according to engine type.
10 Undo the retaining bolt securing each
sprocket to its respective camshaft. To
prevent the sprockets turning as the bolts are
undone, either insert a large screwdriver
through one of the sprocket holes and engage
it with one of the backplate bolts behind, or
make up a holding tool from scrap metal,
which is of a scissor shape, with a bolts at
each end to engage with the holes in the
sprocket.
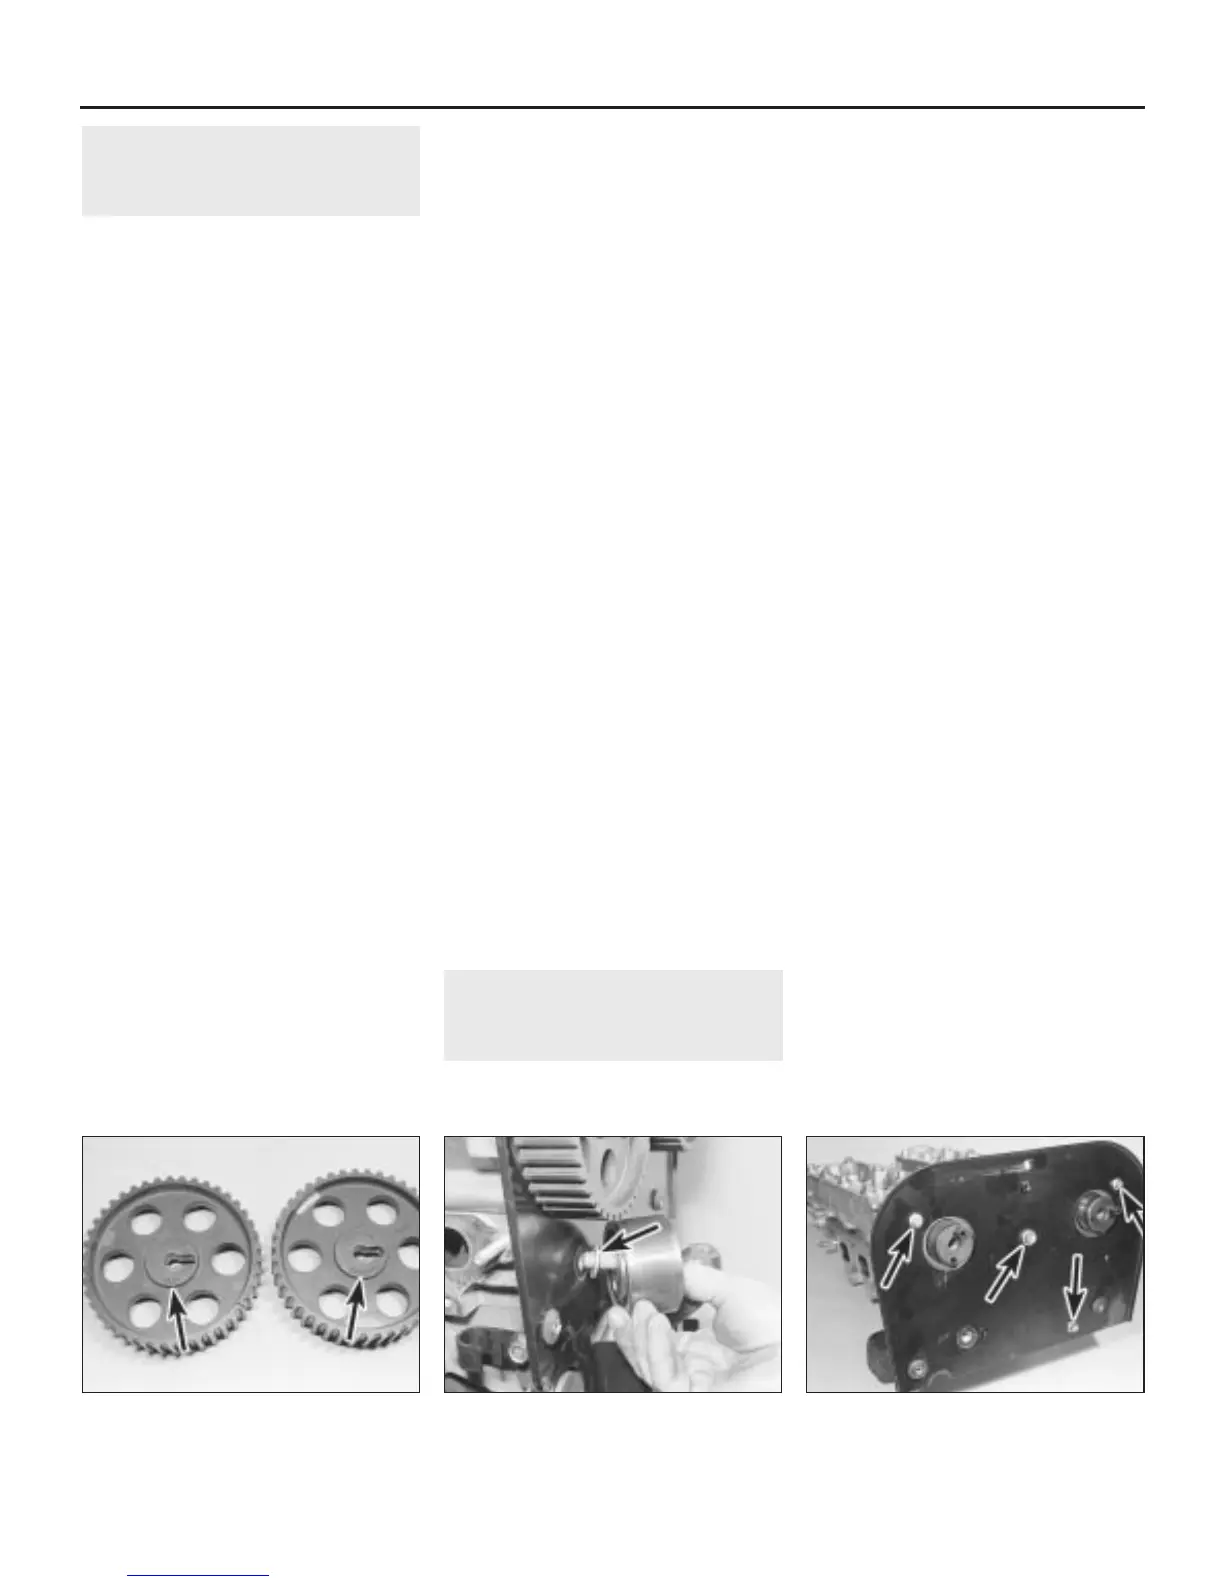
11 Withdraw the two sprockets from the
camshafts, noting that they are not identical,
and should be marked INLET (or IN) and
EXHAUST on their front faces to avoid
confusion. If no marks are visible, make your
own to identify each sprocket (see
illustration).
Inspection
12 Check the condition of the sprockets,
inspecting carefully for any wear grooves,
pitting or scoring around the teeth, or any
wear ridges which might cause damage to the
timing belt. Make sure that the dowels are not
worn and are not a loose fit in the camshaft or
sprocket holes.
Refitting
13 Refitting is a reversal of removal. Ensure
that the sprockets are fitted to their correct
camshafts and tighten the retaining bolt to the
specified torque.
Crankshaft sprocket
Removal
14 Remove the timing belt as described in
Sections 7, or 8, according to engine type.
15 Slide the sprocket off the front of the
crankshaft (“T” series engines).
Inspection
16 Check the condition of the sprocket,
inspecting carefully for any wear grooves,
pitting or scoring around the teeth, or any
wear ridges which might cause damage to the
timing belt. Examine the Woodruff key and its
groove and make sure it is a tight fit.
Refitting
17 Refitting is a reversal of removal.
10 Camshaft oil seals -
renewal
4
Note: The use of an oil seal extractor which
screws into the seal inside circumference is
preferable for this operation. These are
available at most accessory shops and can
often be hired from tool hire outlets. In the
absence of this type of tool, an alternative (but
less satisfactory) method of removal is
described in the following procedure.
Front oil seals
1 Remove the camshaft sprockets as
described in the previous Section.
2 On early “M” series engines undo the
retaining bolt using an Allen key, and remove
the timing belt idler pulley. Recover the spacer
behind the pulley (see illustration).
3 Undo the bolts and remove the backplate
from the cylinder head (see illustration).
4 The oil seals are now accessible for
removal. Punch or drill two small holes
opposite each other in the oil seal.
Screw a self-tapping screw into each hole and
pull on the screws with pliers to extract the
seal.
5 Check that the housing is clean before
fitting the new seal. Lubricate the lips of the
seal and the running faces of the camshaft
with clean engine oil, then carefully locate the
seal over the camshaft and drive it squarely
into position using a tube or a socket. Take
great care not to turn over the lips of the seal
as it is being fitted. An alternative method of
fitting is to draw it squarely into position using
the sprocket bolt and a distance piece.
6 With the seal fully inserted in its housing,
refit the components removed for access then
refit the camshaft sprockets as described in
the previous Section.
Rear oil seals
Exhaust camshaft oil seal
7 Refer to the relevant Part of Chapter 4 and
remove the air cleaner assembly and intake
trunking components as necessary for
access.
8 Undo the two retaining bolts, withdraw the
distributor cap, and place it to one side.
9 Undo the retaining Allen screw, and remove
the distributor rotor arm.
10 Undo the two screws and remove the
2A•10 4-cylinder engine – in-car engine repair procedures
10.3 Undo the bolts (arrowed) and remove
the backplate
10.2 Remove the timing belt idler pulley
and recover the spacer (arrowed)
9.11 The camshaft sprockets are marked
INLET (or IN) and EXHAUST on their front
faces (arrowed)
1380 Rover 800 Series Remake
 Loading...