2 Jack up the front of the car and support it
on axle stands.
3 Remove the right-hand front road wheel
and the access panel under the wheelarch.
4 Place a jack with interposed block of wood
under the sump and just take the weight of
the engine.
5 Undo the two right-hand engine mounting
retaining bolts.
6 Lower the jack slightly to provide access to
the oil cooler and filter head assembly from
under the wheelarch.
7 Undo the three bolts securing the assembly
to the front of the engine.
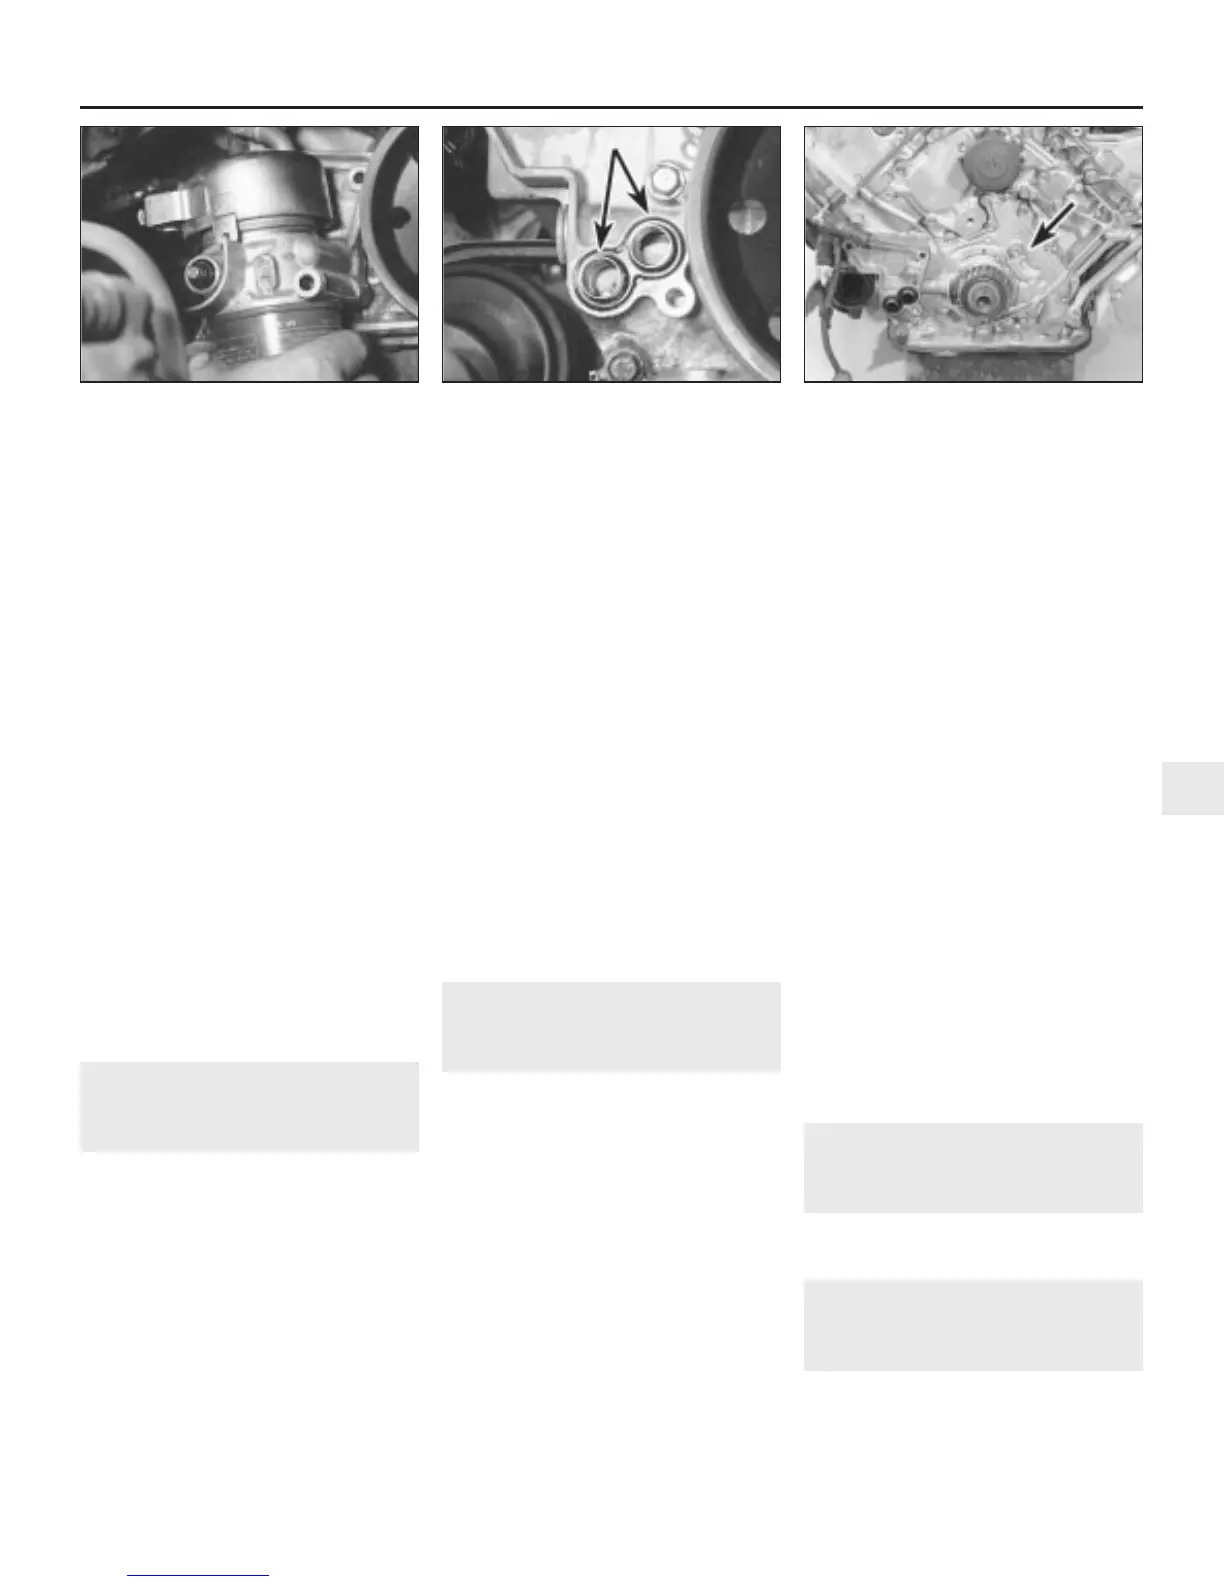
8 Withdraw the assembly from the engine,
and disconnect the oil pressure switch wiring
and the two coolant hoses (see illustration).
9 Recover the double O-ring seal from the
filter housing outlets on the engine (see
illustration).
10 With the assembly on the bench, undo the
centre bolt from the oil cooler and remove the
cooler from the filter head. Recover the O-
rings.
Refitting
11 Refitting is a reversal of removal, but
lubricate the O-rings prior to fitting. Fill the
cooling system and top-up the engine oil as
described in Chapter 1, on completion.
19 Oil pump -
removal and refitting
4
Removal
1 Drain the engine oil as described in Chap-
ter 1.
2 Remove the timing belt as described in
Section 12.
3 Remove the crankshaft sprocket and the
timing belt tensioner as described in Section
13.
4 Remove the timing belt inner guide from the
front of the crankshaft.
5 Unscrew the timing belt tensioner spring
anchorage stud from the oil pump housing.
6 Remove the oil cooler and filter head as
described in Section 18.
7 Support the engine from above using a
crane and chains or sturdy slings attached to
suitable anchorage points on the engine.
8 Remove the jack from under the sump
(from the previous operation) then remove the
sump and oil pick-up strainer as described in
Section 17.
9 Undo the retaining bolt and remove the
dipstick tube. Recover the O-ring.
10 Undo the two bolts from the oil feed tube
and remove the tube. Recover the O-rings.
11 Undo the nine oil pump housing retaining
bolts, noting the locations of the two longer
bolts (see illustration).
12 Release the pump housing from the
dowels and remove it from the engine.
13 Clean off all traces of sealant on the pump
housing and cylinder block mating faces prior
to reassembly.
Refitting
14 Refitting is a reversal of removal. Apply a
bead of RTV sealant to the housing mating
face, inside the line of bolt holes and tighten
the retaining bolts to the specified torque. Use
new O-rings on all components.
20 Crankshaft oil seals -
renewal
4
Front oil seal
1 Remove the timing belt as described in
Section 12.
2 Withdraw the sprocket from the crankshaft
together with the timing belt guide plate.
3 Remove the Woodruff key from the slot in
the crankshaft.
4 Note the fitted depth of the oil seal in
relation to the front of the housing as an aid to
refitting.
5 Punch or drill two small holes opposite
each other in the seal. Screw a self tapping
screw into each, and pull on the screws with
pliers to extract the seal.
6 Clean the seal location in the pump
housing, and clean off any burrs or raised
edges, which may have caused the seal to
fail.
7 Lubricate the lips of the new seal with clean
engine oil and carefully locate the seal over
the crankshaft and into the housing.
8 Using a tubular drift which bears on the
hard outer edge of the seal, drive the seal into
the housing to the previously noted depth.
9 Refit the Woodruff key to the crankshaft.
10 Refit the timing belt guide plate and
sprocket to the crankshaft.
11 Refit the timing belt as described in
Section 12.
Rear oil seal
12 Remove the flywheel/driveplate as
described in Section 22.
13 Punch or drill two small holes opposite
each other in the seal. Screw a self tapping
screw into each, and pull on the screws with
pliers to extract the seal.
14 Clean the seal housing, and polish off any
burrs or raised edges, which may have
caused the seal to fail in the first place.
15 Lubricate the lips of the new seal with
clean engine oil and carefully locate the seal
on the end of the crankshaft.
16 Using a large tubular drift bearing on the
hard outer edge of the seal, drive the seal into
the housing until it is flush with the housing
face.
17 Clean off any surplus oil then refit the
flywheel/driveplate as described in Sec-
tion 22.
21 Engine/transmission
mountings - inspection and
renewal
Refer to Part A, Section 18.
22 Flywheel/driveplate -
removal, inspection and
refitting
3
Removal
1 With the engine removed from the car and
separated from the transmission, or with the
V6 engine - in-car engine repair procedures 2B•11
19.11 Oil pump housing location on the
front of the engine
18.9 Recover the double O-ring seal from
the filter housing outlets
18.8 Removing the oil cooler and filter
head assembly
2B
1380 Rover 800 Series Remake
 Loading...