31 Working under the car, place a jack and
block of wood under the engine to support it,
then unscrew the eight bolts that secure the
engine longitudinal support member by
approximately 15 mm - it should not be
necessary to remove the bolts. Have an
assistant lever the support member down to
give increased clearance, which will allow the
compressor to be removed from the car.
Refitting
32 Refitting the compressor is a reversal of
removal. Tighten the unions and all mountings
to the specified torque. Have the system
evacuated, charged and leak-tested by the
specialist who discharged it.
Receiver/dryer
Removal
33 Have the refrigerant discharged at a
dealer service department or an automotive
air conditioning repair facility.
34 Unscrew the two pipe unions on top of
the receiver/dryer and plug or cover the
disconnected pipes and receiver/dryer ports
(see illustration). Recover the O-rings from
the pipe unions.
35 Undo the three mounting bolts, move the
adjacent components clear and remove the
unit from the car.
Refitting
36 Refitting the receiver/dryer is a reversal of
removal. Tighten the unions and mountings to
the specified torque. Have the system
evacuated, charged and leak-tested by the
specialist who discharged it.
Electric cooling fan assembly
37 Refer to Section 5.
Blower motor
Removal
38 Remove the trim panel under the facia on
the passenger’s side.
39 Disconnect the wiring multiplug from the
motor socket.
40 Detach the hose from the motor and
motor housing.
41 Undo the three bolts and remove the
motor from the blower housing.
Refitting
42 Refitting is a reversal of removal.
Evaporator
Removal
43 Have the refrigerant discharged at a
dealer service department or an automotive
air conditioning repair facility.
44 Undo the five screws and remove the
glovebox from the facia.
45 Remove the radio/cassette player and the
clock as described in Chapter 12.
46 Undo the retaining screws and remove
the glovebox bar.
47 From within the engine compartment
unscrew the two pipe unions using two
spanners, one to unscrew the union nut and a
second to counterhold the relevant pipe.
Recover the O-rings from the pipe unions. Plug
or cover the disconnected pipes immediately.
48 Disconnect the thermistor wiring multiplug
on the front face of the evaporator.
49 Undo the evaporator mounting nuts and
bolts, noting the location of any cable support
brackets and clips.
50 Disconnect the wiring at the connector
multiplugs as the unit is withdrawn and
remove the evaporator from the car.
Refitting
51 Refitting the evaporator is a reversal of
removal. Tighten the unions and mountings to
the specified torque. Have the system
evacuated, charged and leak-tested by the
specialist who discharged it.
Blower housing
Removal
52 Remove the evaporator as described
previously.
53 Disconnect the wiring multiplugs, undo the
mounting bolts and remove the unit from the car.
Refitting
54 Refitting is a reversal of removal.
Cooling, heating and air conditioning systems 3•13
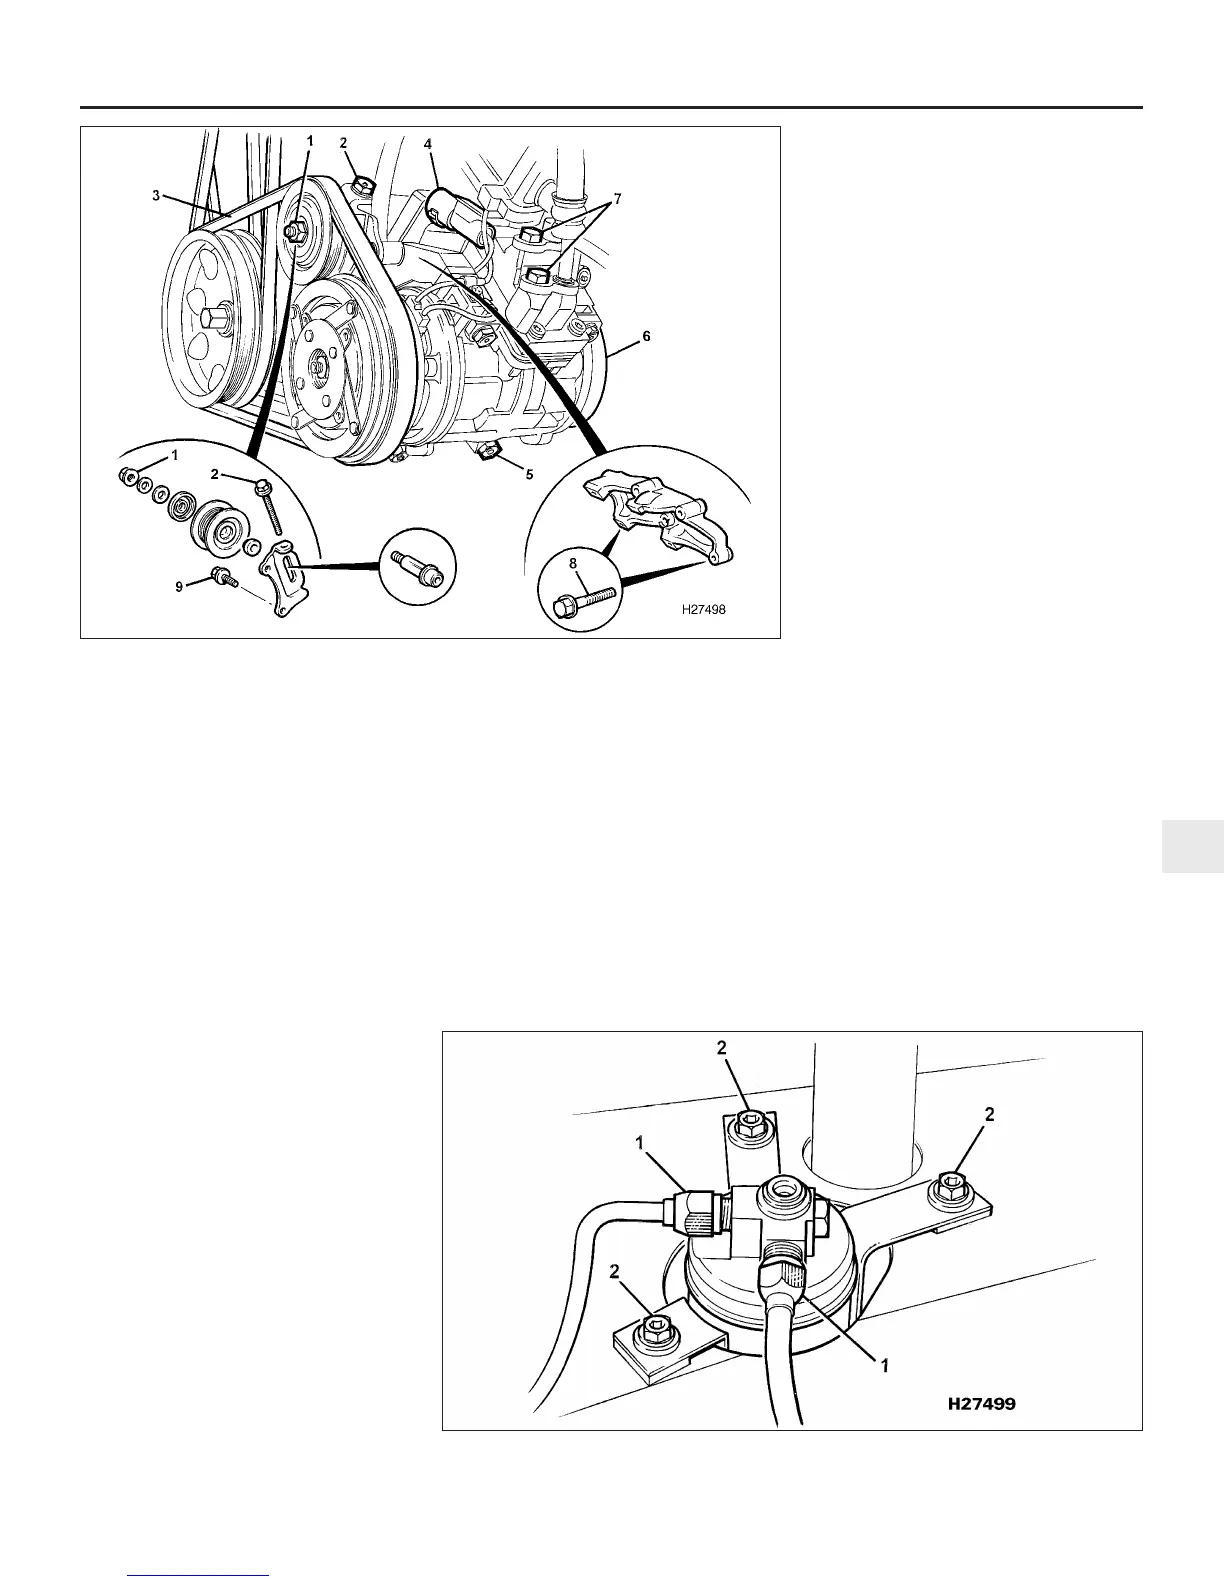
14.28 Air conditioning compressor mountings and attachments on V6 engines
1 Tensioner pulley locknut
2 Tensioner adjuster bolt
3 Drivebelt
4 Wiring connector
5 Compressor mounting bolts
6 Compressor
7 Pipe mounting flange bolts
8 Mounting bracket bolts
9 Tensioner bracket bolt
14.34 Air conditioning receiver/dryer pipe unions (1) and mounting bolts (2)
3
1380 Rover 800 Series Remake


 To Next Page
 Loading...
