has different fittings requiring different
tools, so that there is no chance of the
two types of refrigerant becoming mixed
accidentally.
(e) If for any reason the system must be
disconnected, entrust this task to your
Rover dealer or a refrigeration engineer.
(f) It is essential that the system be
professionally discharged prior to using
any form of heat - welding, soldering,
brazing, etc - in the vicinity of the system,
before having the vehicle oven-dried at a
temperature exceeding 70ºC after
repainting, and before disconnecting any
part of the system.
14 Air conditioning system
components -
removal and refitting
1
Warning: Refer to the
precautions given in the
previous Section before
proceeding.
Condenser
Removal
1 Have the refrigerant discharged at a dealer
service department or an automotive air
conditioning repair facility.
2 Disconnect the battery negative (earth) lead
(see Chapter 5, Section 1).
3 On pre-1992 model year vehicles, remove
the radiator grille as described in Chapter 11,
Section 19.
4 Undo the two bolts each side securing the
centre platform to the body side members.
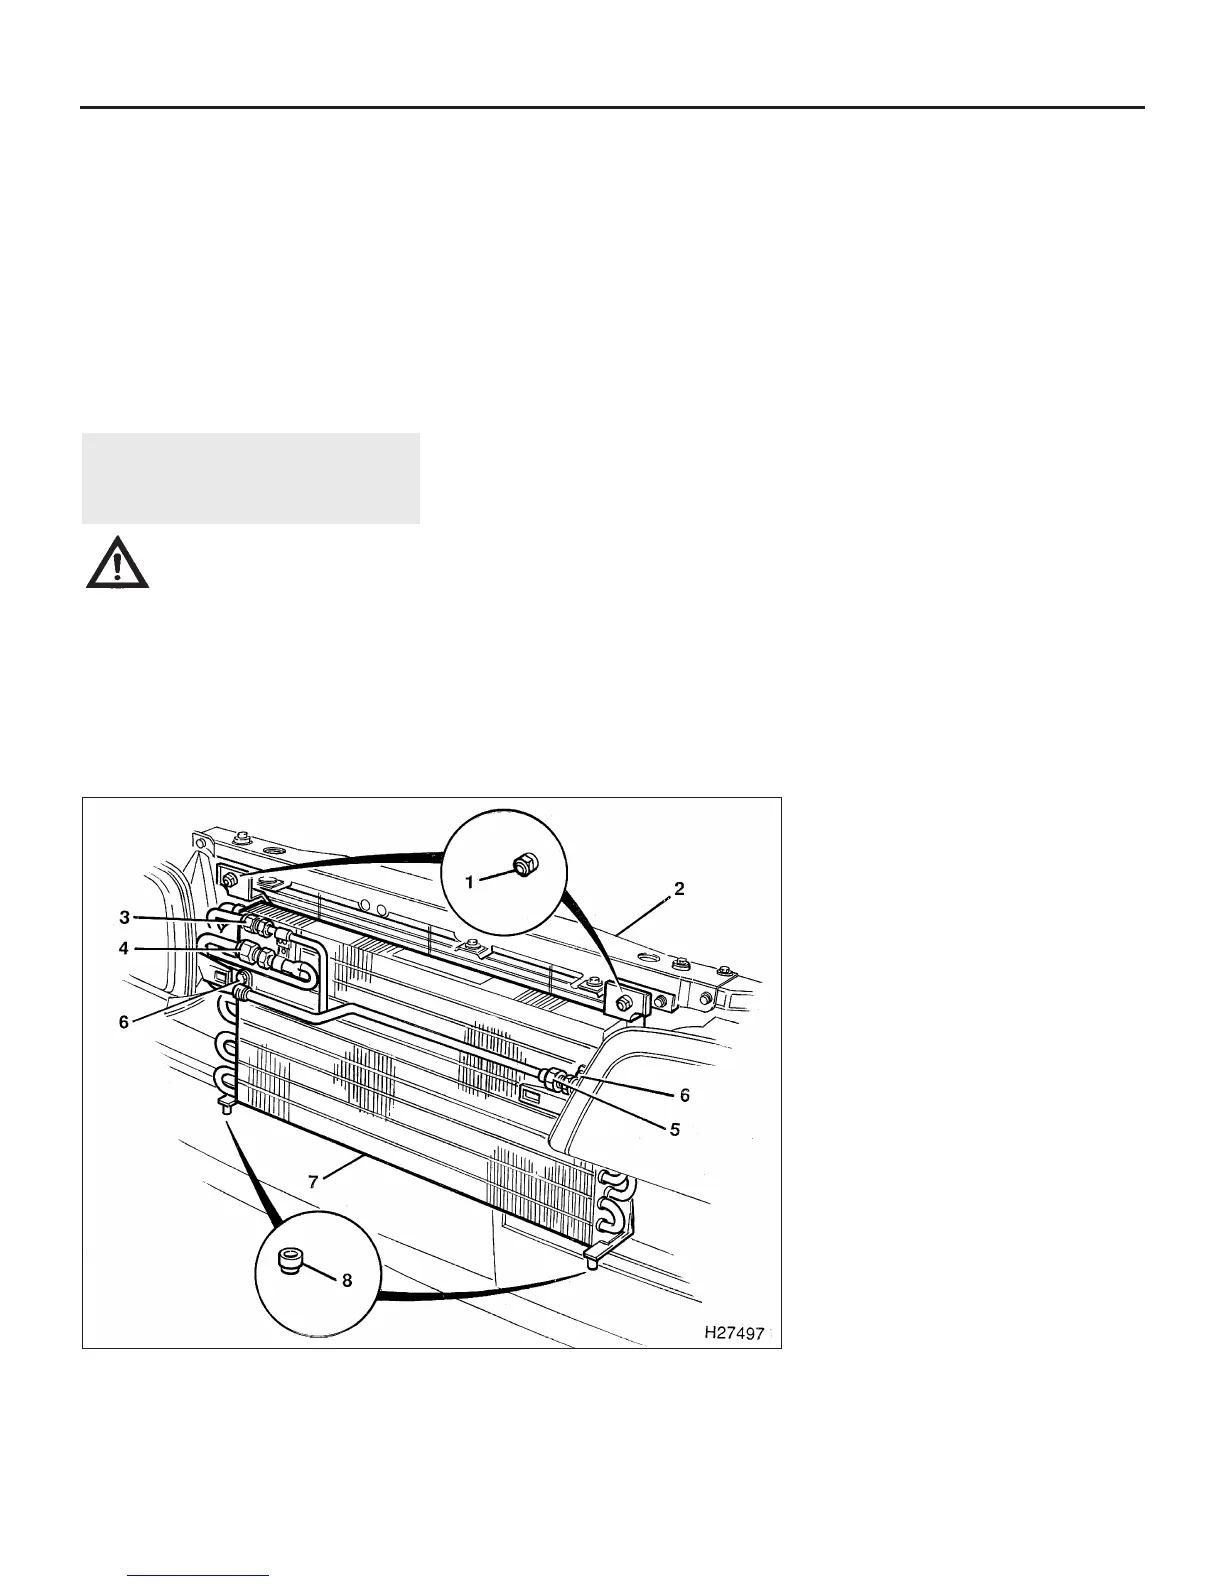
5 Undo the two nuts securing the condenser
to the front of the centre platform (see
illustration).
6 Undo the nut and retaining bolt securing
the bonnet safety catch to the centre
platform.
7 Cut off the cable ties securing the various
hoses to the centre platform.
8 Lift the centre platform upwards, turn it
over, and cut off the cable ties securing the
bonnet release cable to the platform
underside. Remove the platform from the car.
9 On early models, using two spanners, one to
unscrew the union nut and a second to
counterhold the relevant pipe, unscrew the pipe
unions on the front of the condenser. Where
fitted, recover the O-rings from the pipe unions.
Plug or cover the open pipes and condenser
ports. On later models, undo the two pipe union
retaining bolts and release the pipes. Recover
the O-rings from the pipe connector ends.
10 Undo the bolts from the pipe support
brackets and move the disconnected pipes
aside.
11 Lift the condenser upwards, and carefully
remove it from the car.
Refitting
12 Refitting the condenser is a reversal of
removal, but ensure that the lower mounting
lugs engage in the rubber grommets, and the
centre platform grommets locate over the
radiator upper lugs. Re-secure the bonnet
release cable and hoses to the centre
platform, using new cable ties. Have the
system evacuated, charged and leak-tested
by the specialist who discharged it.
Compressor - 4-cylinder engines
Removal
13 Have the refrigerant discharged at a
dealer service department or an automotive
air conditioning repair facility.
14 Disconnect the battery negative (earth)
lead (see Chapter 5, Section 1).
15 Raise the front of the vehicle and securely
support it on axle stands.
16 Remove the auxiliary drivebelt (see
Chapter 1).
17 Remove the alternator as described in
Chapter 5.
18 Undo the bolts securing the alternator
support bracket to the compressor and move
the support bracket aside.
19 Disconnect the compressor clutch wiring
at the in-line connector.
20 Unscrew the two pipe unions at the rear of
the compressor and plug or cover the
disconnected pipes and compressor ports.
Where fitted, recover the O-rings from the
pipe unions.
21 Undo the bolt securing the pipe bracket to
the flange on the underside of the
compressor.
22 Undo the upper and lower compressor
mounting nuts and bolts and remove the unit
upwards off the engine.
Refitting
23 Refitting the compressor is a reversal of
removal. Tighten the unions and mountings to
the specified torque. Have the system
evacuated, charged and leak-tested by the
specialist who discharged it.
Compressor - V6 engines
Removal
24 Have the refrigerant discharged at a
dealer service department or an automotive
air conditioning repair facility.
25 Disconnect the battery negative (earth)
lead (see Chapter 5, Section 1).
26 Raise the front of the vehicle and securely
support it on axle stands.
27 Remove the auxiliary drivebelt (see
Chapter 1).
28 Disconnect the compressor clutch wiring
at the in-line connector (see illustration).
29 Undo the four compressor mounting bolts
and withdraw the compressor from the
mounting bracket.
30 Undo the two bolts and release the pipe
mounting flanges from the compressor.
Recover the O-rings from the pipe unions and
plug or cover the disconnected pipes and
compressor ports.
3•12 Cooling, heating and air conditioning systems
14.5 Air conditioning condenser mounting and attachment details (early version shown)
1 Condenser-to-centre
platform retaining nuts
2 Centre platform
3 Pipe union nut
4 Pipe union nut
5 Pipe union nut
6 Bracket
7 Condenser
8 Lower mounting lug rubber
grommets
1380 Rover 800 Series Remake


 To Next Page
 Loading...
