3
Set the ironing temperature using
the thermostat control (
), based
on the fabric type. We recommend
that you refer to the table above.
The temperature indicator light will
go on, indicating that the soleplate
is heating up. When the temperature
indicator light (
) goes o, the desired
temperature has been obtained.
Please note the following: when
heating a cold iron, wait for the
second extinction of the indicator
light. Only then is the set temperature
obtained.
Useful tip: As the cooling period is
longer than the heating period, we
recommend that you iron delicate
fabrics at a very low temperature
initially.
IRONING AND STEAM FUNCTIONS
D
1 • Ironing WITHOUT steam
(D1)
To iron without steam, set the variable
steam control (
) to and set the
temperature based on the fabric type
(symbols •, •• or •••).
2 • Ironing WITH steam (D2)
To iron with steam, the thermostat
control button must be set above the
•• position. The ow of steam can be
adjusted either by or (maximum
steam ow).
For maximum steam flow ,
we recommend that you set the
temperature to •••.
3 • Jet steam ironing (D3) (Set
the temperature to position •••)
To remove stubborn creases using
powerful jet steam, press the steam
button (
).
4 • Vertical smoothing (Set the
temperature to position •••)
To smooth clothes that are hanging up,
curtains, etc., hold the iron in a vertical
position and press the jet steam button.
Avoid contact between the hot
soleplate and sensitive fabrics.
A horizontal jet of steam and a vertical
jet of steam (D3) are also possible when
the variable steam control is set to
. The interval between jets of steam
must be approximately 4 seconds.
Important: Never
direct the jet of steam
towards people or
animals.
5 • Spray function
(D4)
To dampen stubborn creases, press the
spray button (
).
NO
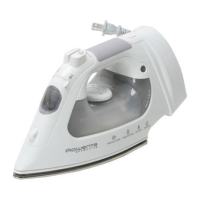
SET THE IRONING TEMPERATURE
C
Fabric labels Type of fabric Thermostat
Synthetic bres e.g.
viscose, polyester
Silk, wool
Cotton, linen
FILLING THE WATER TANK
B
Before lling the water container,
unplug the appliance and set the
variable steam control to position .
Open the inlet-cover, hold the iron in a
slanting position and ll with water up
to the maximum water level mark. (
).
Never remove anticalc valve by lling
the tank.
Useful tip: Spray starch onto the
underside of the fabric that you are
ironing only.