Do you have a question about the RPM Toe-In Gauge and is the answer not in the manual?
Instructions for using the RPM Toe-In Gauge for accurate toe-in measurements on vehicles at static ride height.
Guidance for using the toe-in gauge on narrow chassis vehicles or with slick tires, including alternative reference points.
Procedure for checking toe-out, noting it's a rarely used setting and how to adapt the gauge reading.
The RPM Toe-In Gauge is a specialized tool designed to accurately measure the toe-in and, less commonly, toe-out angles of remote-controlled (RC) vehicles. Its primary function is to help RC enthusiasts and racers fine-tune their vehicle's suspension for optimal performance, ensuring that the front wheels are aligned correctly relative to the vehicle's centerline. Proper toe-in or toe-out settings are crucial for stability, steering response, and tire wear in RC cars and trucks.
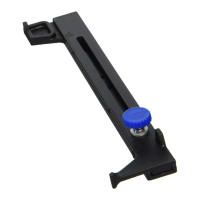
The gauge itself is a compact, hand-held device with several key features that facilitate its use. It has a bottom edge equipped with two small feet, which provide stability when the gauge is placed on a flat surface. This stability is essential for obtaining consistent and accurate measurements. The gauge also features a blue knob, which is spring-loaded and designed to be operated with light tension. This knob controls the opening and closing of the gauge's pointers, allowing it to adapt to different vehicle widths.
One end of the gauge is characterized by what is described as a "whale's tail" design; these are the pointers that make contact with the vehicle's tires. The opposite end features a graduated scale, accompanied by a single pointer. Each line on this scale represents one degree of total toe-in, which translates to half a degree per side. This clear, graduated scale allows users to quickly and precisely read the toe-in angle.
For vehicles with larger tires or those requiring additional clearance, the gauge includes risers. These risers are installed just to the outside of the balancing feet, elevating the gauge to the appropriate height to clear the vehicle's chassis and tires. This adaptability ensures that the gauge can be used across a wide range of RC vehicle types, from sedans to off-road trucks.
The usage of the RPM Toe-In Gauge follows a specific procedure to ensure accuracy. All measurements must be taken with the vehicle at its static ride height, meaning the vehicle should be resting on a level surface as it would normally sit. The gauge itself must also be placed on a smooth, flat surface to prevent any inaccuracies caused by uneven terrain.
To begin a toe-in measurement, the user first slides the gauge partially open. If measuring an off-road truck, the risers should be installed. With the front of the vehicle facing the user, the gauge is placed under the vehicle, behind the front tires, with the blue knob facing the user. The user then selects a "reference rib" on each tire. These ribs serve as consistent contact points for the gauge's pointers. One gauge point is carefully placed against the inside of the chosen reference rib on one tire. The gauge is then slid open until the pointer on the other end touches the inside of the reference rib on the opposite tire. Once both pointers are touching their respective reference ribs, the blue knob is tightened to lock the gauge in position.
After the gauge is locked, it is gently removed from under the vehicle. The vehicle's ride height should then be reset. The gauge is then placed in front of the tires, again with the blue knob facing the user. At this point, only the left gauge pointer will be facing the tire. This pointer is placed against the inside edge of the same reference rib used previously. The reading is then taken on the right side of the gauge, where the inside of the reference rib on the tire aligns with a line on the graduated scale. The outermost end of the scale represents "0" degrees, and each line moving inwards represents one degree of toe-in. If the reference rib does not align with any lines, it indicates toe-out, and adjustments to the turnbuckles are necessary until the desired toe-in is achieved.
For vehicles with a narrow chassis, such as sedans, the gauge offers an additional feature. If the gauge cannot close far enough in its standard configuration, there is a second hole for the blue knob. The user can remove the knob from its standard position, close the gauge until the second threaded hole is revealed, and then reinstall the knob. This allows the pointers to come closer together, accommodating narrower vehicles. In cases of tighter tread designs or slick racing tires, it may be necessary to use the inside edge of the tires as reference points. Additionally, small risers or thin, equal-thickness spacers can be placed under each front tire to elevate the chassis, allowing the gauge to stand upright behind the tires.
While toe-out measurement is less common, the gauge can also be used for this purpose. If a user prefers to run toe-out or encounters a situation where toe-out is prevalent, the procedure is slightly modified. The measurement begins from the front of the tires and concludes by taking the reading from the back of the tires. The key difference in this procedure is that the blue knob must face the rear of the vehicle throughout the entire process.
Maintenance of the RPM Toe-In Gauge primarily involves ensuring its cleanliness and proper handling. The gauge should only be used on smooth, flat surfaces to prevent damage to its feet or pointers and to ensure accurate readings. Keeping the gauge clean of dirt and debris will help maintain the smooth operation of the sliding mechanism and the clarity of the graduated scale. The spring-loaded blue knob should be operated with light tension to avoid unnecessary wear on the mechanism. After use, storing the gauge in a protective manner will prevent physical damage and help preserve its accuracy over time. Regular inspection for any signs of wear or damage to the pointers, feet, or scale will ensure the gauge remains a reliable tool for suspension tuning. If the gauge is dropped or subjected to impact, it should be checked for any misalignment or damage that could affect its accuracy.
| Type | Toe-In Gauge |
|---|---|
| Accuracy | ±0.1 degrees |
| Display | Digital LCD |
| Power Supply | 9V Battery |
| Weight | 0.5kg |
| Operating Temperature | 0°C to 50°C |