EasyManua.ls Logo

RST CHAMP Series User Manual

RST CHAMP Series
48 pages
To Next Page IconTo Next Page
Page #1 background imageLoading...
Page #1 background image
OWNER’S MANUAL
1
2
CONGRATULATIONS on selecting an RST suspension fork.
You have chosen the best suspension components for your
bicycle! This RST fork is fully assembled and ready to be
installed onto your bicycle.
Proper care and maintenance of your RST product is necessary for longevity and optimum
performance.
Failing to perform routine maintenance will greatly decrease the performance of the
product and may lead to premature deterioration or even failure of the product. Lack of
maintenance may also jeopardize the safe operation of your fork and will void the warranty.
This is an off-road fork, and as such, does not come with proper reectors for on-
road use.
Have your dealer or mechanic install proper reectors to meet the Customer Product
Safety Commission’s (C.P.S.C.) requirements for bicycles if the fork is going to be
used on public roads at any time.
This manual contains important information about the safe operation and maintenance
of your fork. Reading this manual entirely, and properly maintaining your bicycle and
suspension fork is essential. To ensure that your RST fork performs properly, we
recommend that you have your fork installed by a qualied bicycle mechanic. Prior to
riding your bicycle, you should inspect your suspension fork to ensure that no damage
has occurred during the course of riding.
Do not ride your bicycle if the fork shows any signs of bending, cracking, leaking, or
if it is missing any of the original supplied components. Any fall from your bicycle can
result in serious injury or even death. Following these instructions can help you reduce
the risk of being injured. We recommend returning your suspension fork to your dealer
or an authorized service center annually for a thorough inspection and service.
1. Never remove or have the steerer tube or stanchions removed from the crown. The
steerer tube and stanchions (inner legs) are press t at the factory. Press tting of the
inner legs and steerer tubes has higher performance versus having clamped stanchions
or steerer tubes, but they can NOT be pressed out and changed. Pressing them out will
permanently damage the crown beyond repair and render it unsafe for any use.
2. Do NOT attempt to thread a thread-less steerer tube. Cutting threads will weaken the
steerer tube and cause an unsafe condition. The only safe thing to do is to obtain the
proper crown/ steerer from your dealer, contact RST USA warranty service center or
RST Europe.
3. Any other alteration or modication to your fork should be considered unsafe and will
void the warranty. Contact your dealer, RST USA warranty service center or RST Europe
prior to modifying your fork in any way for safety information.
4. Do not use an RST fork if any parts are broken, bent, cracked, or you suspect may be
damaged. Contact your dealer, RST USA warranty service center or RST Europe, if you
have any question concerning the integrity or condition of your fork.
5. RST recommends that you inspect your fork before every ride for wear and damage.
Please pay particular attention to the crown, stanchions, sliders, dropouts and brace for
any sign of cracks, bending or damage.
ENGLISH
CAUTION
IMPORTANT
GENERAL WARNING
CONSUMER SAFETY INFORMATION
Question and Answer IconNeed help?

Do you have a question about the RST CHAMP Series and is the answer not in the manual?

RST CHAMP Series Specifications

General IconGeneral
Steerer Tube Diameter1 1/8"
Wheel Size26"
Travel80mm
Spring TypeCoil
Brake CompatibilityDisc
MaterialAluminum
Weight2100g
ColorBlack, White
AdjustabilityPreload

Summary

Consumer Safety Guidelines

Fork Component Integrity

Do not remove steerer tube or stanchions; press fit is permanent. Do not thread a thread-less steerer tube.

Usage and Condition Warnings

Avoid alterations/modifications and do not use damaged forks; contact dealer if unsure of condition.

Pre-Ride Inspection

Inspect fork for wear and damage before every ride, focusing on key areas like crown and stanchions.

Warranty Information

Warranty Exclusions

Conditions and actions that void the RST product warranty, including misuse, modifications, and improper maintenance.

Installation Instructions

Steerer Tube and Stanchion Warning

Warning against removing or replacing press-fit steerer tubes or stanchions as it renders the fork unsafe.

Functionality

Compression Damping Adjustment

How to adjust compression damping to lockout using crown-mounted or remote levers.

Rebound Adjustment

How to adjust the rebound damping speed using the external adjuster knob.

Tiny Remote Lockout (TRL) Assembly

Instructions for assembling the TRL lever on the handlebar for lockout function.

Air Spring System

Explanation of the RST air spring system for adjustable air pressure.

Adjusting Fork Settings

Measuring and Setting Sag

Procedure to measure sag using a zip-tie method for optimal suspension setup.

Increasing Air Pressure

Steps for using the RST air pump to set the desired air pressure in the fork.

Installation Instructions

Installing QR Type Front Hub

Step-by-step guide for installing a Quick Release (QR) type front hub.

Installing 20mm Front Hub

Instructions for installing a 20mm thru-axle front hub and its components.

Installing 15mm QR Axle

Instructions for installing a 15mm Quick Release (QR) axle and adjusting its position.

Special Notes and Warnings

DJ / Free Ride / DH Usage

Warranty exclusions for forks used in extreme disciplines like DJ, Free Ride, or Downhill.

General Warning - Wear and Stress

Mechanical components are subject to wear; cracks or color changes may indicate reduced lifespan.

Lithium Grease Warning

Do not use lithium-based grease as it can react with fork parts and reduce performance.

Storage and Long-Term Inactivity

Avoid storing forks upside down; reset lock-out to OPEN and cycle fork before riding.

Product Information and Maintenance

Important Safety Information

Proper maintenance is essential for performance and safety; consult dealer for public road use.

Consumer Safety Information

Guidelines on fork components, alterations, damage, and pre-ride inspection.

Warranty Terms

Details on RST warranty period, coverage, exclusions, and claim process.

Installation and Maintenance

Fork Installation Steps

Detailed steps for installing the suspension fork onto a bicycle frame.

Protection and Maintenance

Regular checks for quick releases, stanchions, headset, and brake systems.

Functional Maintenance

Procedures for disassembling, cleaning, and lubricating fork parts.

RST Suspension Fork Service Intervals

Recommended service intervals for RST forks under normal and severe conditions.

Fork Features and Adjustments

Tiny Remote Lockout (TRL) Assembly

Instructions for installing and configuring the TRL remote lockout lever.

Air Spring System

Information on the RST air spring system and recommended air pressure settings.

Sag Value Measurement and Setting

Guide on how to measure and set the sag value for optimal suspension performance.

Air Pressure Adjustment

Steps for increasing air pressure in air forks for personalized setup.

Wheel Axle Installation

20mm Front Hub Axle Assembly

Detailed instructions for assembling and disassembling the 20mm thru-axle front hub.

QR Adapter for Quick Release

Instructions for correctly installing the adapter for a quick-release axle.

Maximum Recommended Rotor Size

Table indicating the maximum recommended disc brake rotor size for different fork models.

15mm Front Hub Axle Installation

15QR Axle Assembly

Step-by-step guide for assembling the 15mm Quick Release (QR) axle.

Special Note for DJ/Free Ride/DH Usage

Warranty limitations for forks subjected to extreme riding conditions or misuse.

General Warning - Stress and Fatigue

Bicycle components are subject to stress; cracks or color changes may indicate reduced lifespan.

Lithium Grease Warning

Warning against using lithium-based grease due to potential damage to fork internals.

RST Limited Warranty

Warranty Period and Coverage

Details on the two-year warranty period and what it covers for RST Products.

Warranty Exclusions List

Specific conditions and actions that are not covered by the RST product warranty.

Wear and Tear Parts Identification

List of normal wear and tear parts and their recommended replacement intervals.

Warranty Handling Process

Procedure for making a warranty claim, including returning products to dealers or service centers.
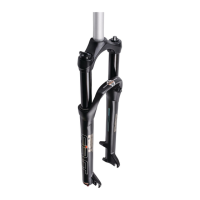
Related product manuals