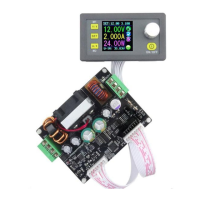
3
Operating Instructions
Whe
n connect the
power
supply, the
sc
reen sho
ws
welcome win
dow
fi
rstly
and then
comes
into main int
erface.
On the
ma
in
inte
r
face
, the o
ut
put
set
voltage
value
and the
output
set
current
val
ue
is on the top
of
the
screen.
S[T
1
.?
fJO
'J
100
12
oov
~
~
4.
894A
"
U
JN
J',
•_,
!,'-'
~
The big
font
value
on
the l
eft
are
the
act
ual
output
voltage, the actual ou
tput
Welcome window Main Interface
cur
r
ent
and the
ac
t
ual
output power.
Input
voltage
is
on
the bottom
of
the
sc
reen. T
here
are
some
run
n
ing
status
icons
on
the right of the screen,
key
l
ock
icon, ab
norma
l output
stat
us
icon,
constant
vo
l
tage
and const
an
t
cur
r
ent
icon,
da
ta set
ti
p
icon
and opening
or
closing
ou
t
put
icon.
Set
the
output
voltage
and
output
current
on
the main
interface
.
Press
I
V/
tJ key shortl
y,
you can en
ter
into voltage setting status. Then
press the coding potentiometer, and then enter to adjust the numerical value.
Pr
ess
coding poten
tiomete
r
to
enter
i
nto
the
status
of
adjusti
ng the
numerical val
ue
you want to ad
ju
st. Turn coding potentiometer
to
ad
ju
st
the
nu
me
rical value. Tu
rn
by
clockwi
se
rot
at
ion to increase the numerical valu
e;
Turn
by
counter
clockw
i
se
to
dec
r
ease
the n
umerica
l value. If you want
to
exit adjusting t
he
numerical value, press shortly
@II
. In the same time the
preset
val
ue
will
be
stored.
Or
you
can
do
nothing in one
minu
t
e,
the status
will
be
automatically
ex
isted and the
preset
will
be
stored too. You can
press
I A/I I to set the
output
current
by
the
same
way.
Set
the
data
on
the
data
setting
Interface
On
th
e main interface, you can press l
sET
l
shor
tly to enter into data se
tt
ing
int
erface
. On the data
sett
ing interface,
press
sh
ortly
[Y
it
l
or
I
A/
I I to
page
up
or
page
down to
U-SET
or
I-SET.
and
then
set
the
output
vol
tage
and
output
current
by
same
way
used in the
main
interface
.
Set
the
protection
value.
Page up
or
page
down
to
S-OVP, S-
OC
P
or
S-OPP place
to set over-voltage
value,
over-curr
ent
value and
over-powe
r
val
ue
correspo
ndingly;
when
the value
is
up
to
the
sett
ing
value, outp
ut
will be
closed;
and
there
is a pr
omp
t
on
r
igh
t
,,
'
~~·
xt:T
·~f
·
' '
~
- t
·
liPf
•
!
TI•
"
r
~t
' '
lll~
~
\ill
I!·
,,,
~
\I
tilt•
1''''
,,
....
'
e
~·
I
ill
of
scree
n . And then
press
shor
tly the coding poten
tiometer
Data
setting
to enter into the
status
of
adjusting the n
umerica
l val
ue
you
interface
want
to adjust. Turn
coding
pot
entio
met
er
to
adjust
the nu
mer
ical value.
If
you
wa
nt to
exit
adju
sti
ng the num
erical
value, press
shortly
l
sEr
l key.
Adjust
the
brightness
of
screen
.
Page up
or
page
down
to
B-LED, and th
en
pr
ess
shortly the
codi
ng
potentiometer
to en
ter
i
nto
the
status
of
adju
st
ing the
brightness
of
screen.
Turn
coding
pote
nt
iometer
to
ad
j
ust
the
n
umerica
l val
ue
you
need.
If
you
want
to exit
adjusting
the n
umerica
l val
ue
, press (
sE
Tj
shortly. There
are
six
br
i
ghtness
levels
of LCD
sc
reen,
0-5
1evel. Rank 0
is
the
da
r
kest
; rank
5 is the
brig
htest.
Yo
u
can
ch
oose
what
you like.
Data
setting
and
store
the specified
data
group
.
Page
up
or
page down
toM-PRE
, and then
press
shortly the coding
po
t
ent
iometer to
ente
r
into
the sta
tu
s
of
choosing the
data
groups.
Tur
n
 Loading...