bottled water
7 If you use bottled water, check that there are no added ingredients, flavourings, etc., and use
“still” water, not “sparkling”. The carbon dioxide which gives the “sparkle” will adversely affect
the flavour of your coffee.
taste
8 Don’t be tempted to reheat coffee in the coffee maker. You’ll damage the coffee maker and
the coffee will be undrinkable.
9 Clean the filter holder, filter, and carafe after each use. Residue from a previous brew will spoil
your coffee.
preparation
10 Sit the coffee maker on a stable, level, heat-resistant surface.
11 Route the cable so it doesn’t overhang, and can’t be tripped over or caught.
12 Don’t plug it in yet.
filling – water
13 Remove the carafe from the hotplate – do this before you open the coffee maker lid.
14 Press and release the front of the coffee maker lid, to unlock it, then lift it up, to expose the
reservoir.
15 Press the lever at the rear of the carafe lid, above the handle, to open it.
16 Use the carafe to fill the reservoir, to avoid overfilling.
17 Fill the reservoir with at least 2 cups of water, but not above max.
18 There’s a hole in the rear wall of the reservoir, to prevent overfilling.
filling – ground coffee
, If you’re using whole beans, jump to point 23.
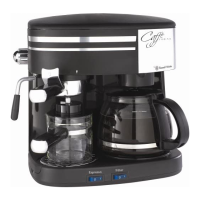
19 Lift the filter holder lid out of the coffee maker, and put filter-ground coffee into the filter.
20 The amount will vary with the type of coffee and individual taste, but we suggest two
rounded teaspoons per cup.
21 Replace the filter holder lid, and check that the end of the water pipe fits into the pipe on top
of the coffee maker
22 Jump to point 27.
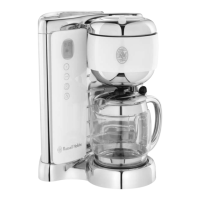
filling – coffee beans
23 Lift the lid off the coffee mill, and put fresh roasted coffee beans into the mill.
24 The amount will vary with the type of coffee and individual taste, but we suggest one level
tablespoon per cup.
25 Replace the lid on the coffee mill.
26 The mill will grind the beans when brewing is activated.
water bypass valve
27 This adjusts the amount of water bypassing the filter, to control over-extraction of unwanted
flavours from the coffee in the filter.
28 Turn it towards + to increase, or towards - to reduce the amount of water bypassing the filter.
close the lid
29 Close the lid of the coffee maker, and press down the front to lock it closed.
30 Close the carafe lid.
31 Sit the carafe on the hotplate, with the spout pointing into the coffee maker.
32 You’ll feel resistance as the carafe lid raises the non-drip valve on the bottom of the filter
holder,
33 Don’t put the carafe on the hotplate unless the coffee maker lid is closed – you may push the
non-drip valve (and the filter holder) up and out of place.

 Loading...