Do you have a question about the Ryobi D552HK and is the answer not in the manual?
Details the RYOBI® power tool limited two-year warranty and 30-day exchange policy.
Specifies that the warranty covers defects in workmanship or materials for two years.
Instructions on how to obtain service by returning the power tool to an Authorized Service Center.
Excludes coverage for misuse, abuse, neglect, alteration, or unauthorized repairs.
Details limitations on implied warranties and responsibility for incidental damages.
Guidelines for maintaining a clean, well-lit work area and keeping children away.
Precautions regarding plugs, grounding, cords, and wet conditions to prevent shock.
Advice on staying alert, using safety equipment, and avoiding accidental starting.
Instructions for proper tool usage, maintenance, and storage to prevent hazards.
Emphasizes using qualified personnel and identical replacement parts for safety.
Precautions for using auxiliary handles, cord safety, and checking for damage.
Guidance on using appropriate gauge and condition extension cords for outdoor use.
Instructions to inspect for nails and ensure power supply cord is not damaged before use.
Defines symbols for Volts, Amperes, Hertz, Watt, Minutes, AC, DC, and speed.
Explains symbols for wet conditions, reading manual, eye protection, and hazards.
Defines signal words like DANGER, WARNING, CAUTION to indicate risk levels.
Highlights the need to read the manual and wear appropriate eye protection.
Explains the safety concept of double insulation eliminating the need for grounding.
Details the required power supply (120V, 60Hz AC) and avoiding DC.
Guidance on selecting the correct wire gauge (A.W.G.) for extension cords.
Lists technical specifications including capacity, speed, and weight.
Details features like speed selection, modes, rotation control, and lock-on button.
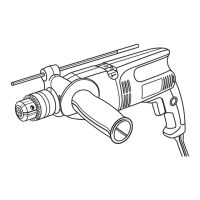
Explains the auxiliary handle, depth stop rod, and understanding drill performance.
Instructions for unpacking, checking parts, and critical warnings before assembly.
Lists the included items: Hammer Drill, Auxiliary Handle, Chuck Key, Depth Stop Rod, Case, Manual.
Critical warnings regarding damaged parts, modifications, and connecting to power.
General warnings about familiarity, safety glasses, and using recommended accessories.
Lists the intended uses of the hammer drill: masonry, wood, plastics, metals, and mixing paint.
Explains how to turn the drill ON and OFF using the switch trigger.
Explains the variable speed trigger and the forward/reverse rotation selector.
Details the two-speed gear train for selecting LO (1) or HI (2) speeds and their uses.
Advises allowing the chuck to stop before changing rotation or speed to prevent gear damage.
Step-by-step instructions for safely installing and removing drill bits using the chuck key.
Explains how to adjust the mode selector for hammer or drilling mode based on material.
Instructions on adjusting and using the auxiliary handle for better control and operation.
Explains how to engage and disengage the lock-on feature for continuous drilling.
Step-by-step guide for drilling, including safety checks, material securing, and bit pressure.
Alerts about bit binding, kickback, using center punch, lubrication, and jammed bits.
Guidance for drilling in wood, including speed, bit type, and preventing rough edges.
Guidance for drilling in metal, including speed, bit type, lubrication, and pressure.
Guidance for drilling in masonry, including mode selection, pressure, and speed.
Emphasizes using identical replacement parts and wearing safety gear during maintenance.
Advises using clean cloths and avoiding solvents for cleaning plastic parts.
Warns about contact with chemicals and accelerated wear from abrasive materials.
States that bearings are factory-lubricated for life and require no further lubrication.
Step-by-step instructions for removing the chuck using a hex key and mallet.
Details on removing the chuck screw, noting it has left-hand threads.
Instructions for tightening a loose chuck on the spindle and its screw.
Warns about hazardous chemicals in dust from sanding, grinding, and drilling.
Provides information on purchasing replacement parts online or via phone.
Explains how to find authorized service centers online or by phone.
Contact information for obtaining customer or technical support.
| Model | D552HK |
|---|---|
| Category | Drill |
| Type | Hammer Drill |
| Power Source | Corded |
| No Load Speed | 0-3000 RPM |
| Max Drilling Capacity (Steel) | 10mm |
| Max Drilling Capacity (Masonry) | 13mm |
| Chuck Size | 13mm |
| Weight | 1.7kg |