EasyManua.ls Logo

Ryobi P750 User Manual

Ryobi P750
28 pages
To Next Page IconTo Next Page
Page #1 background imageLoading...
Page #1 background image
OPERATOR’S MANUAL
MANUEL D’UTILISATION
MANUAL DEL OPERADOR
18 VOLT HYBRID TRANSFER PUMP
POMPE DE TRANSFERT HYBRIDE DE 18 V
BOMBA PARA TRANSFERIR DE HÍBRIDA DE 18 V
P750
WARNING: To reduce the
risk of injury, the user must read and
understand the operator’s manual
before using this product.
SAVE THIS MANUAL FOR
FUTURE REFERENCE
ADVERTENCIA: Para reducir
el riesgo de lesiones, el usuario debe leer
y comprender el manual del operador
antes de usar este producto.
AVERTISSEMENT :
Pour
réduire les risques de blessures,
l’utilisateur doit lire et veiller à bien
comprendre le manuel d’utilisation avant
d’employer ce produit.
GUARDE ESTE MANUAL
PARA FUTURAS CONSULTAS
INCLUDES: Pump, Pump Base, 6 ft. Hose,
Intake Filter, Oil Bottle, External Power
Supply, Additional Impeller and O-Ring,
Operator’s Manual
TABLE OF CONTENTS
****************
Important Safety Instructions ..........2-3
Transfer Pump Safety Warnings ......... 3
Electrical ............................................. 4
Symbols ..............................................5
Assembly ............................................ 6
Operation .........................................7-8
Maintenance ....................................... 8
Illustrations ..................................10-11
Parts Ordering / Service ..... Back Page
INCLUT : Pompe, base de la pompe, tuyau
de 1,8 m (6 pi), filtre d’arrivée, bouteille
de huile, alimentation électrique externe,
impulseur et joint torique supplémentaires,
manuel d’utilisation
TABLE DES MATIÈRES
****************
Instructions importantes
concernant la sécurité
....................2-3
Avertissements de sécurité relatifs
pompe de transfert
............................3
Caractéristiques électriques ...............4
Symboles ............................................5
Assemblage ........................................6
Utilisation .........................................7-8
Entretien .............................................9
Illustrations ..................................10-11
Commande de pièces /
réparation
..........................Page arrière
INCLUYE: Bomba, base de la bomba,
manguera de 1,8 m (6 pies), filtro de entrada,
botella de aceite, fuente de alimentación
exterior, impulsor y juntas tóricas adicional,
manual del operador
ÍNDICE DE CONTENIDO
****************
Instrucciones de seguridad
importantes
.....................................2-3
Advertencias de seguridad para
bomba para transferir
........................3
Aspectos eléctricos ............................ 4
Símbolos ............................................5
Armado ............................................... 6
Funcionamiento ...............................7-8
Mantenimiento ....................................9
Ilustraciones ................................10-11
Pedidos de piezas /
servicio
.......................... Pág. posterior
CONSERVER CE MANUEL
POUR FUTURE RÉFÉRENCE
Question and Answer IconNeed help?

Do you have a question about the Ryobi P750 and is the answer not in the manual?

Ryobi P750 Specifications

General IconGeneral
BrandRyobi
ModelP750
CategoryWater Pump
LanguageEnglish

Summary

Important Safety Instructions

Work Area Safety

Keep work area clean and well lit. Avoid explosive atmospheres and keep children away.

Electrical Safety

Use specified chargers, protect power cords, avoid wet conditions, unplug when not in use.

Personal Safety

Maintain proper footing and balance, do not use on ladders, prevent unintentional starting.

Transfer Pump Use and Care

Evaluate pump for water use only. Do not operate if switch fails. Disconnect power before adjustments.

Battery Tool Use and Care

Recharge with specified charger, use designated battery packs, keep away from metal objects.

Service

Product service must be performed by qualified personnel using identical replacement parts.

Transfer Pump Safety Warnings

Read manual, do not let pump run dry, inspect hoses and filter, do not use damaged battery packs.

Electrical

Electrical Connection

Connect to 120V AC, 60 Hz power supply. Do not use DC. Check power supply if product does not operate.

GFCI

Ground Fault Circuit Interrupter protection is recommended for the pump circuit.

Extension Cords

Use 3-wire, grounding cords with proper wire size. Inspect cords for damage before use.

Symbols

Signal Words

Explains risk levels associated with DANGER, WARNING, CAUTION, and NOTICE signal words.

Specific Symbols and Meanings

Explains common symbols like Safety Alert, Read Manual, Wet Conditions, Electric Shock, and Recycle.

Assembly

Unpacking

Carefully remove the tool and accessories from the box. Check all items against the Includes section.

Assemble Pump to the Base

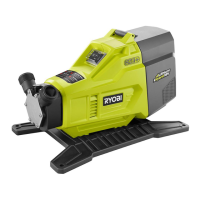
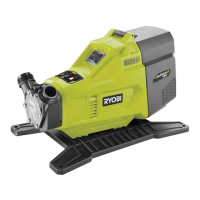
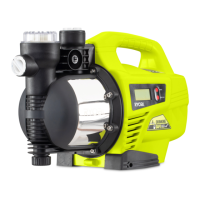
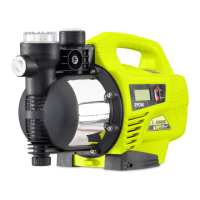
Align tabs on the pump with slots on the base and slide the pump body onto the base until it clicks.

Assemble Intake Filter and Hose

Attach hoses to pump and filter, add oil to inlet, and add water to prime the impeller.

Operation

General Operation Warnings

Do not allow familiarity to cause carelessness. Keep water discharge away from electrical devices.

Applications

Use the tool to drain water from flooded areas, clogged sinks, and water basins.

Installing/Removing Battery Pack

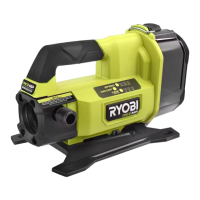
Set switch to OFF, open latch, insert pack securely, and close cover.

Installing/Removing Power Cord

Route cord away from traffic. Insert cord into product until it clicks and secure it.

Starting/Stopping the Transfer Pump

Add oil and water to prime. Connect power supply. Set switch to ON to start, OFF to stop.

LED Function of the Pump

Explains LED indicators for Power On, Pump Run Dry, Motor Over Temp, and Overload states.

Maintenance

Storing the Transfer Pump

Store indoors in a dry, locked-up place away from children and corrosive agents.

General Maintenance

Avoid solvents for cleaning plastic parts. Use clean cloths for dirt, dust, oil, and grease.

Replacing the Impeller and O-Ring

Remove power, remove cover screws, replace impeller and O-ring, reassemble cover.

Notes

Related product manuals