Do you have a question about the Ryobi R1801M and is the answer not in the manual?
Read and understand the operator's manual and pay close attention to all safety rules.
Symbol indicates important safety precautions where user attention is required.
Always wear safety goggles or safety glasses with side shields and a full face shield when needed.
Keep the work area clean, well-lit, and free from distractions to prevent accidents.
Understand double insulation, polarized plugs, and avoid body contact with grounded surfaces.
Stay alert, use common sense, do not operate when tired or under the influence, and dress properly.
Secure workpieces, do not force the tool, disconnect power before adjustments, and maintain tools.
Hold tool by insulated surfaces when near hidden wiring to prevent electric shock.
Know your tool, wear safety glasses, protect lungs and hearing, inspect cords, and check for damaged parts.
Be aware of hazardous chemicals in dust from construction activities and take precautions.
Study and learn the meaning of symbols used on the tool for better and safer operation.
Definitions for DANGER, WARNING, CAUTION, IMPORTANT, and NOTE symbols indicating hazard severity.
Explains double insulation as a safety concept eliminating the need for grounding.
Connect the router to a 120V, 60Hz AC power supply only. Do not use DC.
Use appropriately sized extension cords for power tools to avoid voltage drop and overheating.
Check extension cords for damage before use; replace immediately if damaged.
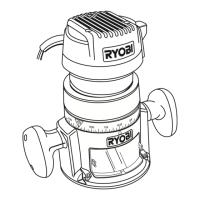
Detailed specifications including depth of cut, collet size, power, speed, and weight.
Covers motor, switch, spindle lock, depth adjustment, locking arm, and chip shield.
Discusses ergonomic design and electrical connection/double insulation features.
Carefully remove tool and accessories, check packing list, inspect for damage.
Do not operate the tool if any parts are missing to avoid serious personal injury.
Never connect the tool to power during assembly, adjustments, or when not in use to prevent accidental starting.
Exercise caution, understand applications, and wear proper safety gear during operation.
Instructions on how to turn the router on (I position) and off (O position).
Step-by-step guide for operating the router, starting with unplugging it.
Never place the router down until the cutter has completely stopped to avoid injury.
Never connect power during assembly, adjustments, or maintenance to prevent accidental starting.
Detailed steps for removing and installing the router base.
Ensure the tool is unplugged before removing or installing the router base.
Step-by-step instructions for removing and inserting router cutters.
Warnings about hot cutters, secure collet nuts, and appropriate cutter types.
Wait for the motor to stop completely before engaging the spindle lock to prevent damage.
Explains factors affecting depth of cut and the process for setting it.
For deep cuts, make multiple passes, not exceeding 1/8 inch per pass.
Steps for adjusting the depth of cut on fixed base routers.
Ensure the tool is unplugged before adjusting the depth of cut.
Explains the importance of setup and feed rate for professional routing and edge shaping.
Describes the correct direction of feed (left to right) for external routing due to cutter rotation.
Explains the correct direction of travel when routing grooves, considering guide placement.
Discusses factors influencing feed rate and its impact on cut quality.
Explains the consequences of feeding the router too fast, leading to rough finishes.
Explains the consequences of feeding the router too slowly, causing burning or rippled cuts.
Importance of depth of cut, its relation to feed rate, and avoiding excessive depth.
Highlights the versatility of the router for various applications like grooves, carving, and joints.
Instructions for routing grooves across boards, including setting depth and using guides.
If depth of cut is too great, make multiple passes instead of one to avoid injury.
How to route grooves wider than the cutter diameter using dual guides.
Guide to using the router freehand for routing signs, sculptures, and patterns.
Avoid large bits for freehand routing to prevent loss of control and hazardous conditions.
How to use piloted cutters for cutting rabbets and molded edges.
When workpiece is thin, use an extra board as a guide for the pilot.
Route end grain first, then sides, when shaping all edges of a panel.
Use clean cloths, avoid solvents, and wear safety gear during maintenance.
Keep cutters sharp and clean; clean the collet and shaft taper regularly.
Tool bearings are pre-lubricated; lists recommended accessories and warns against unlisted ones.
Contact nearest Ryobi Authorized Service Center for repair parts or service.
Record the tool's model and serial number for service and support purposes.
Provide model and serial number when ordering repair parts for accurate fulfillment.
| Speed | Variable |
|---|---|
| Collet Size | 1/4 inch |
| Plunge Capacity | 55mm |
| Depth Adjustment | Micro-adjustable |
| Base Type | Fixed |